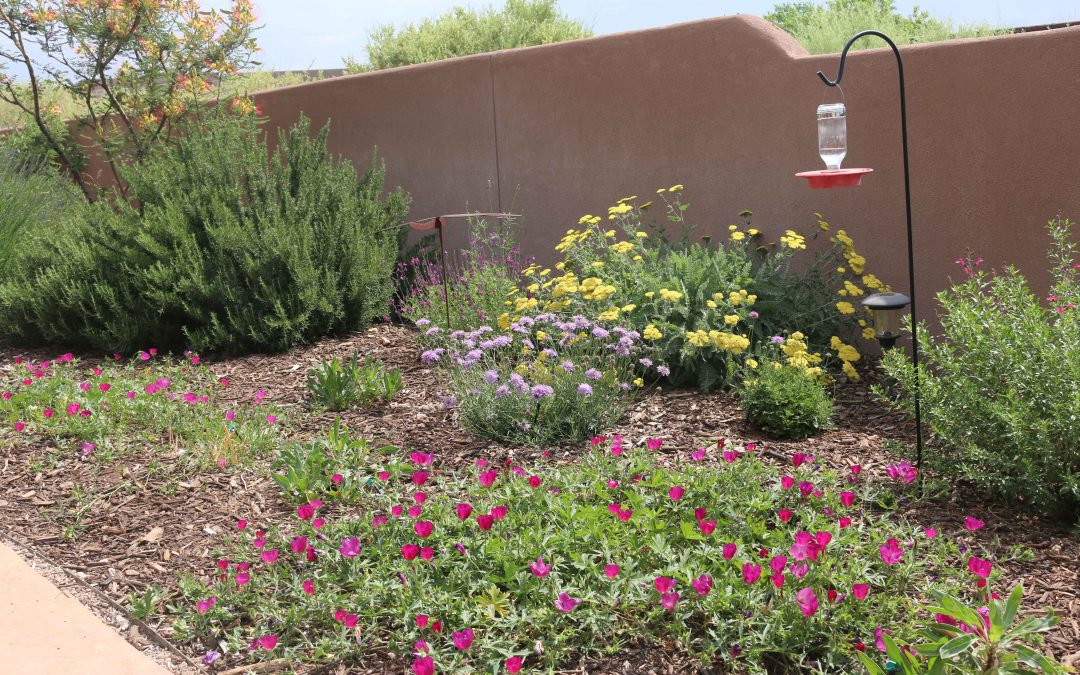
505Outside sat down with local landscape contractor Hunter Ten Broeck, owner of WaterWise Landscapes Incorporated, to chat about Water Harvesting in Albuquerque.
There are two categories of water harvesting techniques: passive water harvesting and active water harvesting. Passive water harvesting is the practice of slowing water down and encouraging it to soak into the ground. Water is collected from the source (roof, canale, downspout, or sloped earth) and directed to the landscape where the water can be immediately used by the plants. Active water harvesting uses rain barrels, cisterns, and other types of containers to store rainwater for later distribution. These typically hold as few as 200 gallons of water up to 10,000 gallons. A good calculation to remember is 1” of rain on a 1000 sq. ft. roof equals about 600 gallons of water.
Hunter
says the key to any type of water harvesting system, whether active or passive,
is to incorporate it into the landscape design. Thinking through how the rain
water will interact with your landscape and designing for that should be first
and foremost.
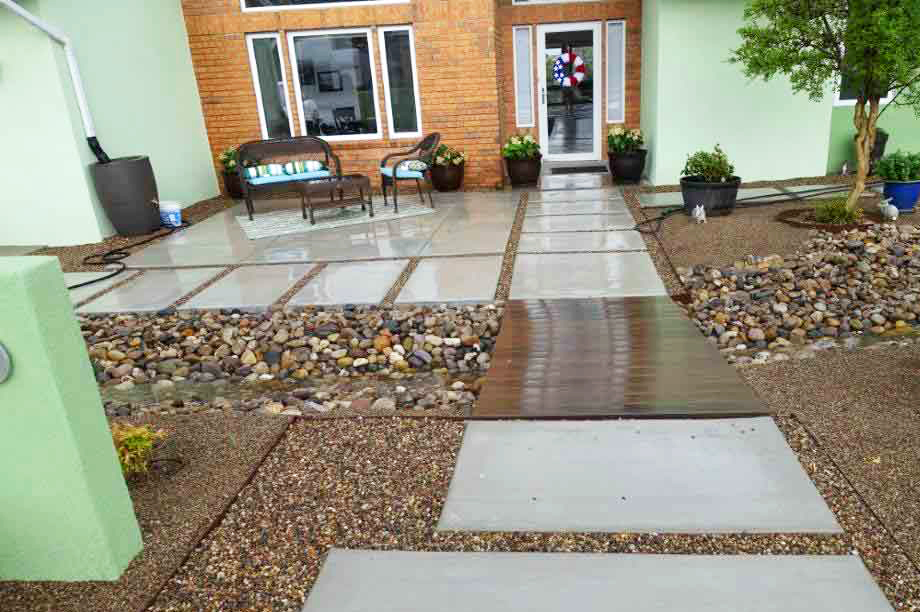
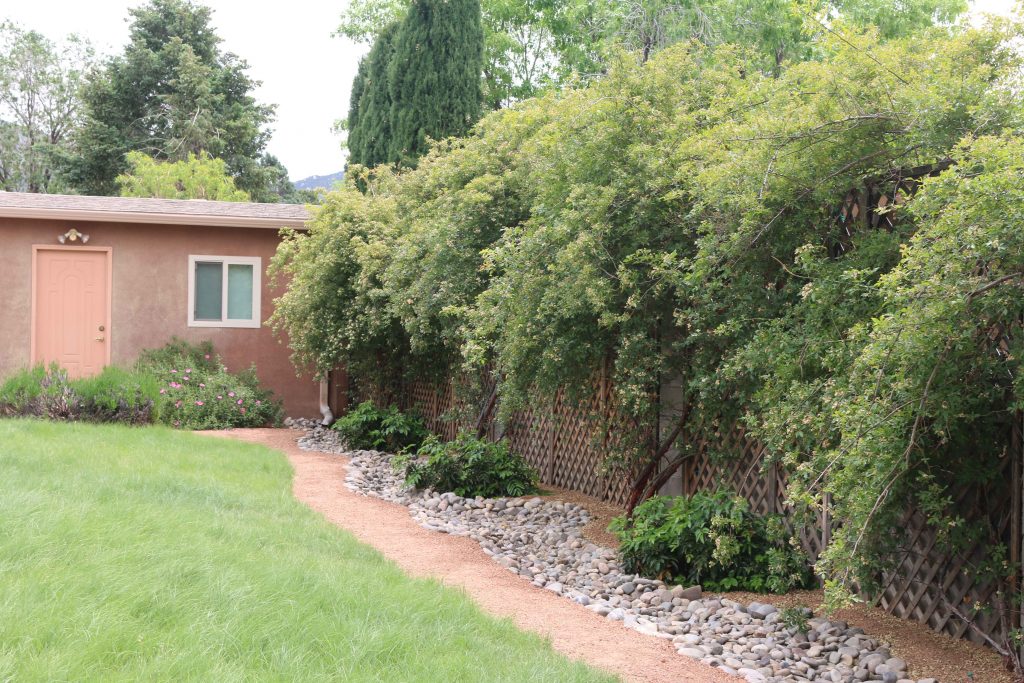
When asked what a homeowner could easily do to start water harvesting in their yard, Hunter recommended starting small and trying passive water harvesting. Passive systems can be as simple as a swale, a French drain (or rock burrito, as nicknamed by his staff), or more complicated systems that include building an underground soil sponge area. He says to start by finding the roof’s downspouts and canals, then provide a catch area underneath them. A catch area could be a concrete splash block or cobbles. Then direct that water away from the home via a cobble swale that runs into a planting area. This can be done easily by digging down a few inches and creating a slope away from the house into the planting area. Once the swale is dug, add cobble on top to stabilize the soil and prevent erosion.
Cobble swale located at downspout next to house.
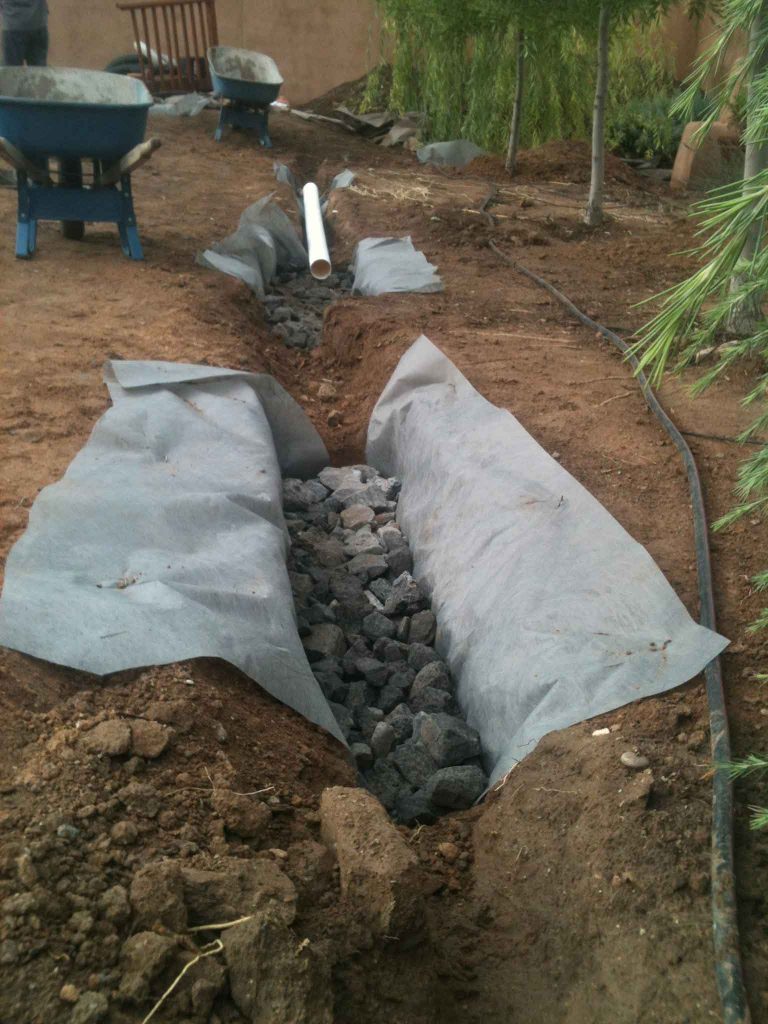
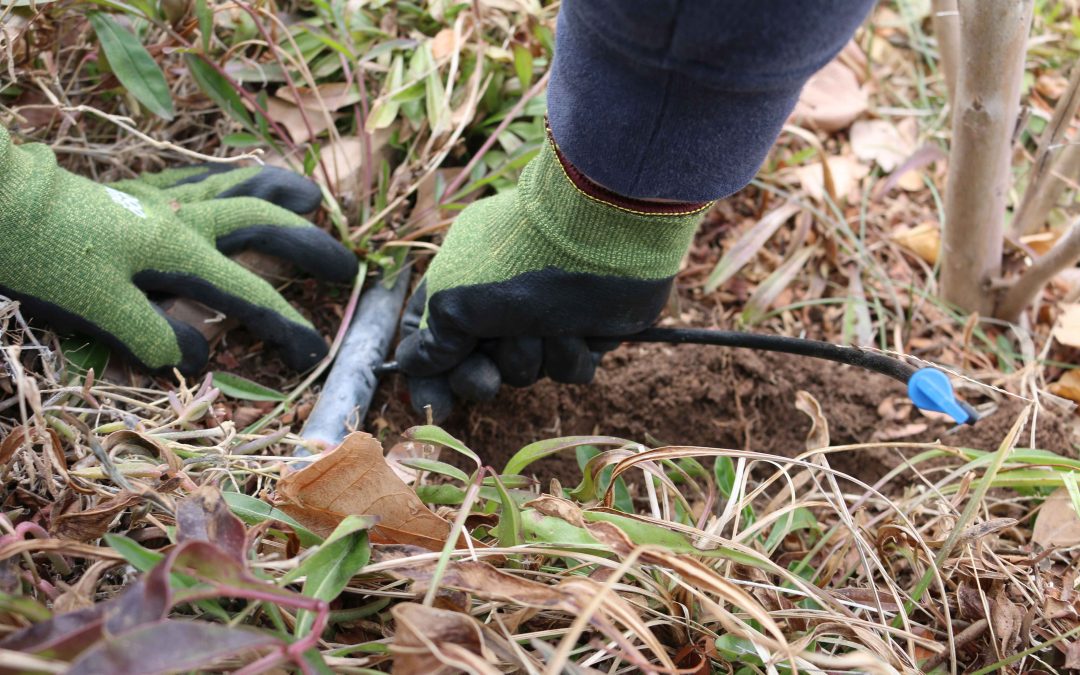
To make Hunter’s “rock burrito” simply dig an 8” wide trench at least 12” deep and as long as necessary for the space. Slope the bottom of the trench toward the drainage area. Layer the trench with filter fabric followed by cobble or rocks. Roll the fabric over the rocks then backfill with soil. This will provide an underground collection area for water. Water will slowly soak into the ground providing moisture to adjacent planting areas.
"Rock Burrito" French drain under construction in an Albuquerque landscape.
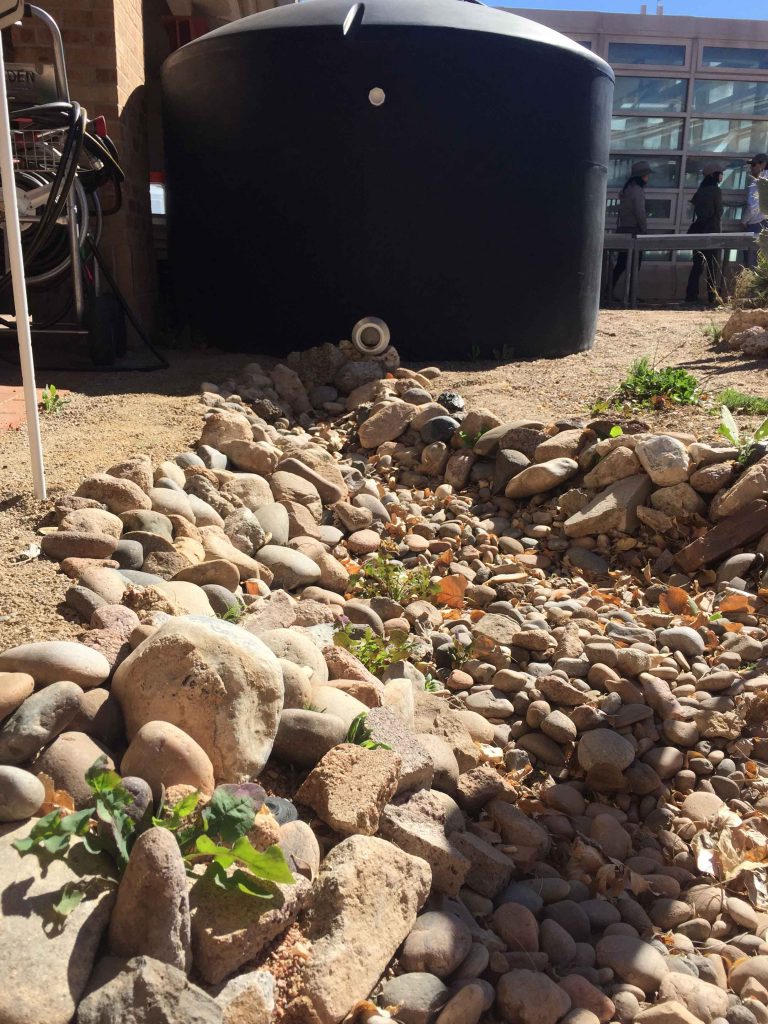
For homeowners who are ready to tackle an active water harvesting system like a rain barrel or cistern, Hunter recommends adding a passive water harvesting system next to the active one for when the container overflows.
Passive water harvesting swale next to active water harvesting cistern.
Using every drop of water through water harvesting is an important feature Hunter incorporates into all his landscape designs.
Local Expert: Hunter Ten Broeck, Landscape Contractor and owner of WaterWise Landscapes Incorporated in Albuquerque, NM. Author: Jill Brown, ASLA Landscape Architect and owner of My Landscape Coach in Albuquerque, NM.
Testing the soil moisture with a long screwdriver.
Use a soil probe or a long screwdriver to test soil moisture. Push the screwdriver into the soil 24 hours after you’ve watered your plants. It will go easily into moist soil. Mark and measure how far it went into the ground. That will tell you how deep you have watered that plant. Every yard is different, but once you figure out how long it takes your watering system to water to certain depths, you’ll be set.
Experienced gardeners in New Mexico know that the key to
success is in the soil. Soils in our climate are highly erosive and without
care will blow away with spring winds or wash out during summer monsoons.
Covering bare soil with mulch is an essential gardening practice with benefits like
reducing moisture loss through evaporation, suppressing weeds, and giving
landscapes a finished appearance. When you use organic mulches (as opposed to a
gravel type mulch), there are even more benefits. Like keeping the soil cool, improving
soil structure, and feeding the soil microbiology that supports plant health.
Despite the benefits, organic mulches continue to be passed
over for gravel in our area. This is due in part to our tendency to mimic the
practices we see around us. But those are not always best practices! This is
also a consequence of several myths that we’d like to dispel.
Before digging into these myths, let’s take a moment to
define the term “organic mulch.” A mulch is a layer of material placed on top
of the soil. An organic mulch is
one that is derived from living matter. The term “organic” in this context has
no relationship to the standards followed to generate the material. Examples of
locally available organic mulches are wood mulch, bark mulch, pecan shell
mulch, and straw. Because organic mulches were once alive, they contain
essential nutrients, minerals, and energy that nourish the soil ecosystem as
they decompose. An important consideration when using organic mulches is to
skip the landscape fabric, which prevents the rich organic matter created by
decomposition from working its way back into the soil.
Myth #1: Organic
mulches rob your soil of nitrogen
This is a common misconception that is easily dispelled.
Organics decompose via microorganisms that use nitrogen as they undergo
explosive reproduction in response to a new food source. This is why we say
that nitrogen gets “tied up” in the soil when unaged composts are integrated.
But therein lies the key. Mulches are not integrated into the soil - they lie
on top of it! By definition, decomposition only occurs on the surface area of
the material being decomposed. Therefore, plant roots do not compete for
nutrients with the microorganisms that are slowly breaking down the organic
mulch to feed the soil below.
Myth #2: You’re going
to attract all kinds of insects and vermin
The cool, moist environment created by organic mulches is
ideal for promoting plant health. Gravel mulches increase the reflective heat
in a landscape and compact the soil, contributing to plant stress. Heat also creates
higher water demand. The cool, moist layer that is so good for plant health
also provides a hospitable environment for insects. But mulch itself is not a
beacon for the insects in the neighborhood to colonize your yard. It simply
provides a more favorable habitat for
what is already there. But this environment also benefits insects and
vertebrates that predate on the undesirable ones. This creates a healthier
ecosystem that supports your plantings. If you have concerns about termites,
rest assured that a mulch layer does not provide the necessary habitat for a
termite colony. A one-foot bare space between organic mulches and your house
will discourage insects from finding their way into your home.
Myth #3: It will all
wash or blow away
If you use the wrong kind of organic mulch in the wrong
place it can migrate. But with a little understanding of different mulch types, this can be avoided. Most wood mulches
available on the market are chipped flat and consistent in shape in size. These
are great in areas that will receive some foot traffic as they compact down to
a firm surface. However, in areas of higher wind exposure or periodic
inundation with water, use a mulch that is more irregularly shaped and sized as
the pieces will hold together better. Mulches made from recycled yard waste and
tree trimmings typically fit this description. Mulches made from bark tend to
be lighter and can have a tendency to migrate more readily. Above all, pay
attention to grades when using organic mulch. Design landscapes so that the finished
grade of mulched areas is below hard surfaces like sidewalks and patios. If you
use organic mulch on a slope make a small berm on top of the slope and dig in
contour swales to prevent the mulch from washing down.
Myth #4: Organic
mulches are more difficult to maintain
Anyone who has wheelbarrowed out a graveled landscape,
sifted it to remove dirt and weeds, and shoveled it back in can tell you that
gravel is not inherently easier to maintain. Gravel landscapes with filter
fabric are designed to be maintained with a regime of consistent weed
management and treatment. If spraying chemicals in your landscape is not your thing, then invest in the right
tools to make weed
management simple. A 3-4” layer of organic mulch is effective in preventing
sunlight from reaching annual weed seeds, thereby preventing weed germination.
The beauty of organic mulches is that they can visually
accommodate a little bit of leaf litter, reducing the need for constant raking
and blowing. A thin top coat of mulch added every other year will keep your
landscape looking fresh and replace the material that has broken down to
sustain the soil. Organic mulches are light weight, too, making them easy to
wheelbarrow and rake around.
Organic mulches are available in bags from most local garden centers, and are available in bulk from several retailers in the Albuquerque area. When you buy from local bulk retailers, you are supporting the recycling of local organic materials that may otherwise end up wasting away in a landfill and contributing to greenhouse gas emissions. Buying bulk also means less plastic! Organic mulches are a renewable resource that will improve your landscape health and help you conserve water.
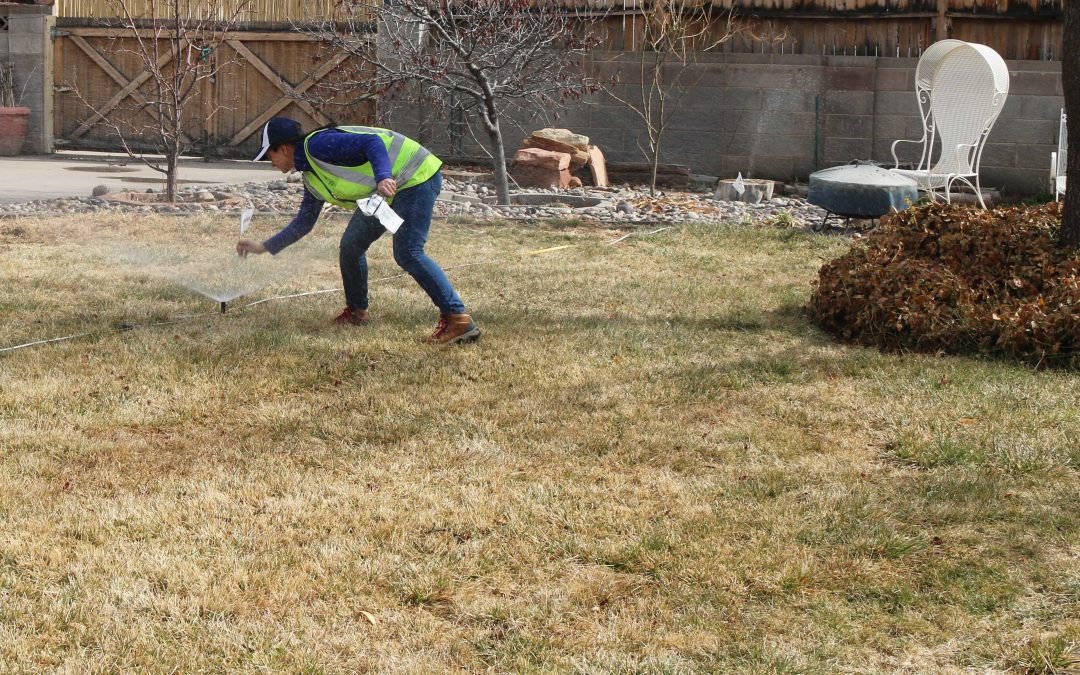
What should every home owner know about simple irrigation maintenance?
The most important thing is to visually inspect your system periodically. Usually, irrigation runs during the middle of the night and we’re unaware of how well (or how poorly) it’s working. Turn on each zone and observe its operation. Look for leaks in your valve boxes – if there’s water in the box, you probably have a leak.
With sprinklers:
Look for broken or tilted heads and nozzles that should be adjusted to address overspray. If water continues to drain from one of your sprinklers after the zone has shut down, you may have a low head drainage problem. To fix this, install a simple check valve, which typically screws into the lower part of the sprinkler head. Ask your local irrigation supplier for a check valve recommended for your situation.
With drip irrigation:
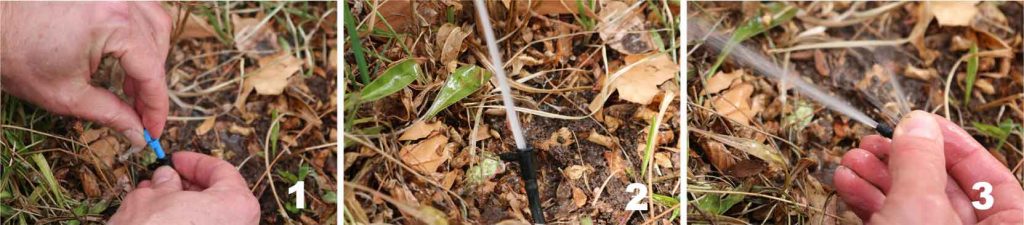
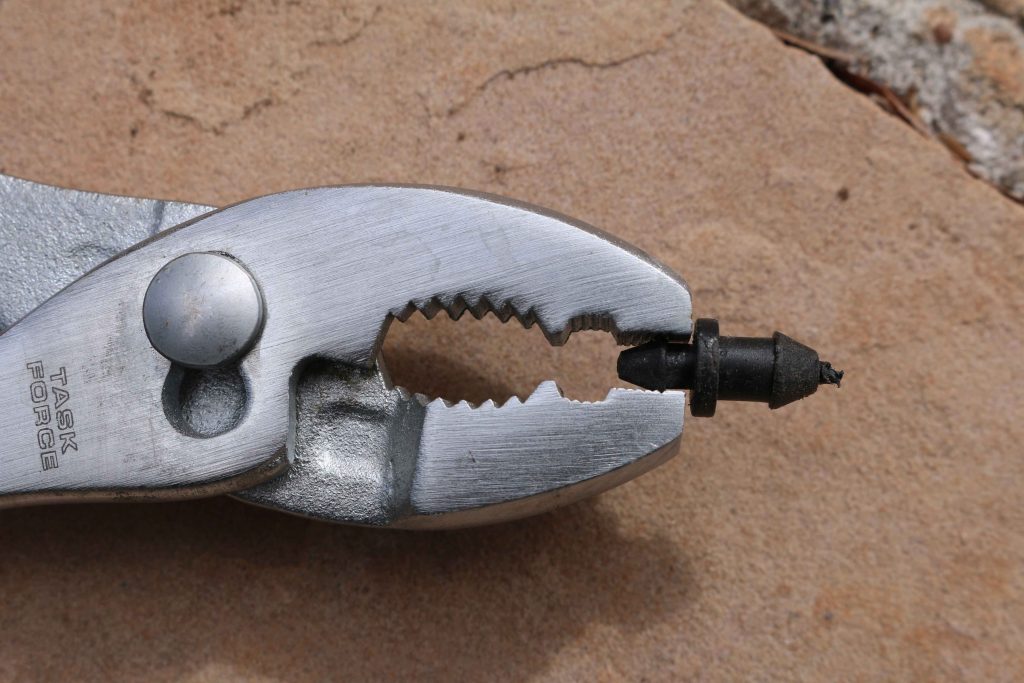
How to unclog your button or flag emitters.
Button emitters are not easy to unclog. Often, it’s easiest to simply remove a clogged button emitter and replace it.
Flag emitters can be unclogged as follows:
While water is flowing through the emitter, twist the colored flag piece located on top of the emitter so that it can be removed.
Allow water to flow out the top of the emitter for 10-15 seconds with the flag piece removed.
Block flow from the top of the emitter to send water through the side orifice for 10-15 seconds.
Twist the flag piece back into place to resume typical irrigation (not pictured).
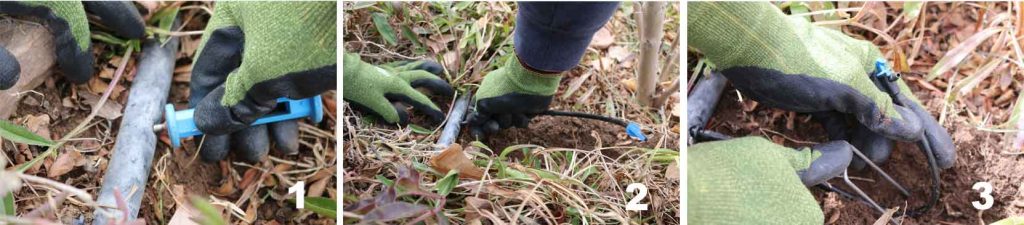
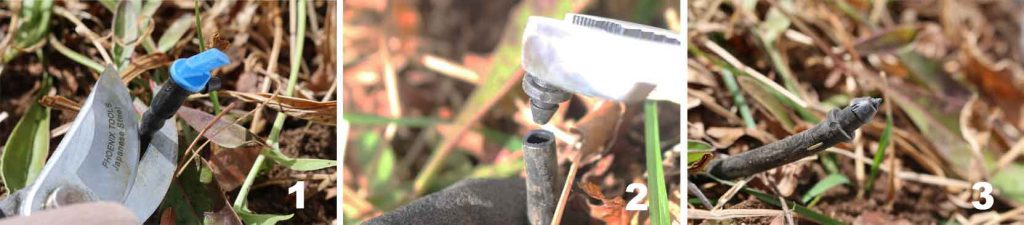
How to add an emitter?
Using a punch tool, make a hole where you will connect the spaghetti tubing
Attach the spaghetti tubing to the lateral line using a barbed connector
Run the spaghetti tubing through a small trench to where you want the emitter to apply water – at the dripline of the plant is usually best
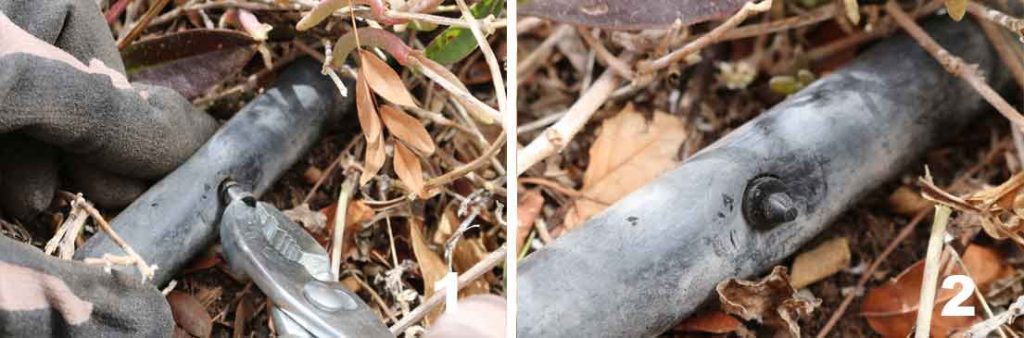
How to repair a poly tube if it's been punctured?
Locate the damaged section of poly
Cut out the damaged section
Use a fitting – there are many types that will work – to join the ends
What is a goof plug and how to install it?
It’s a simple, 2-sided plastic piece used to plug a small opening in drip irrigation lines
Goof plugs can be used to stop water flow through spaghetti tubing, as follows:
Locate tubing to plug (cut off emitter if necessary)
Twist small end of goof plug into spaghetti tubing opening
Enjoy your water conservation!
Goof plugs can be used to stop water flow through distribution line, as follows:
Locate tubing to plug
Twist large end of goof plug into distribution line
Using these few simple tricks, you can easily manipulate water flow in your landscape for maximum system efficiency.
Author: Laura Ferenchak, Irrigation Efficiency Specialist with Albuquerque Bernalillo County Water Utility Authority
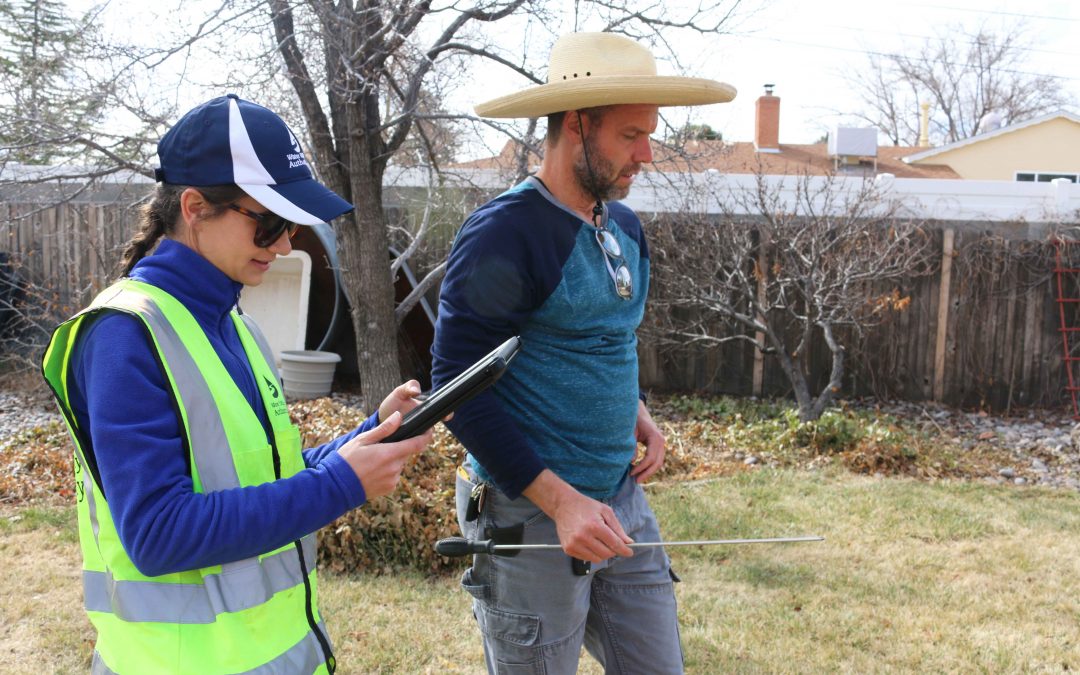
As irrigation season ramps up, we sat down with the Water Authority’s irrigation specialist to ask a few questions about the utility’s new FREE Efficient Irrigation Consultations.
Why is the Water Authority offering this service?
In ABQ, 40% of our drinking water is
used on landscapes.
Improperly maintained irrigation
systems often apply twice the water the
plants need in order to compensate for system inefficiencies.
Often, relatively simple maintenance
or scheduling changes have a big impact on how much water our irrigation
systems use to water plants.
It’s often difficult for someone not
trained in this field to detect irrigation problems, since the systems usually
run at night and most components are hidden.
Empowering you to better understand your landscape and
irrigation systems will help all of us steward our valuable water resources.
How does a typical
consultation go?
A trained specialist will:
Arrive at your home at the scheduled
time to review your landscape goals and plant material.
Check your irrigation system’s
performance and controller settings.
Create customized recommendations for
irrigation settings to help you save money and water.
Review rebates that are available
through the Water Authority that could benefit you and your landscape.
Turn on your irrigation system after the last chance of freezing temperatures has passed (typically late March in the greater Albuquerque area, but possibly as late as mid-April). This will prevent damage to your irrigation system.
1. Turn on your irrigation system. Then observe and listen.
If you turned off the main valve for your irrigation system over the winter to prevent freezing, turn it back on slowly, only part way. Then wait a few minutes until the system is fully pressurized. If it is not leaking, turn it fully on.
Caution: turning it too fast can create a water-hammer which could break pipes.
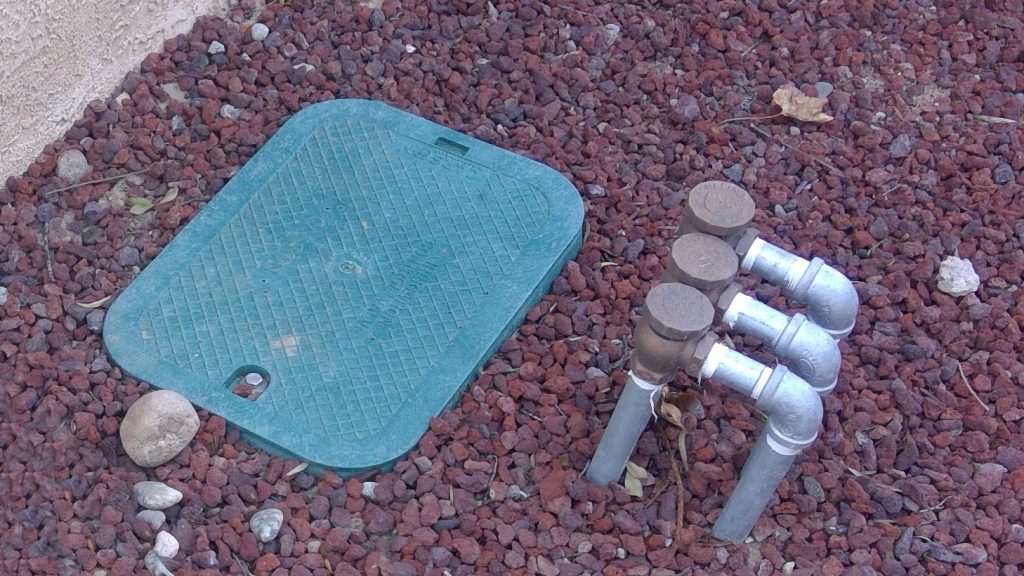
Irrigation valve box with backflow preventers.
Check the backflow preventer for leaks by inspecting it and checking for wetness.
Open the valve box (it usually has a green cover) and make sure there is no water in the box itself. Look for leaks in the valves, connections, filters and pressure reducers.
Run each zone for several minutes (long enough to see every part of it up close). Walk along each irrigation system pipe and inspect all sprinkler, bubbler and/or drip zones.
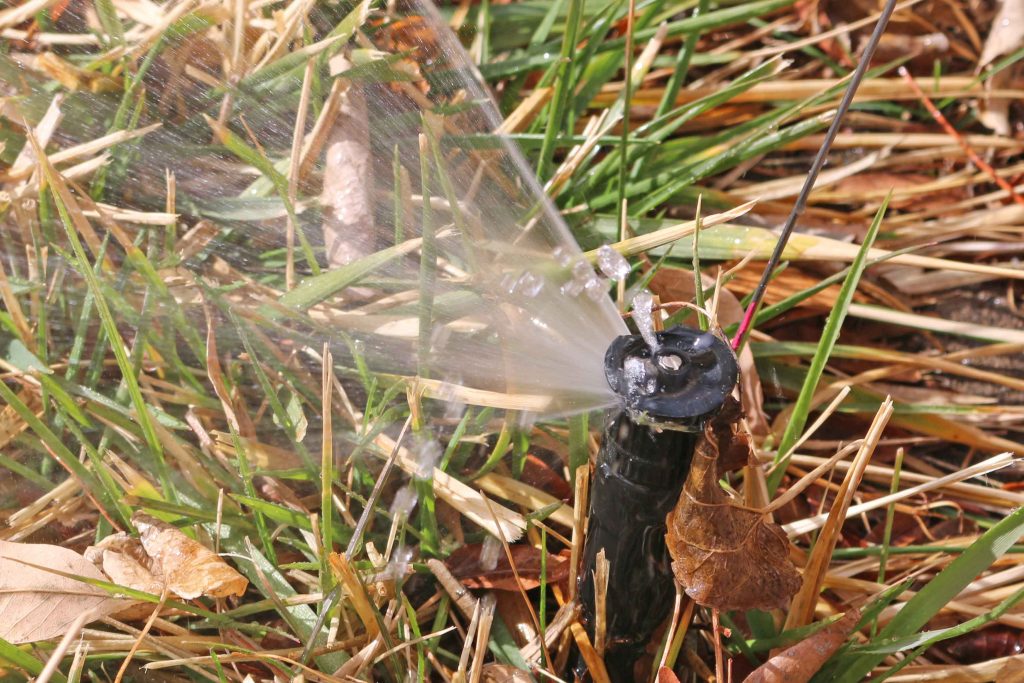
For sprinklers:
Look for signs of a leak, such as at the risers to the heads, the heads themselves, the emitter lines, or the pipes.
Look for heads not spraying correctly, such as spraying in the wrong direction, spraying too low, or other signs of breakage or misalignment. It is very common for them to go out of alignment when the system was turned off for the winter.
Spray head with minor leak
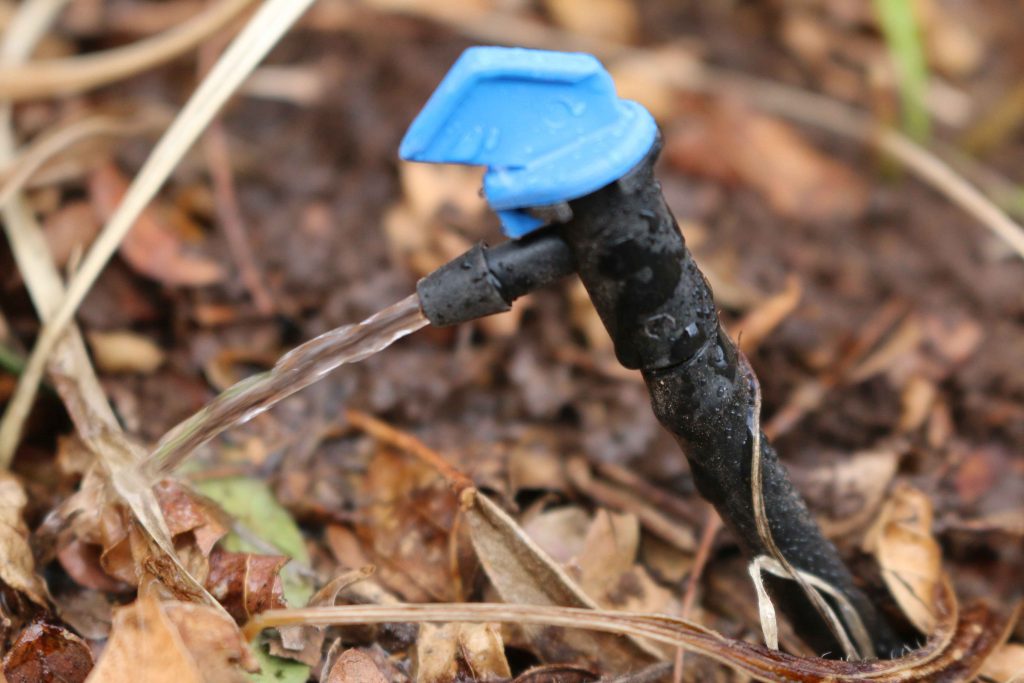
For drip and bubbler systems:
Look for missing emitters and/or bubblers. Emitters or bubblers may be hard to see due to plant coverage so listen carefully. Hearing a whooshing sound means an emitter or emitter line has blown off.
Drip emitter
2. Re-check the valve boxes again for water leaks now that the system has been on for testing.
3. Perform any necessary repairs and re-check for leaks after repairs are complete.
4. Set the timer.
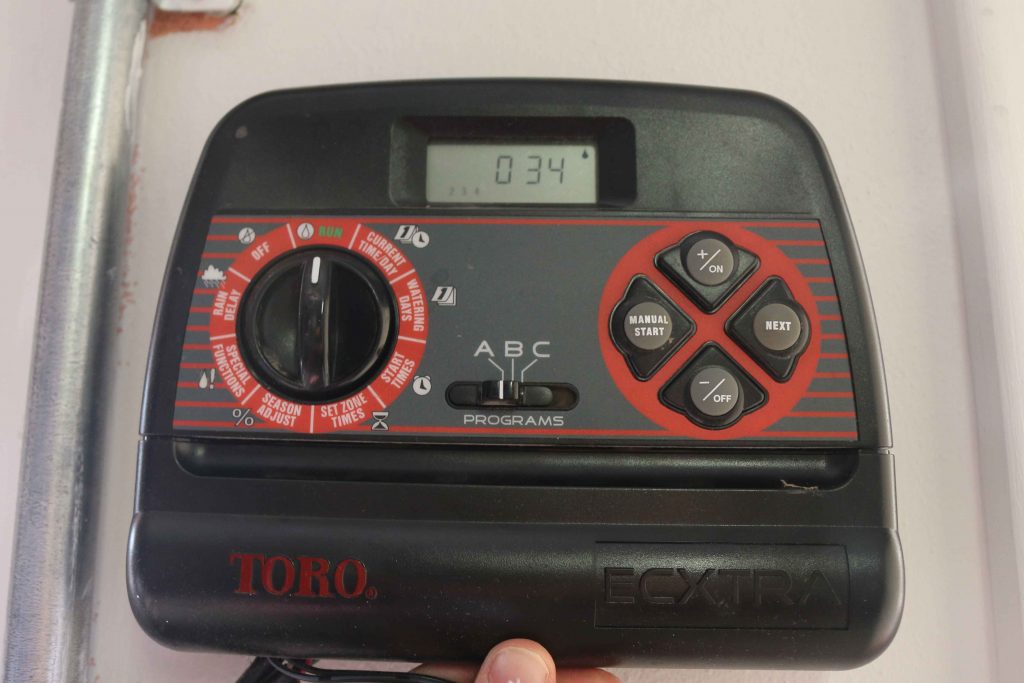
Typical Irrigation Timer
The key to irrigation is to supply enough water to replace evaporative
losses from the ground root areas and from the leaves or stems. Too much or too
little water can harm your plants. It
is important that you set the timer correctly.
Follow the water recommendations guide to help you set your timer. Mixed zones like lawns and desert friendly landscapes are hard to water together. They usually need different run times. Large trees do not do as well being watered as if they were a lawn. Lawns have shallow roots (1” to 6” is typical) so usually need less water per application than trees with their deep roots (up to 24”). They require longer, deeper watering. Sign up for a FREE Efficient Irrigation Consultation at 505-289-3003 for help with your timer settings.
Do not confuse start times with zone numbers. Remember that every start time (4 am, 11 am, 5 pm….) on a program (A, B, C…) will run all your zones in series for the program you are running.
Attach a written copy of your schedule showing programs, zone number and corresponding location to the inside of your controller box.
Sprinkler heads or emitters vary greatly as to how much water comes out per minute. A slow watering head may need 2 to 4 times the watering time of traditional faster water delivery heads. For example, emitters can be as low as ½ gallon per hour but could be as high as 14 gallons per hour. The same watering time will not work for all zones or all emitter types.
Bubblers typically deliver 1 or 2 gallons per minute, compared to emitters that can be 1 or 2 gallons per hour. Many people over water when using bubblers for small plants. If you see pooling, run-off or recognize the flow is too fast, then replace the bubbler with a smaller one.
After watering, test to see if you provided enough, too little, or about right amount of water to the plants. Use a soil probe or a long screwdriver to test soil moisture. Push the screwdriver into the soil about an hour after you’ve watered your plants. It will go easily into moist soil. Mark and measure how far it went into the ground. That will tell you how deep you have watered that plant. Every yard is different, but once you figure out how long it takes your watering system to water to certain depths, you’ll be set.
If your controller is getting old, you would be wise to install an up to date one. There are lots of options. Some are “smart” controllers and can do many irrigation tasks well and can be operated from your phone or home computer, allowing you anywhere, anytime control. Check out the Irrigation Efficiency Rebates here to help you with the cost.
5. Observe your irrigation system the first month of the season.
We suggest the run times for the first few weeks should be during times of day where you can observe the operation of the system. When you are sure everything is running well, then you can have the system run at times you would not normally be observing. However, we suggest manually running the system zones for a few minutes every two months just to stay on top of any problems that may occur.
Many homeowners want to put a lot of water on at the beginning of the year to make sure the dry roots from the winter get thoroughly soaked. This makes some sense for the first watering of the year. Once the roots are soaked, you can go to shorter run times and number of runs per week to adequately irrigate your plants.
If you are uncertain about the any of the start-up tips, or need help, contact us for FREE Irrigation Efficiency Consultations at 505-289-3003. Or consider hiring a landscape contractor to help you get your system up and running correctly.
Author: Richard Chapman of Smart Use in Albuquerque, NM.