Keeping Cool This Summer While Saving Water
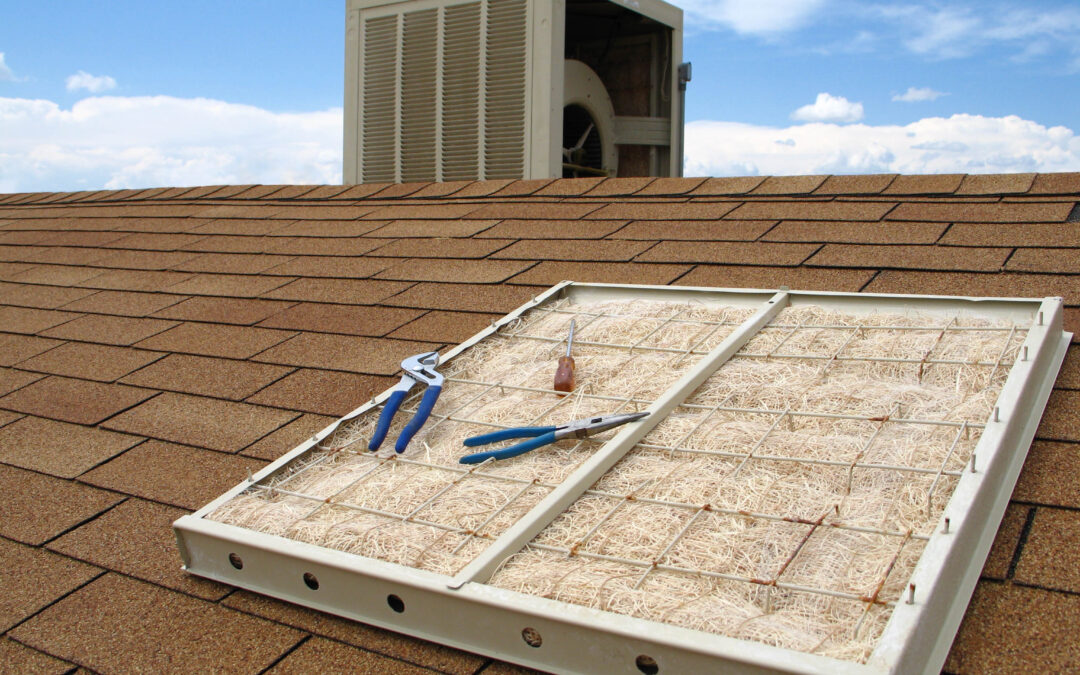
Over 40% of Albuquerque homeowners use evaporative coolers, while the rest use some type of refrigerated air system. Today’s evaporative coolers (also known as swamp coolers) provide a practical, energy-efficient way to cool air in the low humidity climates found throughout New Mexico. Evaporative cooling isn’t a new concept. In fact, it’s the oldest known method of cooling hot, summer air to make living spaces more comfortable. Ancient Egyptians hung wet material so the wind could blow through it to create a cooling effect. In an evaporative cooler, warm air is cooled as it passes through porous pads that are kept moist by water dripping on their upper edges. A blower wheel pulls outside air through the wet pad, and the cool, humidified air is then circulated through the house. In the process of cooling the air, evaporative coolers provide an additional benefit of removing dust and pollen that can cause allergies and asthma attacks.
Evaporative coolers are very effective, particularly when the relative humidity (the moisture content of the air) is low. An evaporative cooler works best during the hottest time of the day, because relative humidity drops quickly as temperature increases. Studies show that a typical evaporative cooler uses only about one-third the energy of a refrigerated air conditioner,
The big question is how much water do swamp coolers use? Water requirements for an evaporative cooler will vary with the size of the house, its orientation toward the sun, window area, type of landscaping, proximity to hard surfaces and other structures, temperature preferences of the occupants, local climate, how many hours the cooler runs, and water quality.
In an average weather year, a 1,500-square-foot home in Albuquerque might use 7,250 gallons (based on the evaporative cooler running 1,130 hours). In an unusually warm year, these water requirements would be significantly higher. Virtually all models of evaporative coolers now available recirculate the water that drips from the pads, resulting in an efficient use of water. (Older, less water-efficient evaporative coolers might not have a pan to catch and recirculate water. If so, excess water shall be directed to plant material. Or replace the old cooler with a recirculating one.)
Some coolers have a “bleed-off valve” to drain a portion of the recirculating water to prevent excessive mineral buildup on the porous pads. Bleed-off water can increase overall evaporative cooler water use by 50% or more, which could increase total evaporative cooler water use to 11,000 gallons in Albuquerque. A more water efficient alternative to continual bleed-off is a “dump pump,” which empties the cooler pan at regular intervals to reduce mineral buildup.
Waterwise Tips for Evaporative Coolers
- Instead of turning on your cooler when it’s 79 degrees outside, wait until it is 85 degrees. Your cooler will use 50% less water.
- Turn on the water pump a few minutes before turning on the fan to give the cooler pads a chance to become saturated.
- Open a window 1-2 inches in the rooms you want to cool. This will draw cool air into the rooms and give warm air a chance to escape.
- In the evenings or when it’s not quite so hot outside, run your cooler fan without running the water pump. You’ll get nice, cooling airflow without using any water at all!
- Also run just the fan on rainy and high humidity days when your evaporative cooler is significantly less efficient.
- To keep your cooler from wasting water, check it for leaks monthly during the summer season. Take a look at its filters, pads, pump and reservoir. Replace your cooler pads at least once every summer, preferably twice — or aim to clean them with soap and water.
- Install a digital thermostat. Digital thermostats allow you to use much less water than you would otherwise because once your home gets to your desired temperature, it will automatically shut off.
Additional tips to keep your home cool, harvest water and reduce energy use
- Direct any water from a refrigerated air conditioner or mini split condenser toward plants.
- Servicing your refrigerated air conditioner by performing general maintenance such as replacing or cleaning air filters can lower energy consumption by up to 15%. Add a calendar reminder for the first day of spring to check your air conditioner’s evaporator coil. This should be cleaned annually to ensure the system is performing optimally.
- Cooling your home with ceiling fans will allow you to comfortably raise your thermostat about 4 degrees. In the summer, fans should turn counterclockwise so air pushes downward, circulating the cooler air in the room and making the home feel cooler. Make sure to turn off ceiling fans when house is empty.
- Window treatments or coverings such as blinds, shades and films can help reduce the heat when temperatures rise. Close blinds and curtains on the East, West and South sides when nobody is home to keep the sun from heating up the house.
- Air loss through ducts can lead to high energy costs, accounting for nearly 30% of a cooling system’s energy consumption. By sealing and insulating your ducts, you can lower your energy bills.
- Avoid using heat-producing appliances like clothes dryers, dishwashers, stoves and ovens during the hottest part of the day. Use your grill for cooking and hang dry your clothes.
Learn more by checking out these other useful articles:
PNM Evaporative Cooling Rebates
City of Albuquerque Energy Efficiency Programs

Information courtesy of the Water Use and Conservation Bureau, New Mexico Office of the State Engineer. Additional tips courtesy of PNM. Have a question about the article or anything else? AskAnExpert@abcwua.org