

Mountain Design Template for Fall
All good things start with a solid plan. Developing a landscape plan saves you not only time and money but also makes it more likely you’ll end up with a beautiful yard. A few generous local landscape architects donated their time and put together some design templates for a typical front yard for our 505Outside subscribers. This month, we’re sharing a mountain-inspired landscape.
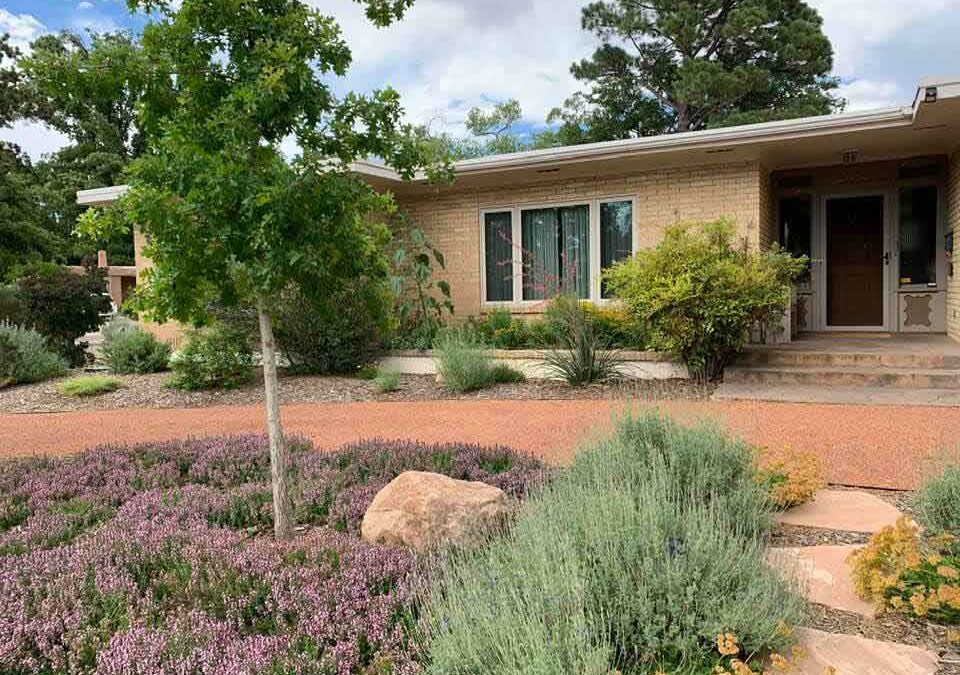
The example landscape template below is for a north or east facing yard and creates the effect of a Rocky Mountain forest while using heat and drought tolerant plants that grow well in town. Take a look and get inspired to recreate this in your own yard.
Shade Tree
Japanese Pagoda, Styphnolobium syn Sophora japonicum
Evergreen Tree
Blue Atlas Cedar, Cedrus atlantica
Rocky Mountain Juniper (female), Juniperus scopulorum
Deodar Cedar, Cedrus deodara
Small/Flowering Tree
Russian Hawthorn, Crateagus ambigua
Large Plant
Western Sand Cherry, Prunus besseyi
Littleleaf Mountain Mahogany, Cercocarpus ledifolius
Medium Plant
Three leaf sumac, Rhus trilobata
Leadplant, Amorpha canescens
Snowberry, Symphoricarpos albus
Small Plant
Groundcovers (less than 2' tall, spreading more than 3'wide)
Panchito manzanita, Arctostaphylos x coloradensis 'Panchito'
Snow-in-summer, Cerastium tomentosum
Golden columbine, Aquilegia chrysantha
June grass, Koeleria macrantha
Vine
Virginia creeper, Parthenocissus quinquefolia
Clematis, Clematis ligusticifolia
Learn more here:
Lucious Landscape Design Template
High Desert Landscape Design Template
Desert Friendly Design Templates

I’ve Xeriscaped My Yard, Now What?
Your new xeric plants are in, and everything is looking good. What do you need to do to keep it that way? Start by looking at your irrigation controller. It may be programmed to apply water too frequently and/or for too long in order to get the plants started. If you hired a contractor, they may have set the controller to water every day because it’s easier than getting a call about a plant that doesn’t look great.
Many desert-friendly plants and trees evolved to survive on very little precipitation but also to make the most of abundant rainfall when it does happen. They’ll store the water in their roots or grow larger (and produce more seed for dry years) than they would with only adequate water. A xeriscaped yard doesn’t automatically “save” water — it is up to the homeowner to do the actual water saving by adjusting their irrigation controller. My dog would be “happier” if I fed her as much as she wanted, but it’s wasteful (among other things) to do so. Watering your desert-friendly plants too much may cause them to outgrow the space they were designed for, which might mean pruning them more than they need so they don’t grow against the house or over a path or outcompete other plants. Overwatering also creates lush, tender growth that is more attractive to pests and susceptible to frost damage.
A recent study in Arizona found that xeriscaped yards didn’t have reduced water usage because the homeowners applied the same amount of water as they would for a traditional yard with a lawn and non-natives.
Here are steps you can take to make sure you’re watering correctly for your new landscape and keeping your plants healthy:
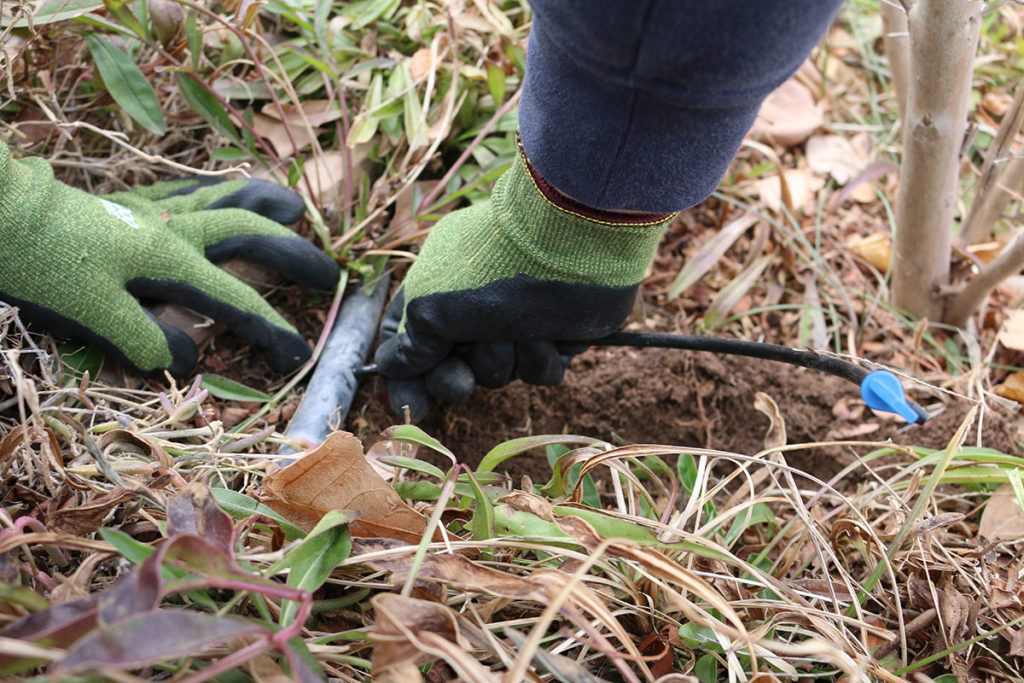
- Reduce the number of emitters if needed: The best way to do this is by cutting off the drip emitter and installing a “goof” plug in the end of the ¼ inch tubing. This is preferable to trying to pull the ¼” coupler out from the larger line, which creates a larger hole that can’t be easily plugged.
- Check your irrigation controller: You’ll want to keep the soil moist around the newly installed perennials, shrubs and trees for the first week, and that might mean watering every day if it’s above 90 degrees. After the first week, switch to watering every other day. Then on week three, switch to twice a week. Exceptions would be for cacti, which I would soak once when planting and then water once a week for the first month before tapering off to once or twice a month until established. (Perennials / grasses - 8-10 weeks, Shrubs - 1 year, Trees - 1-3 years.)
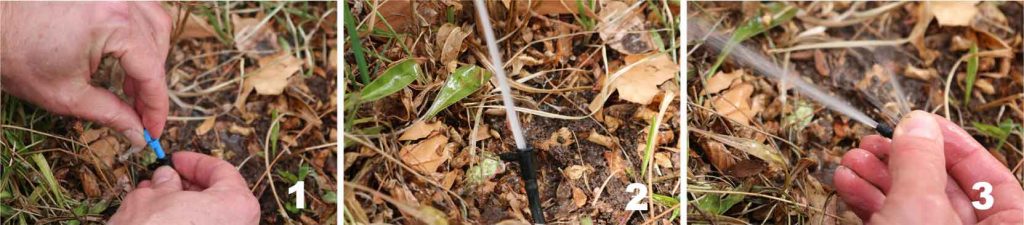
- Check that drip emitters are working properly, especially if a plant looks wilted: Drip emitters often get clogged after a repair is made in the larger ½” or ¾” poly tubing. If you’re using “flag”-shaped emitters and one is not flowing, you’ll want to grasp the body of the emitter while you turn the top “flag” shape counterclockwise 90 degrees to allow the top to separate from the rest. You should do this while the zone is running so that you can see if any emitters aren’t working and so that the water pressure can clear the clog. Once you’ve twisted off the top, you should have a strong flowing stream of water coming out. Hold your finger over the water stream, forcing it into the drip outlet, which clears the clog.
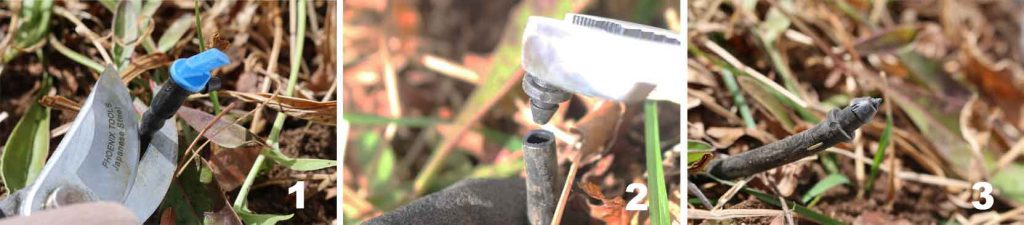
If you’re using “button”-shaped emitters and one is clogged, you’ll need to cut it off and replace it. Don’t try to pull it off the ¼” tubing, just cut it off and plug in a new one so that the barbed insert has fresh (not stretched out) tubing to fit into.
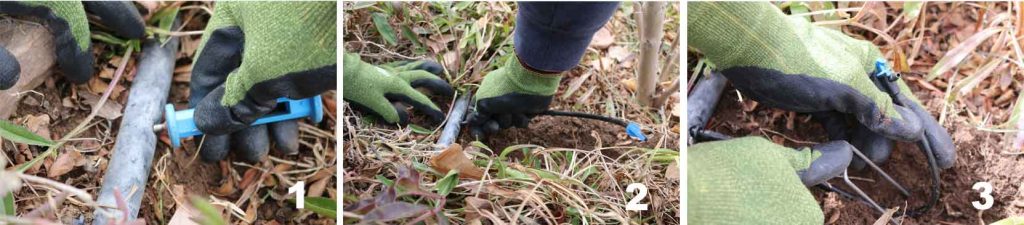
- Keep up with plant growth: As your desert-friendly plants grow larger, you can move the emitters farther away from the base of the plant and add new ones if needed; larger plants require more water. There are several ways to do this. You can poke a new hole in the nearby larger poly tubing, insert a ¼” coupler, run an additional ¼” line to the plant and add an emitter. However, if the main poly line is more than a couple of feet away, install a ¼” “T” in the spaghetti tubing and go from there. It saves time and means fewer holes in the main poly line. Remember, when installing ¼” couplers into the main poly, always poke the hole in the side, not the top; that way if you step on them by accident, they won’t break off. Also, if your plants are on a slope, the emitter should be on the uphill side, so water flowing downhill will cover more of the root zone. Check that water wells are still in place and holding water around the plant.
- Inspect your trees: Check the leaves for any insect damage and the underside of leaves for insect infestations. Also make sure the mulch or gravel isn’t covering up any of the tree trunk above the root flare, which traps moisture that can cause decay or rot. Particularly in fruit trees, this can also allow detrimental insects access to the trunk where they could bore into it.
- Check the soil around the base of your plants: Often during initial watering, the soil will settle into the planting hole and can expose the root ball, which causes it to dry out quickly. If you observe or suspect this, kneel in front of the plants, move the mulch out of the way and scrape the surrounding soil back around the plant to cover up the root ball. Then replace the mulch and reposition the drip emitter as necessary.
- Learn the common or scientific names of your plants: If you don’t have a list, plant tags or a detailed landscape plan, some newer smart phones have a plant identifier built into the camera app (no need to remember the app store password and download another app). The closer you can get to the plant — showing leaves, branch shapes and flowers (if any) — the better the app will work. The phone (as we all know) can be wrong, but it will give you a place to start. Alternatively, send an email with photos to askanexpert@abcwua.org and we can help you identify
Once you know the plant names you can look them up in our xeriscape guide to reacquaint yourself with their water needs and mature sizes. Need help remembering the plant names? Often the plants themselves can tell you. Is it a catmint? Rub the leaves and smell the minty aroma. Turpentine bush? Lemony pine smell, for sure. Maybe it’s the shape of the leaves. Fernbush? Examine the leaves closely and see how they resemble an actual fern from a rainier climate.
Learn more here:
Xeriscape Conversions on the West Side that Use Wood Chip Mulch
DIY Xeriscape Conversions that Use Wood Chip Mulch

How to Transform Your Thirsty Lawn in 6 Steps
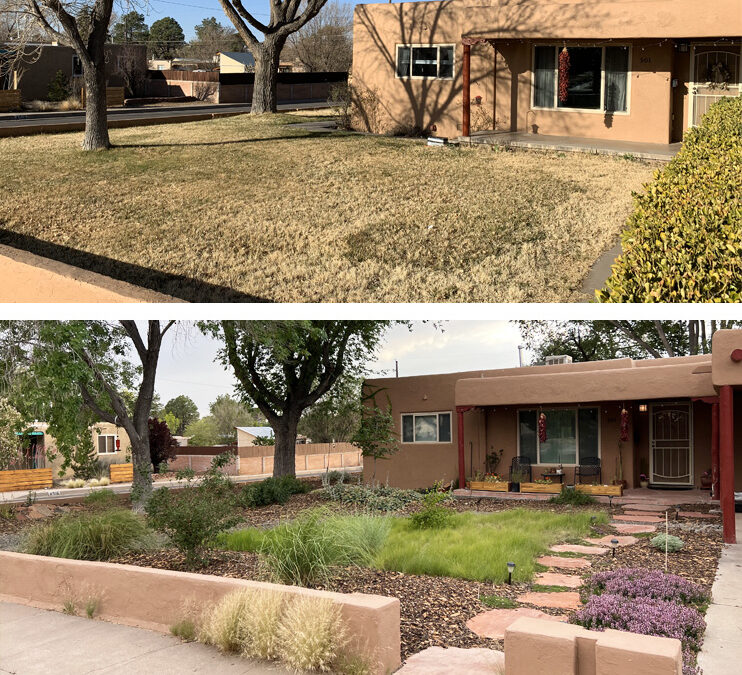
You undoubtedly have seen your neighbors and friends around town removing their grass lawns and replacing them with water efficient desert friendly xeriscapes. You may yourself be interested in doing the same with your yard but perhaps are overwhelmed by the tasks or concerned about how much it would cost. Don’t fret, it’s much simpler than you think. We’re walking you through the six steps to transform your lawn into a beautiful desert friendly xeriscape.
STEP 1
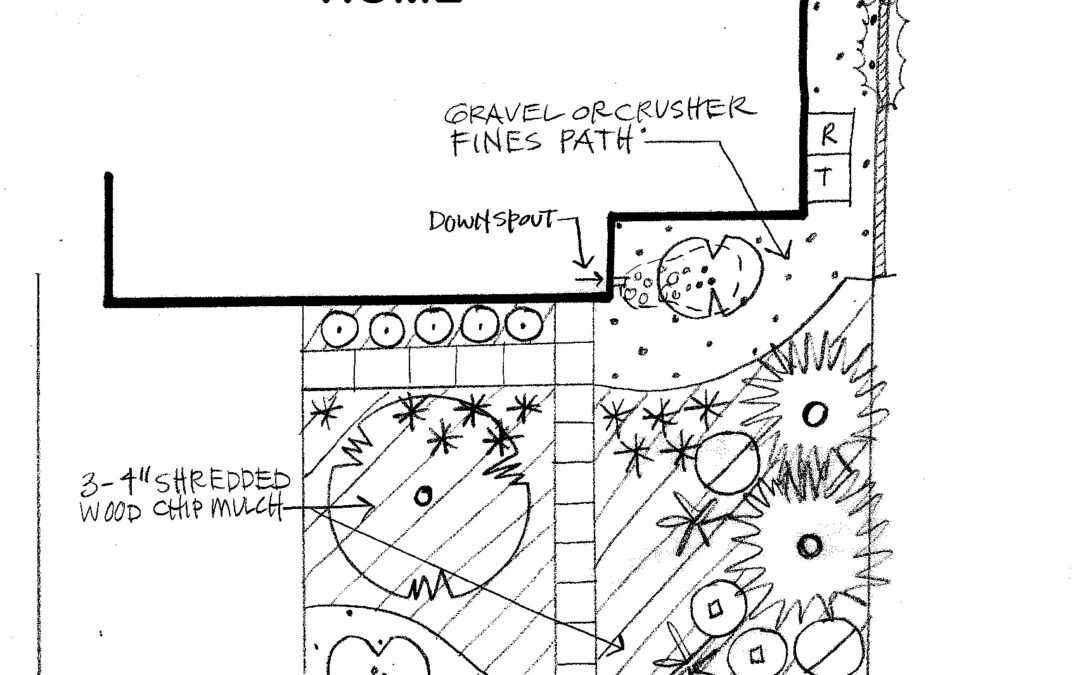
COME UP WITH A DESIGN, then apply for the $3-a-square-foot rebate.
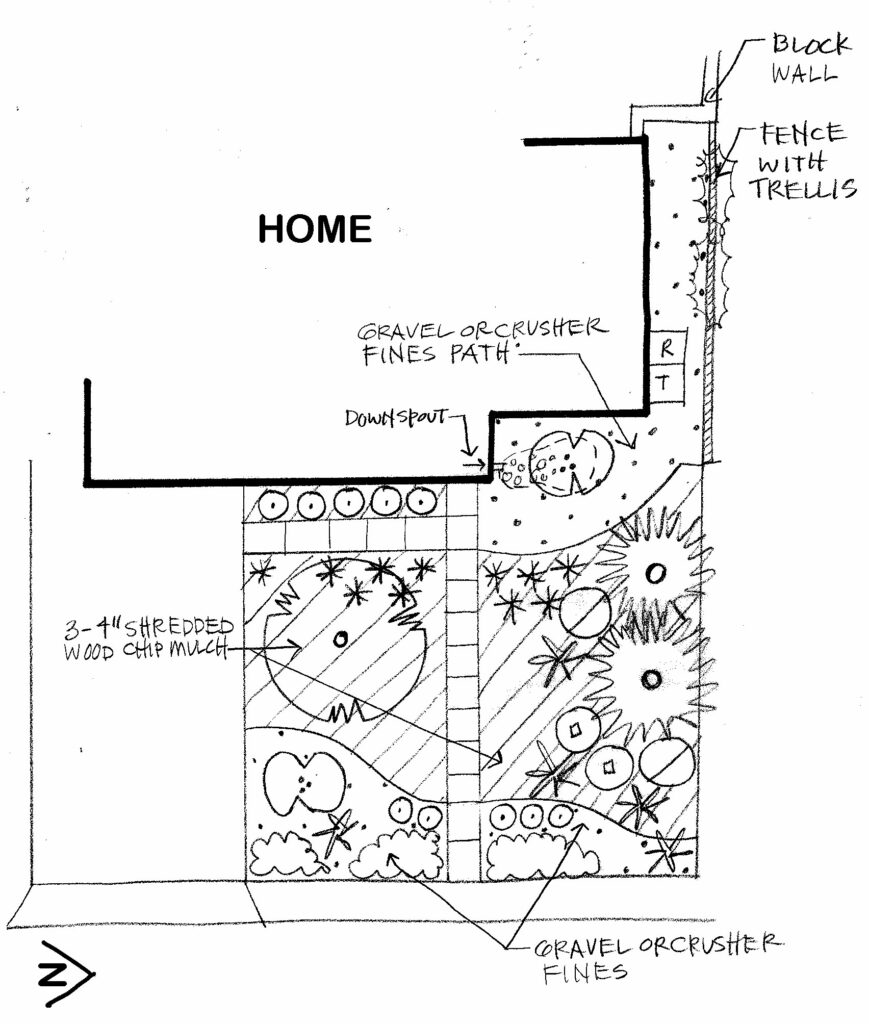
No need to get overwhelmed by this step. You know your yard best, so observe and understand how you want to use your space. Brainstorm elements you want to include. Take into account existing plants and trees, views you want to preserve or hide, shady or very sunny spots, and downspouts/canales or other places where water collects.
Dig Deeper with these design articles:
Simple Steps to Get Started Designing Your Yard
Desert Friendly Design Templates
Favorite Mediterranean Plants for the Albuquerque Area
Apply for the rebate.
STEP 2
DEMOLITION, GRADING AND DRAINAGE
Once you have your design, use spray paint or old hoses to lay it out on the ground. Walk around the space and make changes as needed.
Before demolition and removal of the lawn, call 811 to mark underground utilities. Also note existing tree roots that you need to protect during your work.
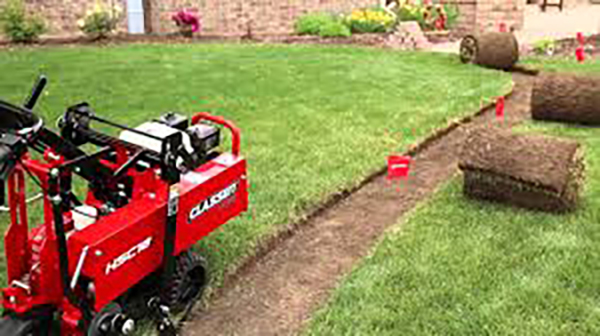
Lawn removal techniques: A sod cutter works best for most lawns unless there are large roots or the grass is Bermuda. Hand dig grass out around large roots so as not to cut any that are more than 2” thick. Use an herbicide to kill Bermuda due to its invasive and prolific roots. Along sidewalks you’ll want to dig down 4” by 12” wide to make room for 3” of mulch and slope the soil back up to the surrounding grade gently. Avoid using a skid steer to remove the grass, this can unnecessarily remove useful existing topsoil.
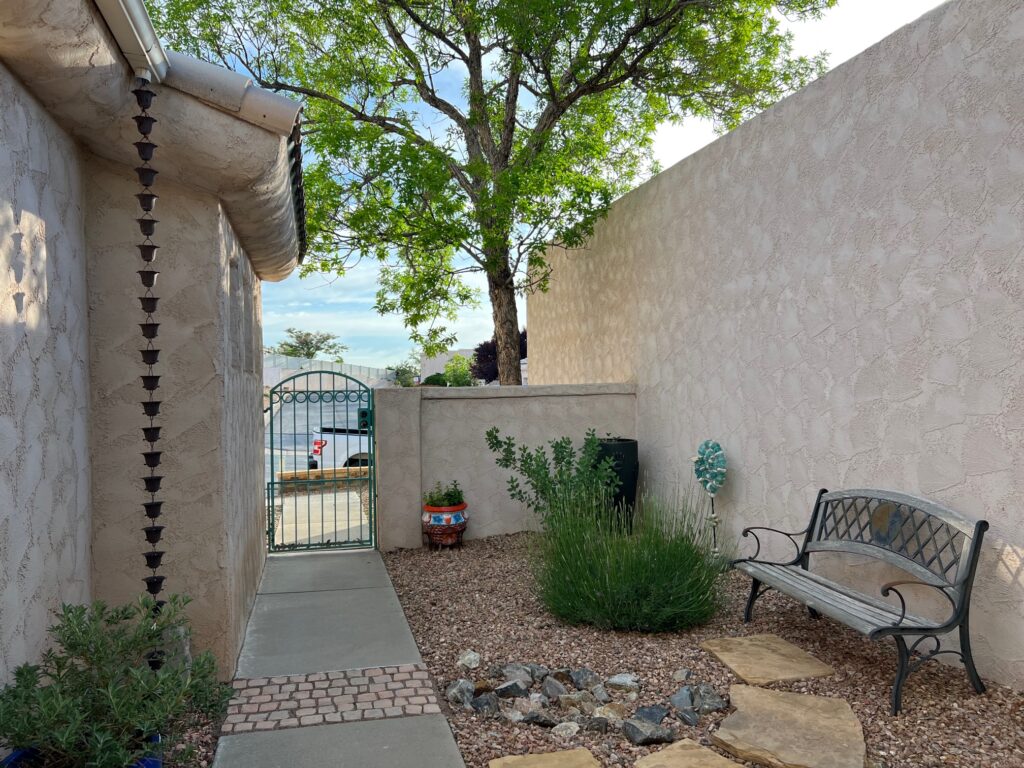
Drainage Considerations: Always grade water away from your house, masonry walls or walking paths and towards planting areas.
Dig Deeper with these articles:
Passive Rainwater Harvesting for Homeowners
Plants for Passive Rainwater Harvesting Gardens
Residential Rainwater Harvesting Information
STEP 3
HARDSCAPE

Install any hardscape elements such as walls, pergolas, sidewalks, pavers and boulders.
STEP 4
IRRIGATION
You’ll use a drip system to irrigate your new beautiful desert friendly xeriscape. Check that your existing spray valves are in good working condition. If so, you can reuse these valves. Simply have a licensed irrigator or plumber add a pressure reducer after the valve, then you can add your ½” drip polyline.
Irrigation Components: If your existing valves are damaged or non-functional you’ll need to install new ones. Typically, an irrigation specialist or licensed plumber would install your new manual shut-off valve, automatic valves, box, backflow preventers and pressure reducers. But if you want to do it yourself, do your research and reach out to local landscape irrigation suppliers for advice.
Drip Tubing: The drip tubing is everything downstream of the pressure reducers, and it’s relatively easy for homeowners to install. Uncoil the ½” or ¾” poly tubing in the sun until it’s flexible enough to manage (making sure there are no kinks in the process). Then, dig shallow 6” trenches, lay out the ½” poly in the trench, staking it with 6” weed fabric staples along the way, and snake the poly within a few feet of the plant locations. Wait until the plants are installed to cover the poly unless you have long lengths of it without plants.
Dig Deeper with these articles:
Use Drip Irrigation for your Trees and Shrubs
How to Convert your Existing Spray System to Drip
Drip Irrigation Maintenance Checklist
STEP 5
PLANTING
Install the plants (link to article). Water your new plants with a hose right after they’re installed. You might need to create temporary basins around each plant to keep the water from running off.
At this point, you’ll want to set up the permanent irrigation. Use your drip tubing punch tool to create a hole for the ¼” coupler and ¼” tubing. Always punch the hole in the side of the ½” poly, not the top, so a footstep doesn’t damage the connection. Carve a small trench in the dirt and run the ¼” tubing to the base of the plant and attach the emitter (use a weed fabric staple to hold it in place if necessary). Avoid running ¼” tubing farther than 3 feet in order to keep things orderly. After the ¼” tubing is installed, cover it with dirt to protect it and keep it from being tripped over.
Dig Deeper with these articles:
STEP 6
INSTALLING MULCH
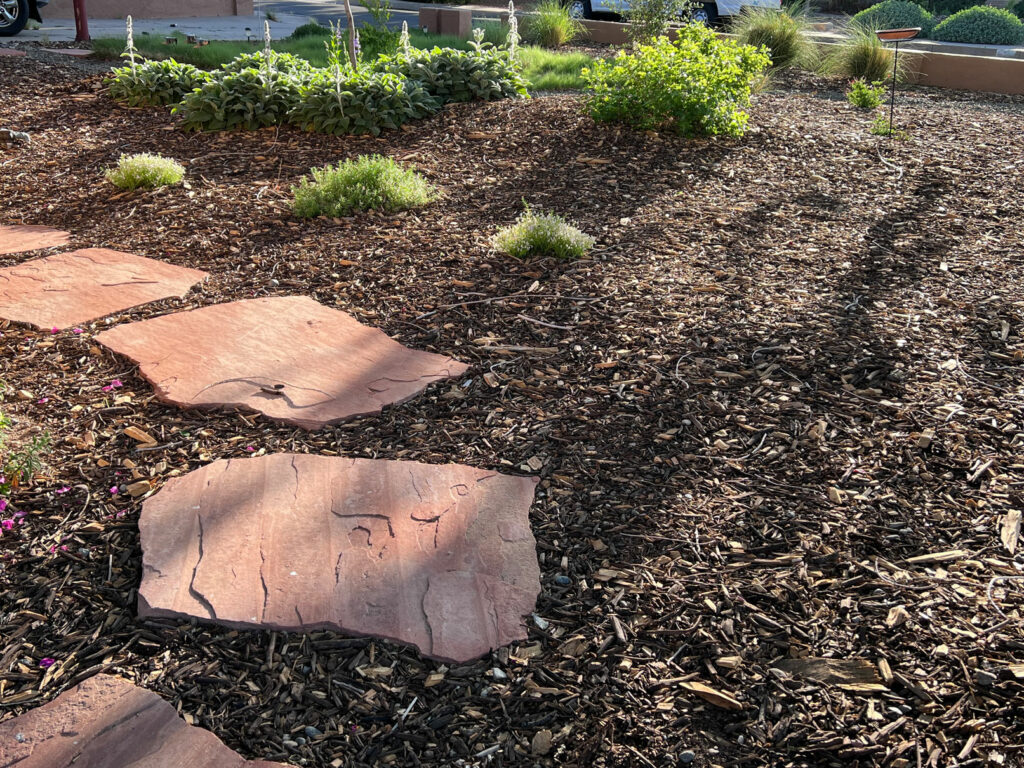
If you’re using gravel, the complexity and layout of your yard will determine whether you install weed barrier fabric before or after planting, but you do want the drip tubing under the weed fabric. For shredded wood chip mulch, lay the irrigation line down over the bare dirt then top with 3-4” of wood mulch.
If the mulch has been delivered in the street or on a concrete driveway, use a square shovel to scoop it up. From there, just load each wheelbarrow full and dump it throughout the yard. Spread it out with a rake and you’re done!
Dig Deeper with these articles:
Xeriscape Conversions that use Wood Chip Mulch
4 Common Myths about Organic Mulch

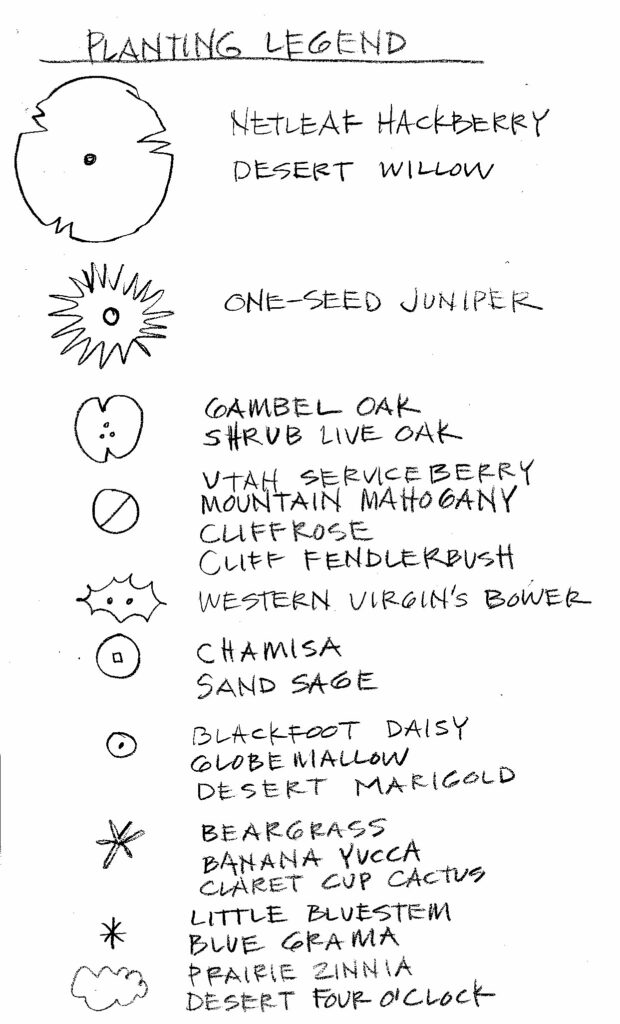
High Desert Landscape Design Template
All good things start with a solid plan. Developing a landscape plan saves you not only time and money, but it is more likely to result in a beautiful yard. A few generous local landscape architects donated their time and put together some landscape design templates of a typical front yard for our 505Outside subscribers.
Above is a look at an example landscape template for a south facing front yard. This design brings all those local native plants you see in the foothills into your landscape. It’s full of a mix of oaks, sages and grasses. Take a look and get inspired to recreate this in your own yard.
Trees: Deciduous
Shrub live oak
Trees: Evergreen
One-seed juniper (female only)
Shrubs
Utah serviceberry
Chamisa
Flowering Plants
Blackfoot daisy
Desert marigold
Desert Accents
Groundcovers
Desert four o’clock
Grasses
Vine
Learn more here:
Desert friendly landscape reveal
Lucious Landscape Design Template
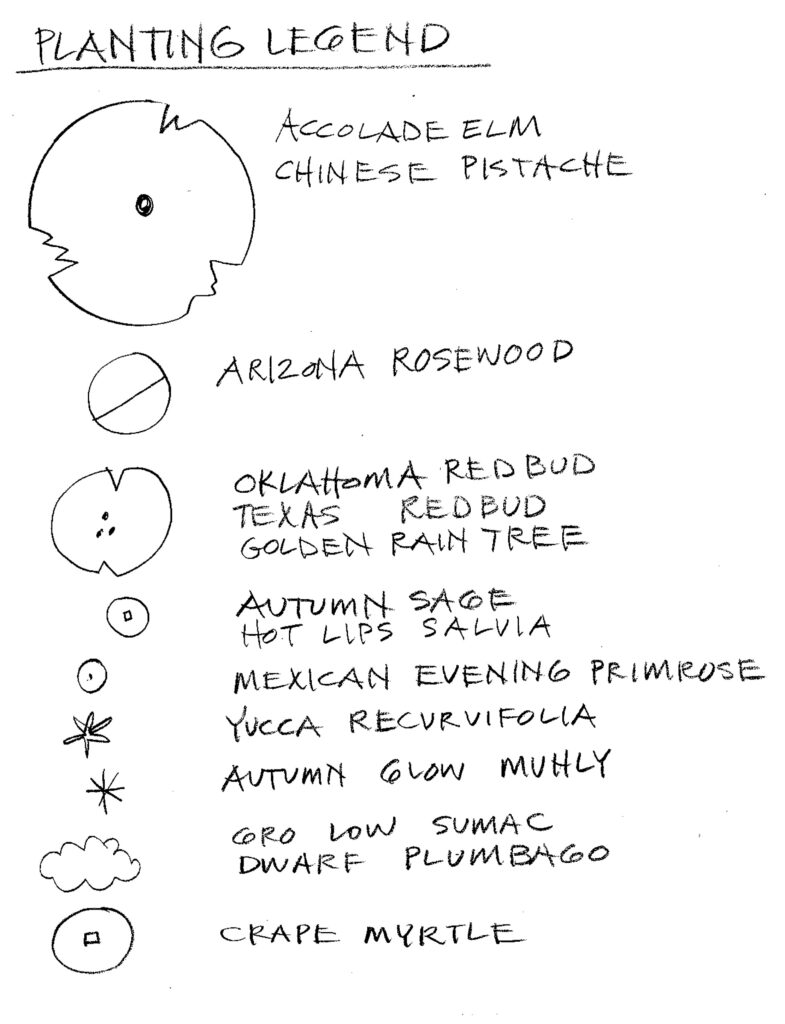
A lot goes into designing a landscape, hence there’s an entire profession called landscape architecture devoted to designing outdoor spaces. A few generous local landscape architects donated their time and put together some Landscape Design templates of a typical front yard for our 505Outside subscribers.
All good things start with a solid plan. Developing a plan saves you not only time and money, but it is more likely to result in a beautiful landscape. Above is a look at an example landscape template for a south facing front yard. This design brings a taste of the East Coast or Midwest to your home in New Mexico. It’s full of leafy green desert friendly plants. Take a look and get inspired to recreate this in your own yard.
Luscious Landscape Design Template
Tree: Deciduous
Tree: Evergreen
Shrubs:
Crape myrtle
Hot Lips salvia
Flowering Plants:
Desert Accents:
Yucca recurvifolia
Groundcovers:
Wall germander
Grasses:
Vines:
Learn more about plants here:
505Outside Plants of the Month
Six Steps to Get Started Designing Your Yard
Desert Friendly Design Templates