Sometimes you need help to create your perfect desert friendly landscape. Many times, this involves hiring a landscape contractor. The Water Utility Authority is committed to helping its customers. Below we share some tips to help you choose a landscape contractor.
It’s important to start with a to-scale landscape design plan. This may be done by a professional landscape architect or a landscape designer. Or perhaps you worked up your own design plan.
Hiring a landscape contractor requires research similar to what you would do when hiring any home repair contractor. It’s important to consider the following:
Is the contractor able to secure bonding and are they insured?
What are the contractor’s credentials (formal training, references, professional certification)?
Does the contractor belong to a local or national trade association and abide by its standards?
Does the contractor have a Water Smart Contractor listing through the Albuquerque Bernalillo County Water Utility Authority?
The contractor should provide references for projects similar in size, scope and design so you can talk to previous customers about their experiences.
The contractor should share photographs of other projects you can check out.
Estimate/Bid and Contract
The contractor should provide you with a detailed, line-item estimate for the work. This will include the price of the materials, labor, taxes and permit costs if applicable. A detailed estimate will help you accurately compare pricing and services.
A signed estimate may act as the official contract, a legal requirement that will protect both you and the contractor if anything goes wrong.
What is the payment schedule? Most contractors will ask for anywhere from 30% to 50% up front so they can purchase materials. They should provide you with a general timeline or payment schedule.
How long will the construction take, and what does the sequencing/schedule look like?
How does the contractor manage additional work that may be added in the middle of the project and is not on the plan?
During and After Construction
Who will be the contractor’s point person, someone you can go to with questions? How will they communicate with you and how often?
How will the contractor handle variabilities that come up during construction?
What happens if there is a delay once construction has started?
The contractor should show you how to maintain the landscape after it is built and how to work the elements installed, such as the irrigation controller.
What are the warranties for the project? What do they cover and exclude?
Does the contractor provide troubleshooting support during the first year after installation?
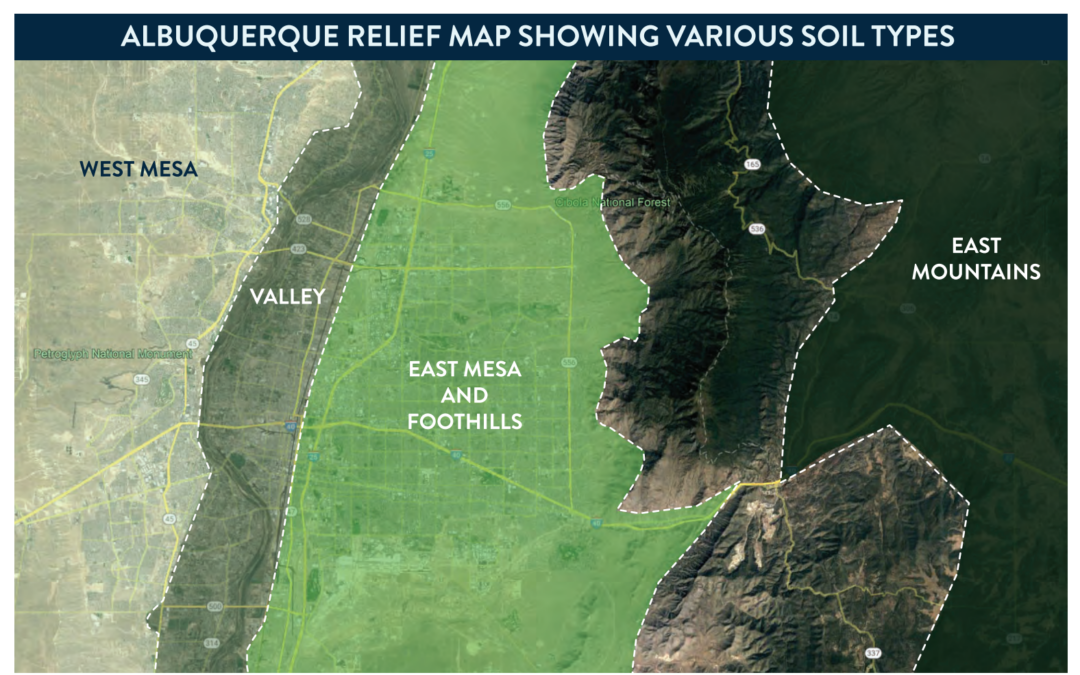
Albuquerque has a variety of soil types. Learning what type of soil is in your yard is a critical step to understanding how water will infiltrate the soil and how long specific plants need to be watered to get the water to the correct depth.
VALLEY SOILS
Valley soils vary from dense clay to grainy sand. They are layered and braided through the area because of the historic flooding of the Rio Grande. The valley also is where acequias weave through the community, providing many essential benefits. They provide water for creating foodsheds and are culturally significant for our community. They also help create and maintain our tree canopy and provide much needed pollinator habitat. This remains particularly important in our changing climate.
EAST MESA AND FOOTHILLS SOILS
The soils in the foothills are usually coarse, whereas the decomposed granite soils on the mesa are generally finer and prone to compaction. These soils have a broad range of organic material along with the base of decomposed granite, making for a huge diversity, even within a building site. Groundwater is deep — only shallow enough to be occasionally accessible to plants in unpaved arroyos near the foothills and stormwater basins fed by urban pavement.
WEST MESA SOILS
West Mesa soils, which vary from silty clay loam to finer sands, are sometimes deposited in a shallow layer above volcanic basalt. Groundwater is too deep to be accessible to most plants except in large stormwater collecting basins.
EAST MOUNTAIN SOILS
East Mountain soils tend to be a mix of moisture-retaining clay loams with some fast-draining gravelly deposits. The density and type of plant cover reflect the relative soil moisture. In upslope areas, where temperatures are consistently cooler and rain and snow more abundant, shrubland transitions to mixed conifer forest. Slopes tend to be drier than depressions, which accumulate moisture.
HOW WATER MOVES THROUGH DIFFERENT SOILS
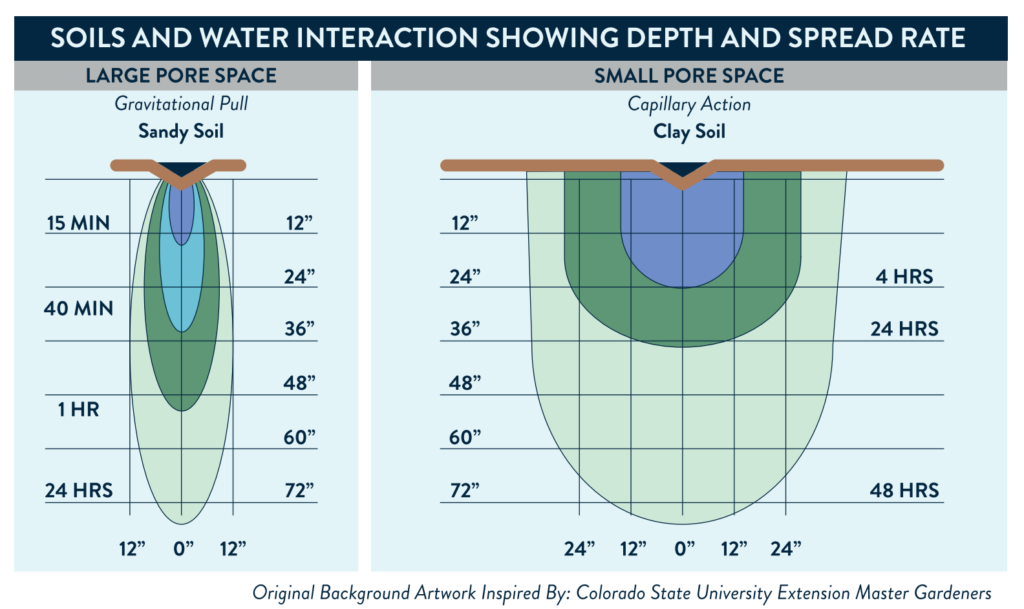
Water soaks into sandy soils much more quickly than in clay soils, but it travels downward in a narrow pattern. In clay soils, the water travels much more slowly and spreads out in a much wider pattern.
Pro Tips:
• Plants in sandy soils generally need additional emitters to distribute water more evenly in a root zone. They also may need to be watered more frequently but for shorter amounts of time.
• Plants in clay soils generally need fewer emitters because the water spreads out. They will probably need to be watered less frequently but for longer periods.
• All soils need to drain between waterings to allow oxygen back into the soil pores.
A struggling plant may be receiving too much water. If soil stays saturated, plants will drown. Since there is a lot of clay in our soils, it is very easy to drown plants. A drowning plant often has similar symptoms to one not receiving enough water: wilted leaves and poor color. Always check soil moisture with a moisture meter before adding more water.
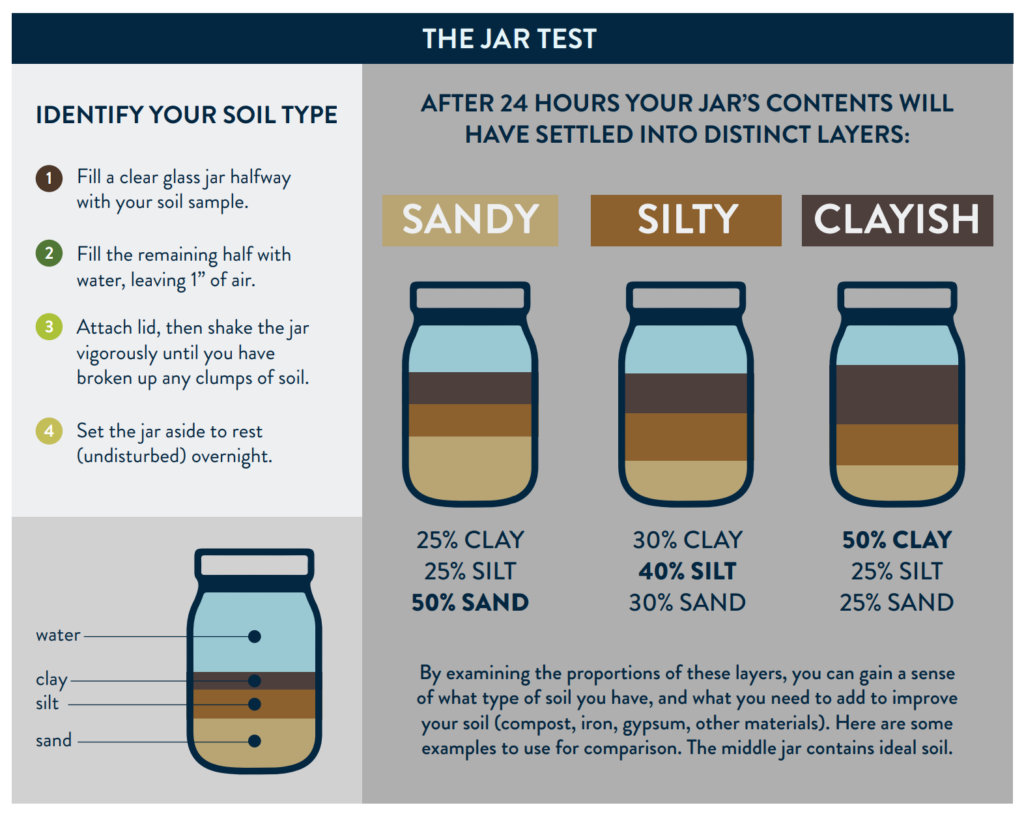
PERFORMING A JAR TEST TO DETERMINE SOIL TYPE
An easy way to get a better idea of what type of soil you are working with is to conduct a jar test. A jar test will separate the three main components of soil: sand, silt and clay. These determine the soil texture that contributes to drainage and overall plant health.
Most building sites, including home sites and the land directly surrounding them, have areas of heavy compaction. When soil is compacted, pore space that allows oxygen and water to get to the root zone is reduced, building an impermeable layer in the soil.
Soil compaction adversely affects percolation rates (the movement of water through the pores) and makes it much harder for roots to expand within the soil and thrive.
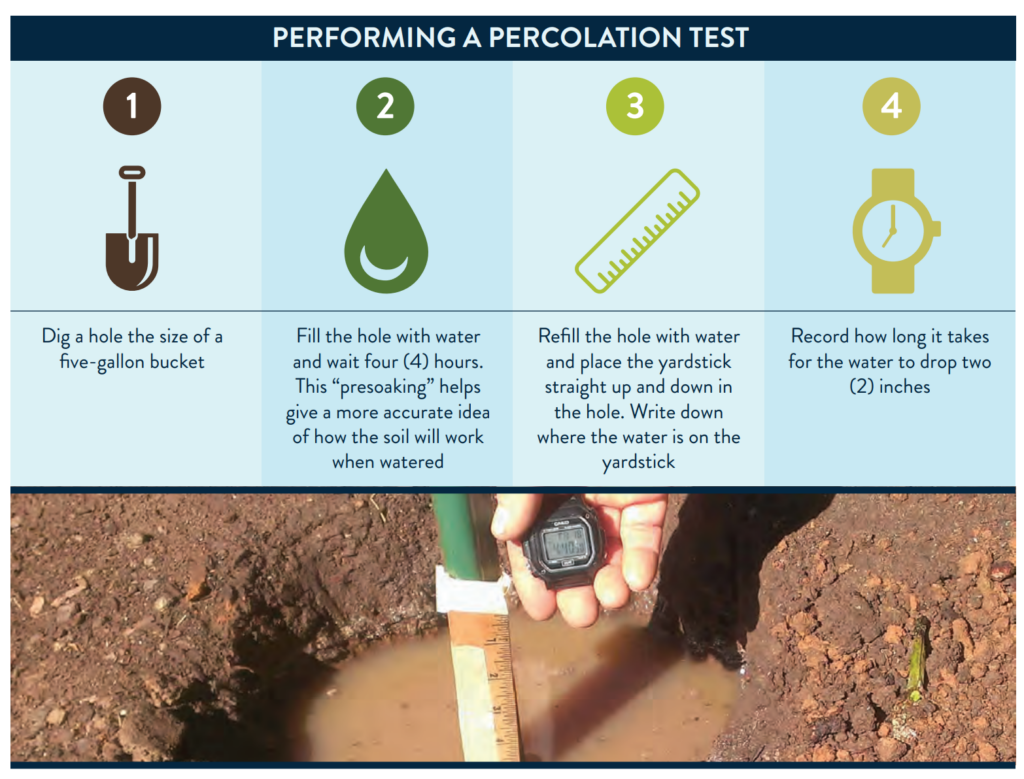
HOW TO TEST THE PERCOLATION RATE IN SOIL
If you do a jar test you will have a pretty good idea what percentage of sand, silt and clay make up your soil. Performing a percolation test will allow you to see how your soil interacts with water.
TOOLS NEEDED:
Shovel, yardstick, timer/watch, pen, paper and hose
To get your hourly percolation rate, divide how long it takes the water to drop 2 inches by 120. A soil percolation rate between 1 and 3 inches per hour is adequate for plants with average drainage needs. If the rate is less than 1 inch per hour, drainage is too slow, and the soil will either need to be improved by adding compost or planted with plants that tolerate wet soils. Watering should be less frequent but longer.
If the drainage is more than 4 inches per hour, it is too fast. Soil will need to be amended with compost and other organic matter either by digging it in or using it as a top dressing. Watering should be more frequent and for shorter time periods.
WHY IS MY SOIL COMPACTED?
Many things — including construction, heavy equipment or vehicles, or a lack of organic matter — can create compacted soil that won’t allow water to drain. One way to prevent further compaction is to park your vehicles and store heavy items only in your driveway or on soil devoid of trees or landscaping.
HOW DO I IMPROVE MY SOIL?
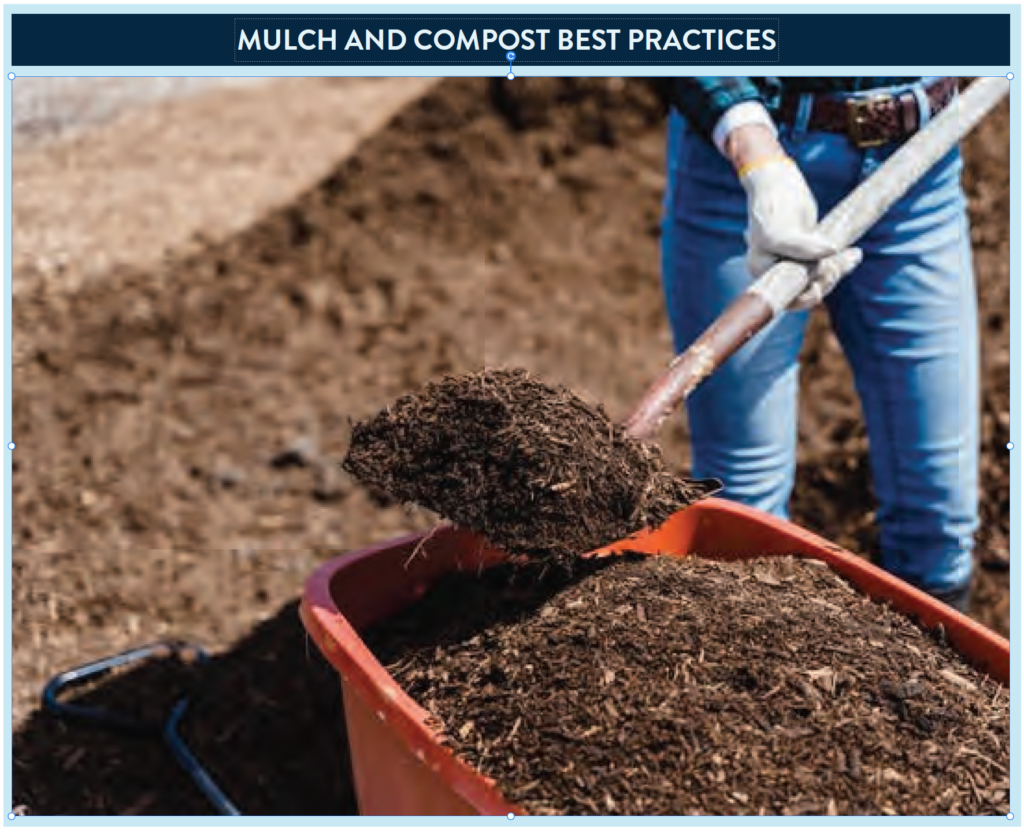
Add organic matter (compost) to clay to make it more permeable and add compost to sand to improve its water-holding capacity.
Add a deep (3”-4”) layer of organic mulch to help all soil types retain moisture better, suppress weeds and feed soil microorganisms. Native and low water use, desert friendly plants do not need compost. Although they will grow slowly in uncompacted native soil, they thrive best there.
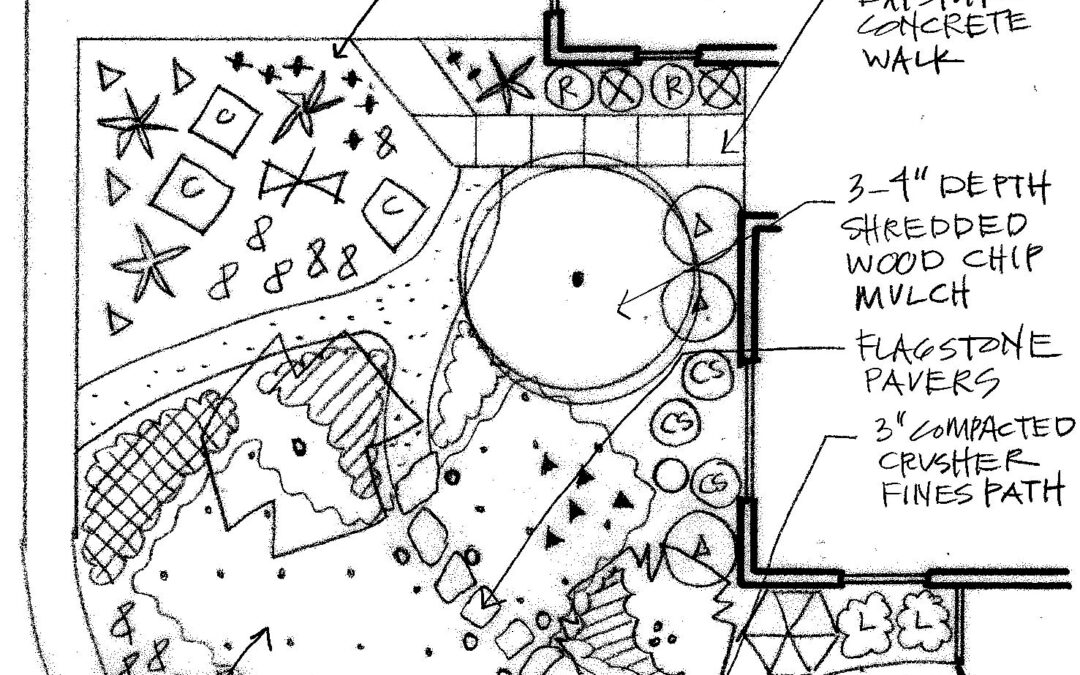
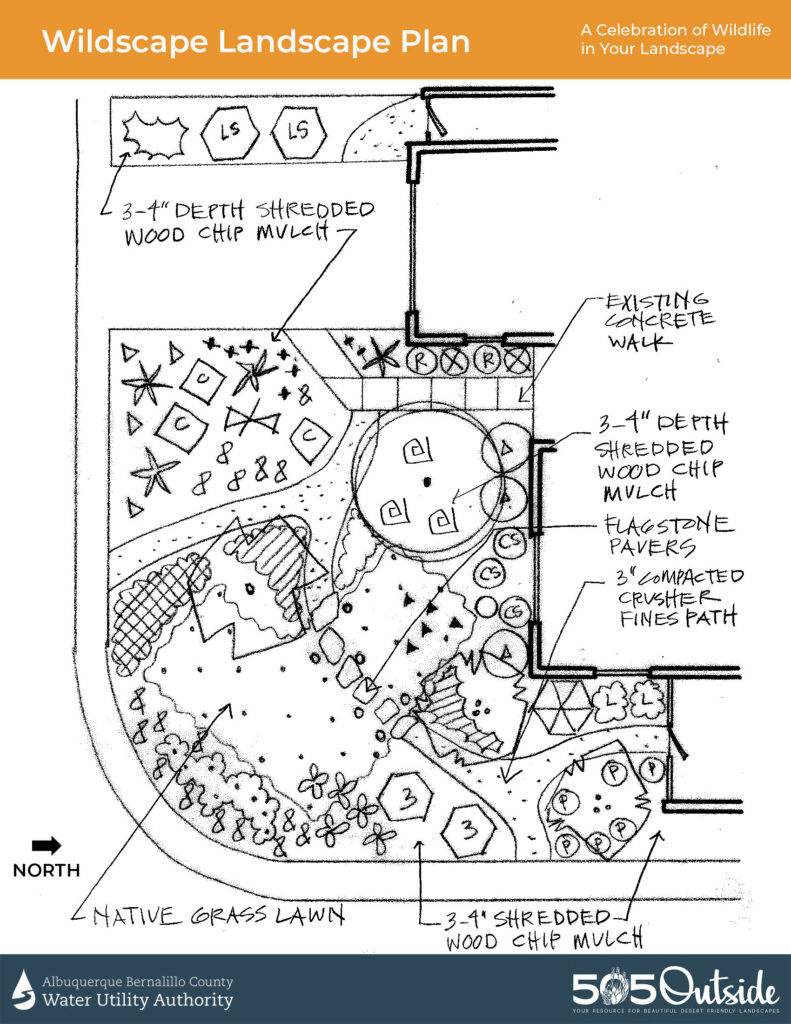
A lot goes into designing a landscape; hence, there’s an entire profession called landscape architecture devoted to designing outdoor spaces. We won’t be able to make you a landscape architect today, but we’re sharing a unique landscape plan designed by New Mexico landscape designer Judith Phillips to get you inspired with ideas for designing your own yard. We’ll be sharing five more landscape plans in future issues of 505Outside.
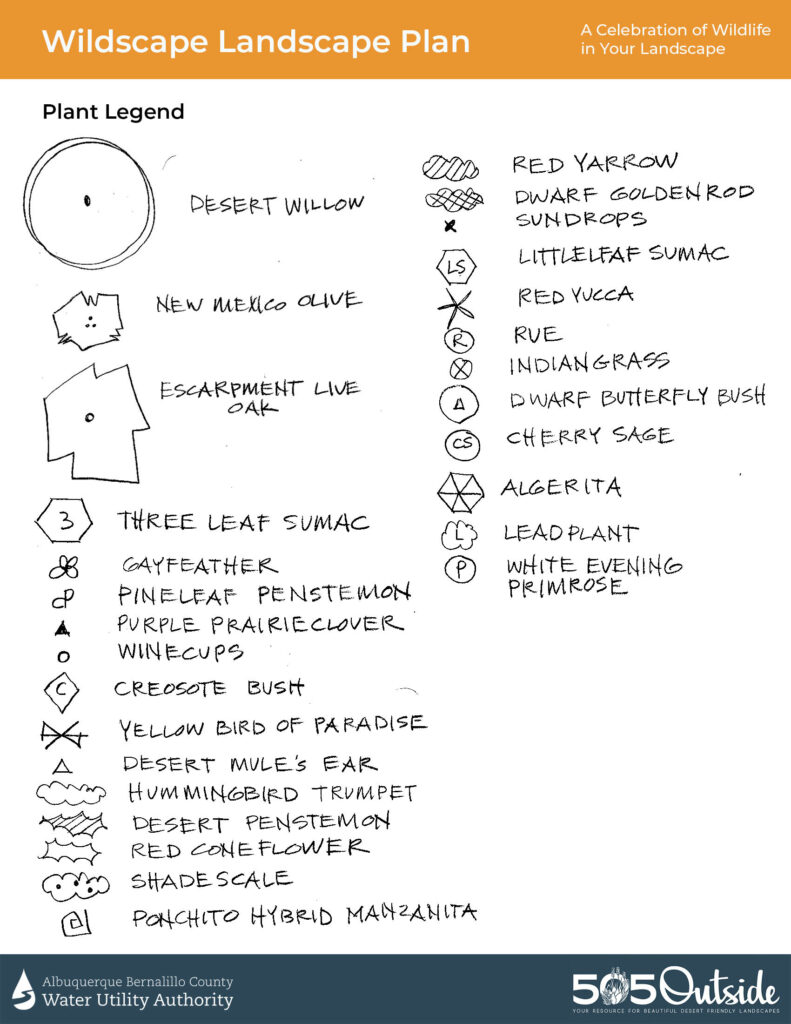
Plant for wildlife and you will host a never-ending garden party. Wildscapes should have tiers of canopy to provide shelter and food for a wide variety of wildlife, including birds, hummingbirds, bees and butterflies. Tall trees provide shade and shelter. Dense thickets of middle-height shrubs provide spaces for roosting and nesting and also give the landscape a sense of enclosure. Open areas with low-growing groundcovers provide areas for nesting and foraging, and the colorful flowers and berries appeal to people as well as winged visitors. A mix of evergreen plants for cover, brilliant flowers for nectar and pollen, and fruits and seeds ripening through the seasons will keep your wildlife friends fat and happy. In this wildscape, the gayfeather, dwarf goldenrod, leadplant, yarrow, rue, grasses and dwarf butterfly bush are lures for butterflies. Hummingbirds are drawn to plants with nectar-rich tubular flowers, such as desert willow, penstemons, cherry sage, coral honeysuckle and red yucca. Local songbirds and quail will be attracted by New Mexico olive, sumacs, creosote bush, desert mule’s ear, coneflowers, shadscale, gayfeather and algerita.
Designed by Judith Phillips, author of Plants for Natural Gardens
Learn more about specific types of gardening here:
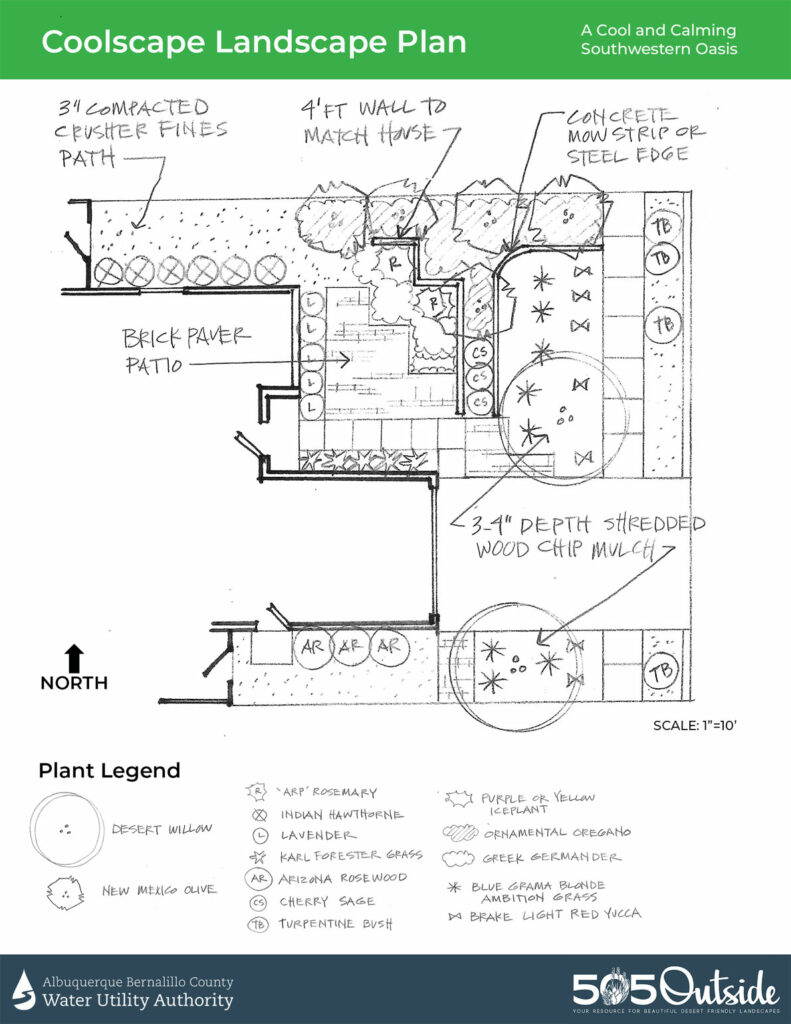
A lot goes into designing a landscape, hence there’s an entire profession called landscape architecture devoted to designing outdoor spaces. We won’t be able to make you a landscape architect today, but we’re sharing a unique landscape plan designed by landscape architects to get you inspired with ideas for designing your own yard. We’ll be sharing five more landscape plans in future issues of the 505Outside.
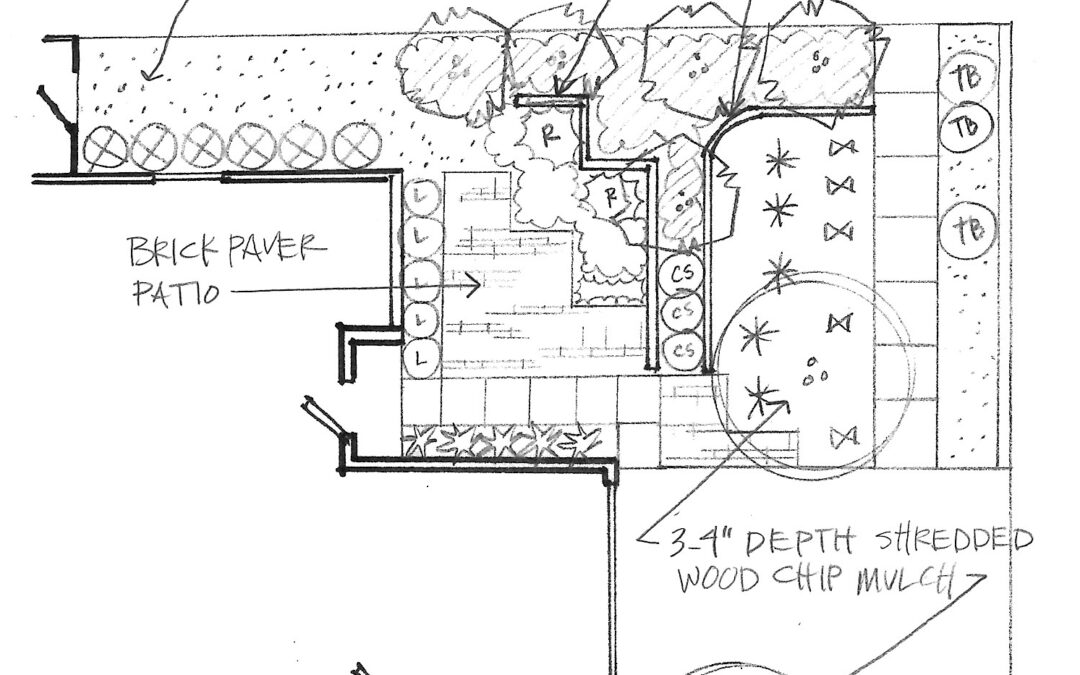
This Coolscape Landscape Plan is designed to provide an attractive streetside landscape as well as a comfortable, private area that is usable even in the winter. The privacy is achieved with a low wall (which should match or complement the house) and a grove of small trees, such as New Mexico olives or chaste trees. The placement of the trees effectively adds to the privacy and provides a backdrop along the edge of the brick patio. All the trees create lots of shade, adding to the coolness of the yard.
The courtyard patio was placed to provide some sun even on an east exposure. Beneath the trees, a groundcover of ornamental oregano grows in the sunnier spots and Kinnikinnick, in those most shady. For the best use of rainwater, the brick patio should be slanted to drain away from the house and into the surrounding planting beds. The edge of the patio on the north side of the yard ends in a bed of fine crushed gravel to create a path to the rear yard. Plants that do best on the cold north exposure of homes, such as Karl Forester ornamental grass and Indian hawthorn, are used to cope with the lack of sun, which in turn makes them more drought tolerant. Likewise, Arizona rosewood is used along the south exposure to capture as much warmth and sun as possible. Lastly, an ornamental clump buffalo grass in combination with a smaller specimen of the red yucca called Brake Light is planted along the front easternmost portion of the yard where it will be the most drought tolerant.
Learn more about specific types of gardening here:
Author: George Radnovich, FASLA Owner of Sites Southwest orchestrates an elegant, simple mixture of ornamental plants and features for north-facing xeriscapes. Have a question about the article? AskAnExpert@abcwua.org
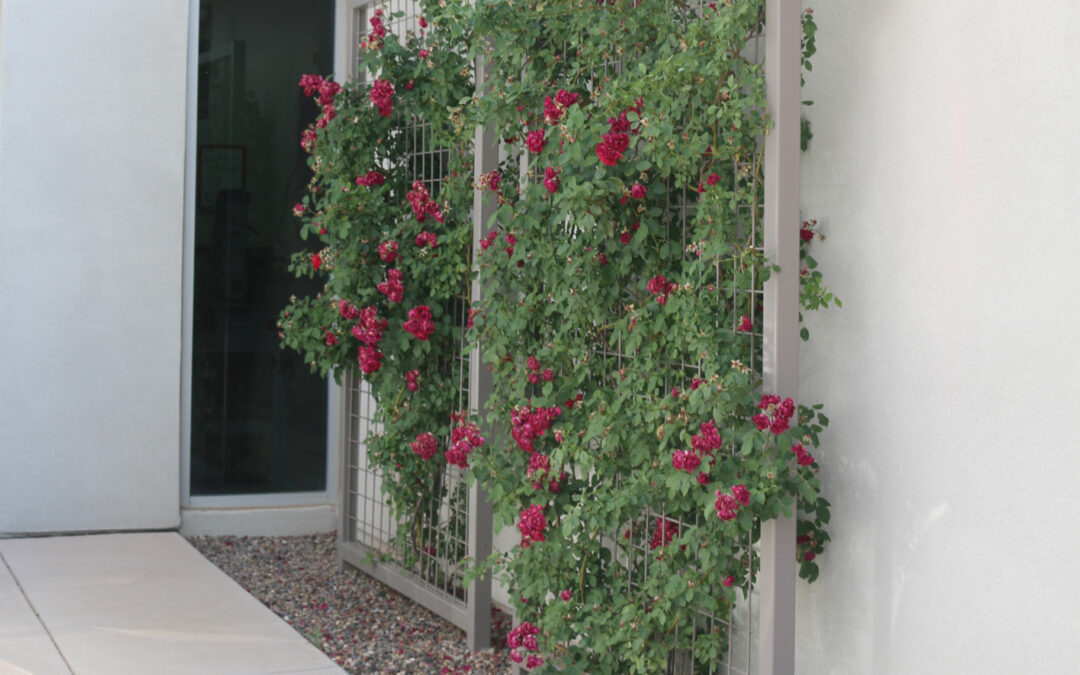
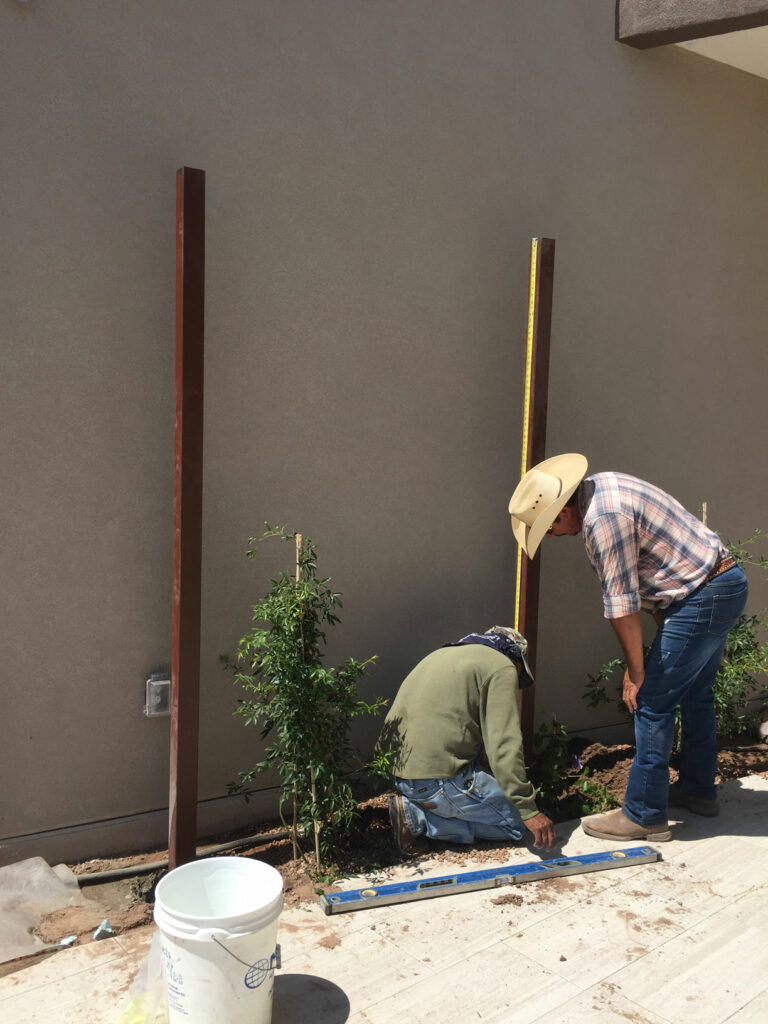
One of the questions the Water Authority xeriscape inspector gets asked most often is how to inexpensively build a trellis for vines. You can make a DIY trellis from materials that are easy to find at your local hardware store. Off-the-shelf trellises can be expensive, and more than likely they are too small. Most homeowners are looking for a trellis to go next to a house or concrete block wall or to divide spaces. Below are two trellis options that will suit those needs.
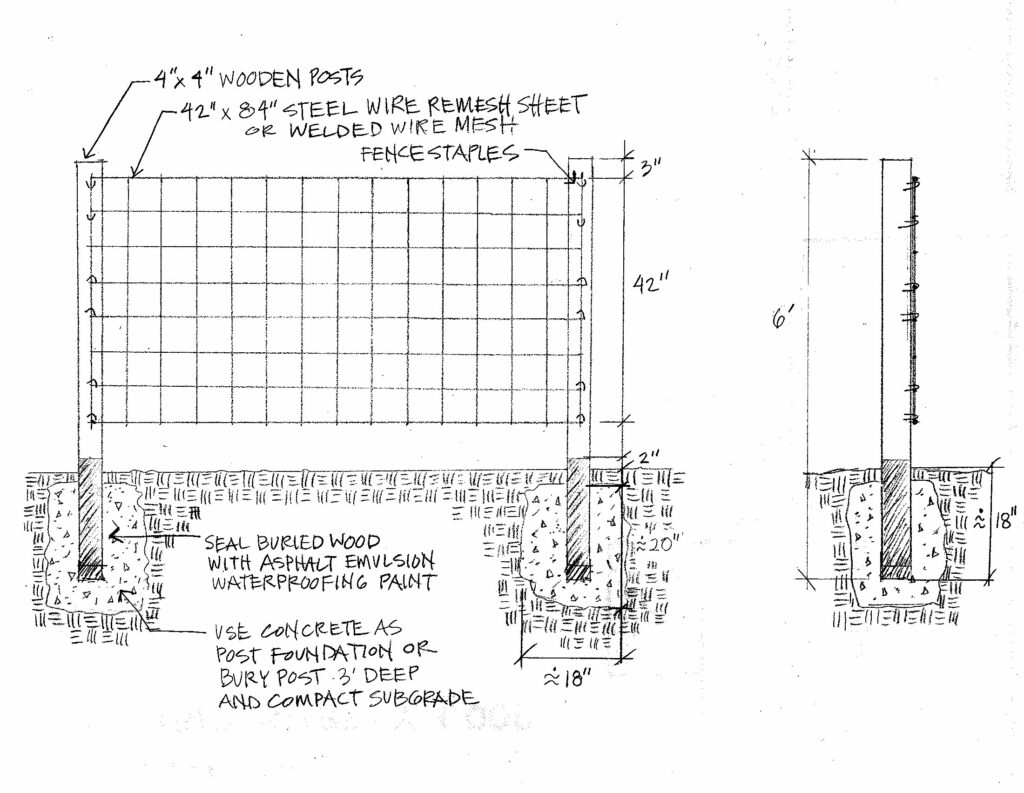
Freestanding Trellis
Materials
4”x4” post (height according to specific project need)
42”x84” steel wire remesh sheet or welded wire mesh
12 fence staples
Asphalt emulsion waterproofing paint or spray paint
Concrete
Tools
Shovel or post hole digger
Hammer
Paint brush
Measuring tape
Level
Step by Step
Step 1: Dig holes for post.
Step 2: Apply waterproofing paint to the section of the posts that will be buried.
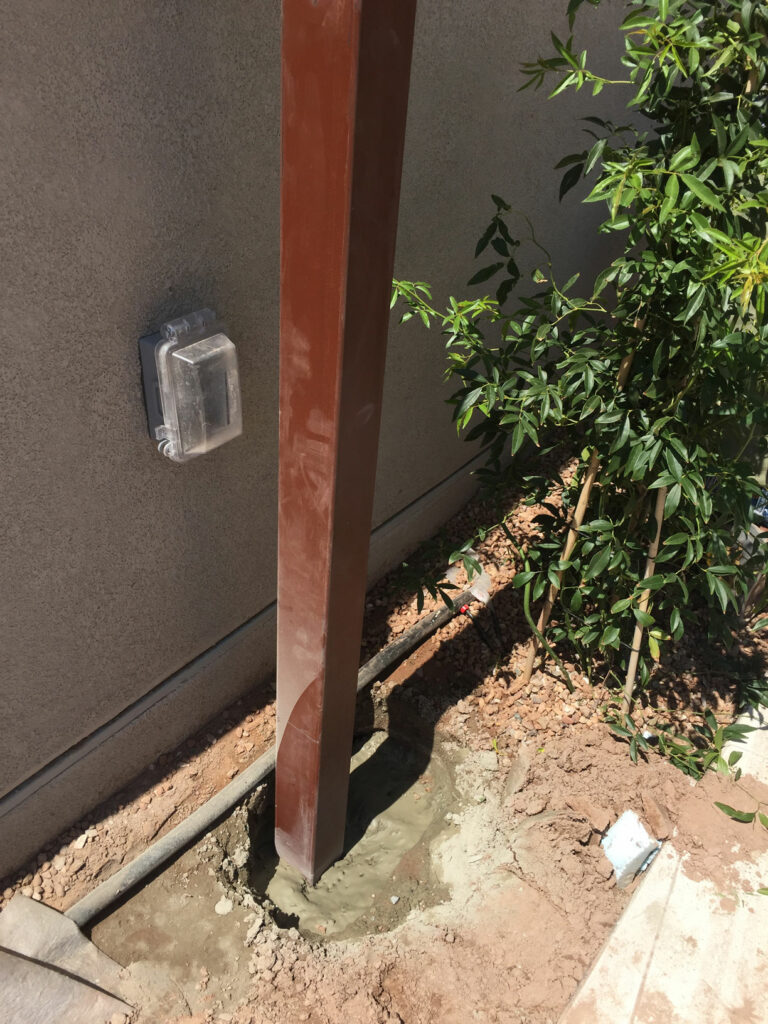
Step 3: Set post in hole. Measure and level post. Once leveled, fill the hole with concrete. If not using concrete, backfill with existing dirt, making sure dirt is compacted every four inches.
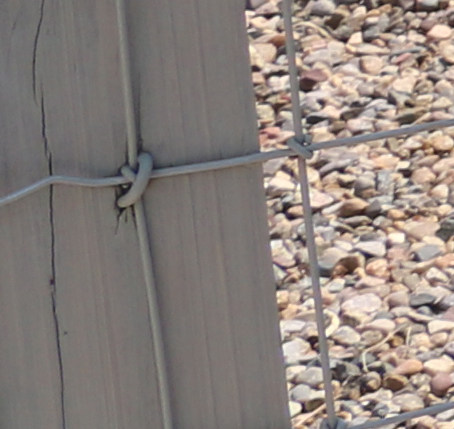
Step 4: Attach steel mesh to wood posts by hammering in fence staples.
Making sure post is the correct height and level. Concrete footing for post. Fence Staple
Trellis Attached to Concrete Block Wall
Materials
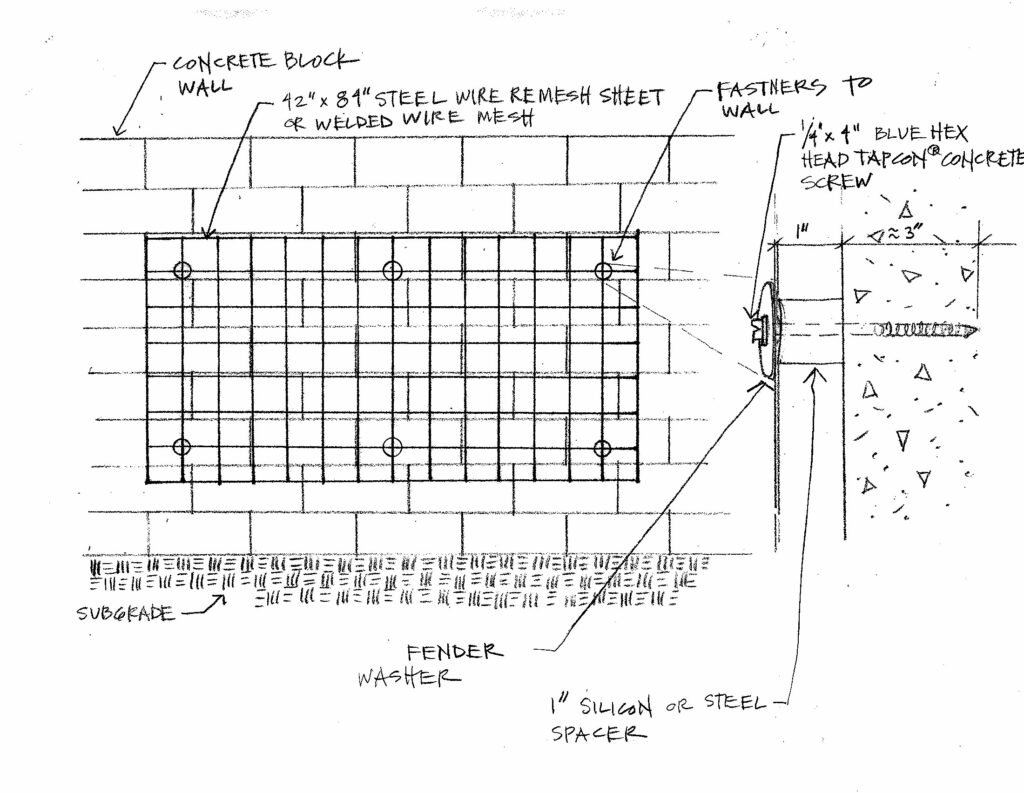
42”x84” steel wire remesh sheet or welded wire mesh
6 ¼” fender washers, 2” circumference
6 ¼” x 4” Blue Hex Head Tapcon® concrete screws
6 1” silicon or steel spacers
Tools
Drill with 3/16” concrete bit
Hammer drill
Measuring tape
Level
Step by Step
Step 1: Measure, level and mark locations to attach fasteners to the wall using wire mesh as a guide.
Step 2: Drill holes for the screws.
Step 3: Attach steel mesh to the concrete wall using suggested screws, washers and fasteners as shown in the diagram.
It’s been a rough few months in the 505. We’re having a challenging gardening season, to say the least. Dry. Hot. Intense. The unraveling of our climate has been on full display.
Whether you’re choosing more adaptive plants and creating habitat or beginning your gardening journey, no doubt you’ve lost plants this summer — or worried about it. I’ve been calling it the Summer of Feeling Like a Not So Great Gardener.
Just to put this in perspective, I’ve been gardening for over 30 years and I’ve struggled and learned a lot this summer. Learning to steward land in a way that’s in alignment with our changing climate is not easy. But it’s crucial.
In the midst of these challenges, you might be experiencing more emotions than you’re used to — anxiety, for example? Frustration, perhaps. Confusion about where to start. Sadness at all the loss and devastation. Feeling alone. Lack of confidence. Overwhelm. Anger. Dread.
So, what’s a gardener to do? It’s easy to think our emotions are totally separate from the scorching heat. We’re used to compartmentalizing — experiencing emotions and deep spiritual questions in one part of our life and tackling complex external issues, like choosing climate-ready trees to plant, in another part of our life. No matter how well we’re dealing with these emotions, they’re bound to creep into our external gardening. What if, instead of shutting ourselves down in order to accomplish the daunting task of adapting our urban forest to the changes before us, we actually bring our emotional and spiritual selves into the garden? This is precisely the zone where deep and meaningful climate resilience awaits us — in the cultivation of our Home Gardens with our Inner Gardens. We grow an ability to weather storms, to adapt as things unravel — in both our inner and outer landscapes.
For example, let’s look at overwhelm, which is so common these days and to which we gardeners are not immune. We might be asking, “Am I doing enough? Am I making the right changes and adaptations? Which do I do first — spread mulch or create ways to passively harvest the rain?” We might be worrying about how much water we’re using or that we’re not using enough. There are so many decisions to make, and it’s easy to feel overwhelmed.
Here’s what I recommend for dealing with overwhelm:
Notice: Take a deep breath and recognize, “Ahh, this is overwhelm. That’s all it is. It’s happening in my inner garden, inside my heart.” That’s the first step. Pause. Notice it. Take a breath with it. The inner garden is what is happening in our consciousness — which primarily lives at the level of our heart (not our brain). There’s a lot of fertile ground to work with in there.
Just be: Next, take 15 minutes and just go outside and sit in the garden. Find a place to just be. Don’t plan or make any lists, just sit and breathe. Don’t skip this step, it’s the most important one. Listen to the sounds, feel the soil, notice the smells. What insights come through?
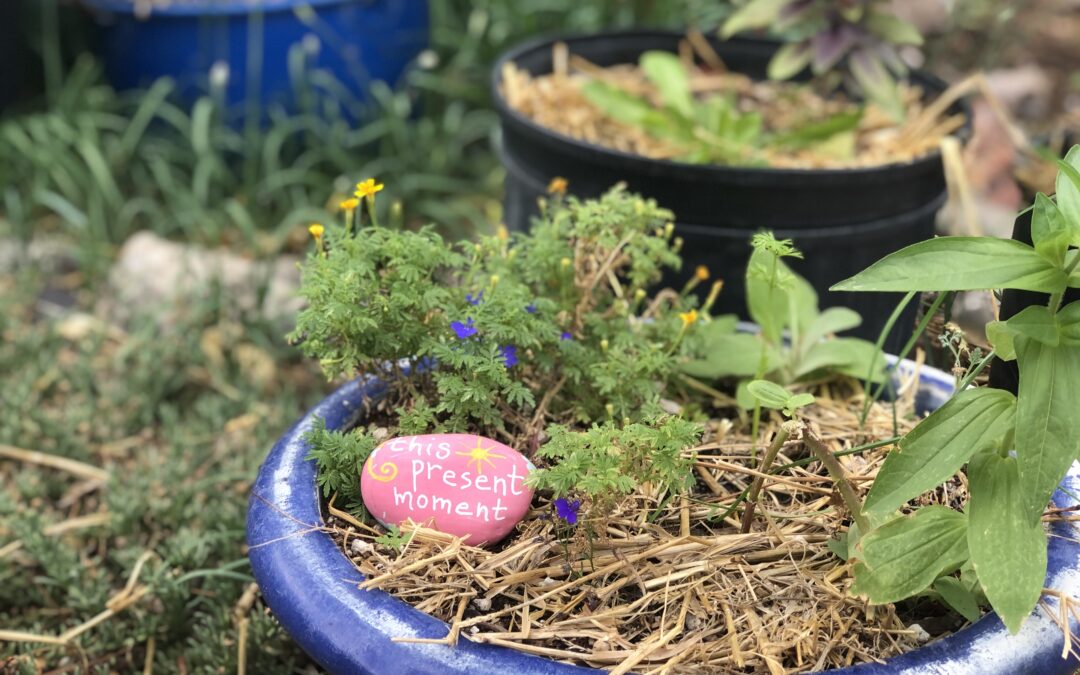
Create: Then, find a special place in the garden and create something to help remind you of what insights came up. It can be very simple, just something that speaks to you — a gathering of stones, an arrangement of leaves, a circle of flower petals. When we take the time to tend what’s growing within our inner garden, we have more inner space to effectively handle what’s happening in our outer garden. This is resilience.
Reconnect: The next time you’re doing a garden task — like weeding — briefly pause and reconnect with your inner garden in your heart. Set a simple intention to help shift the pattern of overwhelm, such as “This garden belongs to all who live here, human and non-human. May my activities today bring benefit to all the beings here.” And then carry on weeding, but with this intention.
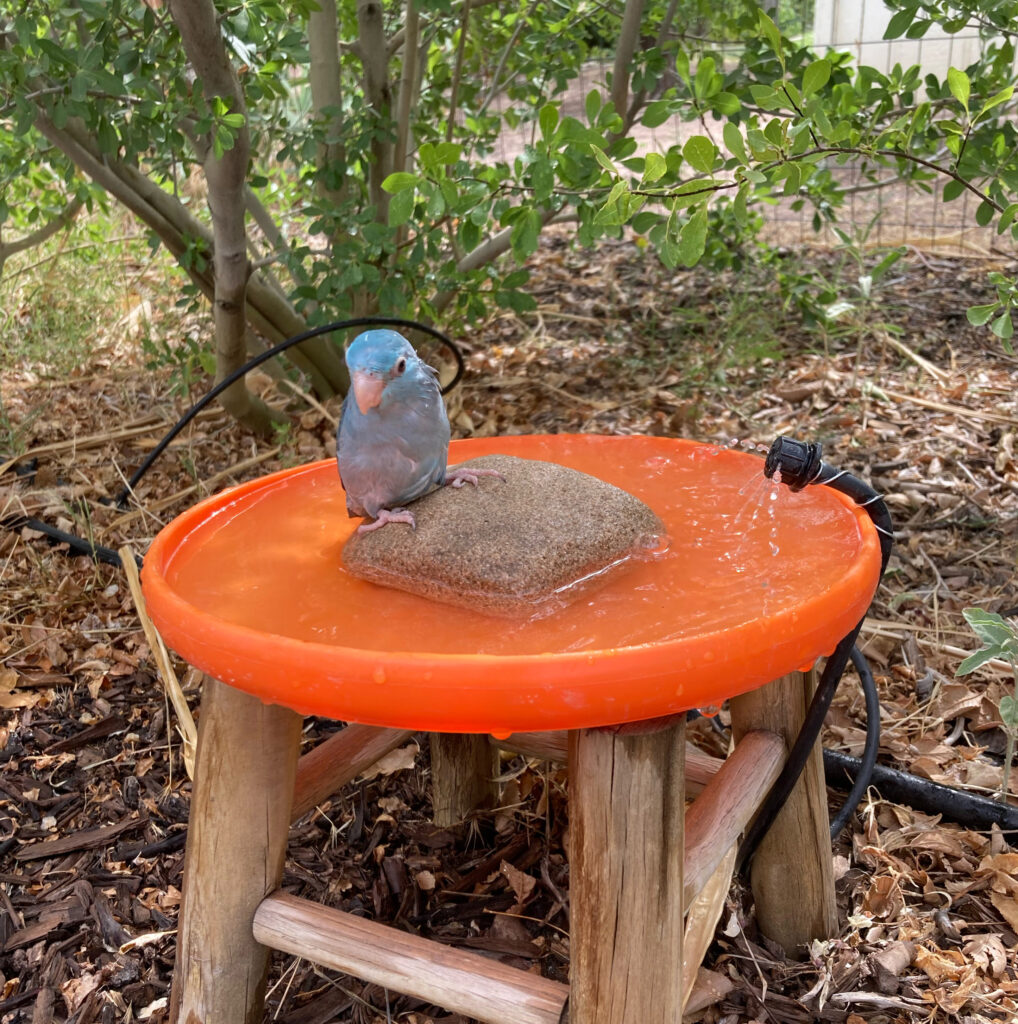
An intention like this can shift our state of mind away from overwhelm and into a place of gratitude and caring. From this place, we’ll make better gardening decisions. We might notice that the birds need more water and fill an old Frisbee with water and put a rock in it. We might start giving ourselves the space to be imperfect in our gardening. We might begin to see ourselves more as a caretaker of the space and less as the “owner” — ”our” garden becomes “the” garden.
The inner garden and the home garden have a profound and interdependent relationship. As we tend both of them together, we cultivate a deeper resilience in both gardens. This adaptation and flexibility then ripple from our own hearts out into the world, so in need of our tending and care.
Learn more about specific types of gardening here: