Simple Steps to Get Started Designing Your Yard
A lot goes into designing a landscape, hence there’s an entire profession called landscape architecture devoted to designing outdoor spaces. We won’t be able to make you a landscape architect today, but we’re sharing six steps to get you started on a great landscape design.
- Brainstorm what you want in your yard.
Think of this as a “brain dump,” which simply means you’ll transfer to paper all the things you are considering, imagining, and dreaming of for your yard. First, find a window that looks out onto a part of your yard. Set up a chair there, grab a pen, clear your mind and set a timer for five minutes. Now write down anything and everything that comes into your head that involves your yard. Ready, set, go.
- Make a plan.
As the old saying goes, “All good things start with a plan.” It’s true! Think about how you approach your job; more than likely you have a general strategy about the steps you are going to take to perform the tasks on your to-do list. It’s the same with your yard: Developing a plan will save you time and money, and is more likely to result in a successful end product.
What is a plan? When it comes to landscapes, a plan is a scaled drawing showing your yard from a top-down perspective. To make sure the dimensions are accurate, it’s helpful to start with a “map” of your existing yard. You can use either a scaled aerial photograph or a surveyor’s plat drawing of the lot on which your house sits, or both.
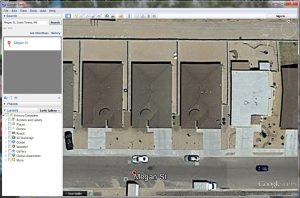
Scaled aerial photograph. Numerous websites provide free aerial photography. Google Earth Pro, which can be downloaded for free, allows you to measure distances and save snapshots of satellite photography with a scale bar included. Though this next step will be a challenge, the aerial photograph can then be opened in a program like Microsoft Paint where you can change the size of the photo and get it to a standard scale (like 1”=10’). Resizing the aerial photograph to a larger-than-normal page size, like 11”x17”, may make it possible to fit your entire property onto one sheet at the desired scale. Don’t forget that you can print large pages at a commercial print shop.
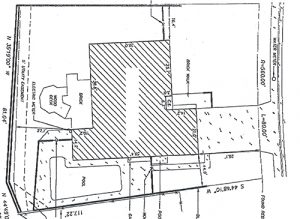
Surveyor’s plat drawing.What is a plat? It’s a map, drawn to scale, showing the divisions of a piece of land. This should be included in the huge pack of documents you received when you bought your home. It should show overall property boundaries, and basic dimensions of the home. It sometimes includes existing features such as driveways, and exterior structures like sheds. If it does not show these, you can use a tape measure to measure the structures and hardscape areas such as patios, driveways or sidewalks then note them in pencil on the survey plat.
Once you’ve got your aerial photograph or surveyor’s plat, you may want to buy a book of tracing paper, which is see-through and will enable your next steps.
- Take stock of what’s in your yard now
You’ve written down what you want to have in your yard, and you’ve got a photo or drawing showing the actual size of your landscape. Now you are ready to take stock of what’s already in your yard. Put a piece of tracing paper on top of your aerial photograph or plat plan, and head outside. You’ll want to populate your tracing paper with information on existing conditions like plant locations and names, patio positions, roof downspouts, and drainage patterns. Be sure to locate any special site features, identify problems such as erosion, excess runoff, ugliness and decline, and identify positive attributes such as a good view, a nice specimen plant or typical travel patterns.
You’ll want to note compass directions on your drawings, since we experience large temperature swings in New Mexico it’s important to note the different levels of sun exposure in your yard. Typically, the south side of your house will receive sun all day long. Compare this with the north side of your house, or northern exposure, where the ground is shaded most of the day. Once you understand the different microclimates of your yard you’ll be able to choose plants that grow best in those conditions.
It may be helpful to use multiple sheets of tracing paper that can be layered to create a full picture of your yard’s existing conditions. For help identifying underground utilities (like water lines) in your yard, call 811 (See https://www.pnm.com/call-before-you-dig1 for more information).
- Analyze your landscape -- do you have enough space for what you want?
Now that you have identified all the existing elements in your yard, you can reflect on how well those elements are working. Take some time to walk around your yard and think through all your existing elements and spaces. Keep these questions in mind: Why is this located here? How does this space relate to the others? What are the pros and cons of my existing spaces?
These questions will help you analyze your yard. Through that process you’ll discover constraints and opportunities for improvement.
- Research other landscape designs to get ideas for your yard
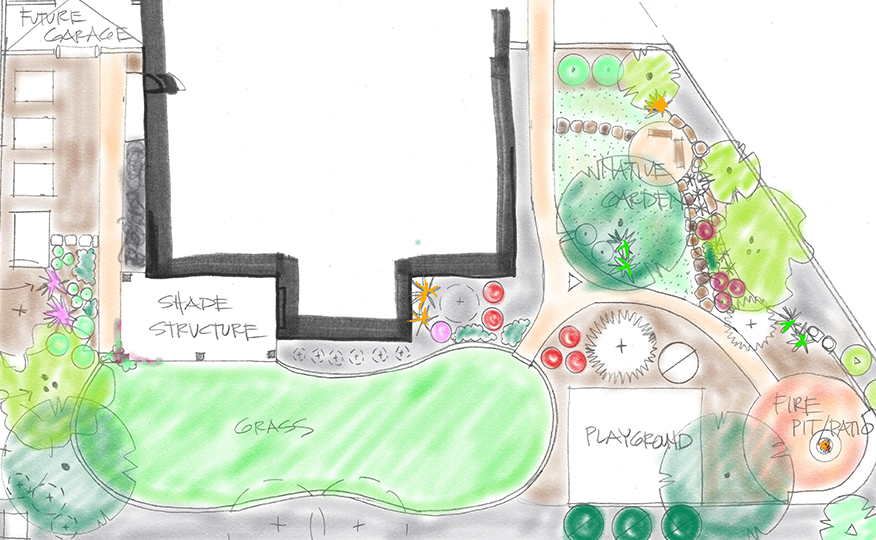
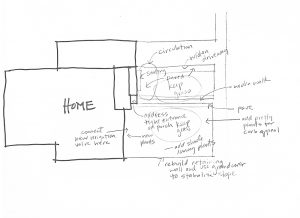
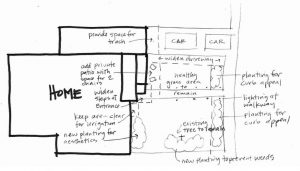
Now that you’ve done the hard work above it’s time to look at other people’s designs for some inspiration. The templates provided here were designed for the Water Authority by local landscape designer Judith Phillips, and landscape architects George Radnovich and David Cristiani. These templates can serve as thought-starters to guide homeowners in creating beautiful waterwise landscapes with color, logic, beauty and purpose.
You’ll want to read through each design and note the aspects of each that you like. Circle your favorite plants, materials and how they shape certain spaces. All of this will help inform your landscape design.
Landscape design templates
Judith Phillips creates vivid, striking plant arrangements with abundant textures and rotating, colorful perennials.
David Cristiani combines contouring with groundcovers, grasses, vines, shrubs and trees for a lush, green xeriscape year-round.
George Radnovich blends dramatic native and xeric plants for a spectacular lower-maintenance xeriscape.
Judith Phillips balances copious blooming perennials with intensely aromatic plants to attract abundant local wildlife.
David Cristiani fuses succulent textures and groupings that thrive in full sun and high heat for impressive visual impact.
George Radnovich orchestrates an elegant, simple mixture of ornamental plants and features for north-facing xeriscapes.
- Draw out your own design
Now it’s time to try this for yourself. Grab your list of wants from your “brain dump,” pull out your plans with all your notes, and lay out the design templates in front of you. A pen, pencil, rule or scale bar, and some tracing paper will be everything you need to start marking up your plan with your new design ideas.
This is the fun part, all the stuff you just brainstormed, inventoried, analyzed and learned can all come together to help you design a really great landscape. Draw out as many ideas as you like and have fun with it. You are now on your way to a beautiful yard!

Author: Jill Brown, ASLA Landscape Architect and owner of My Landscape Coach in Albuquerque, NM.