Compost is defined in the dictionary as “a mixture that consists largely of decayed organic matter and is used for fertilizing and conditioning land.” Some people call it black gold because adding to your garden can produce dark, crumbly soil that is like gold for your plants.
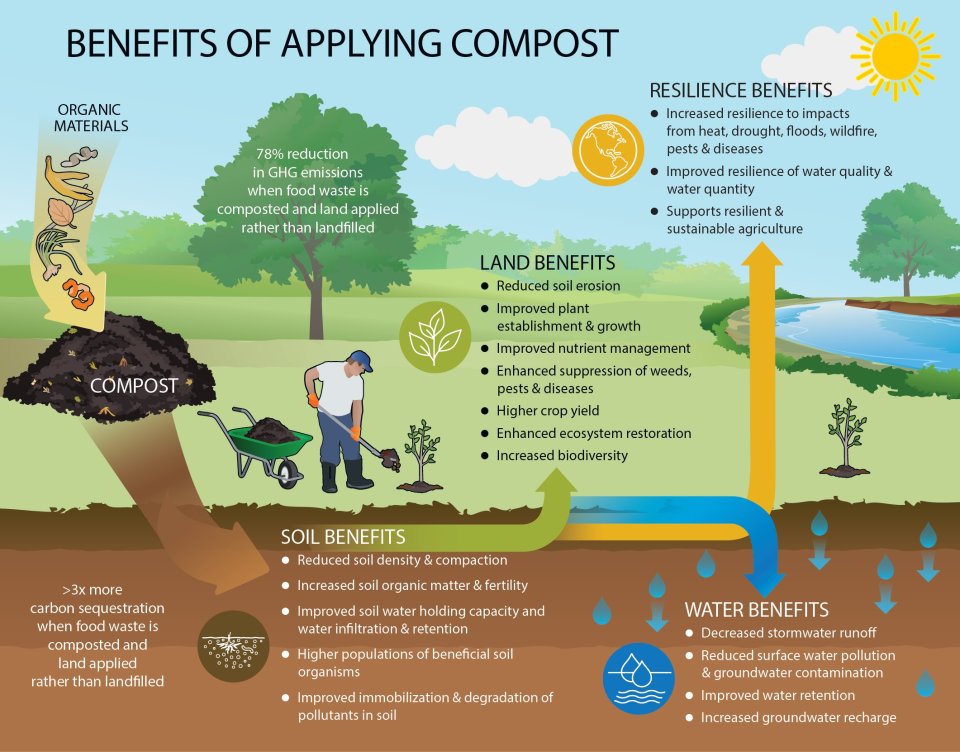
Courtesy of EPA.gov
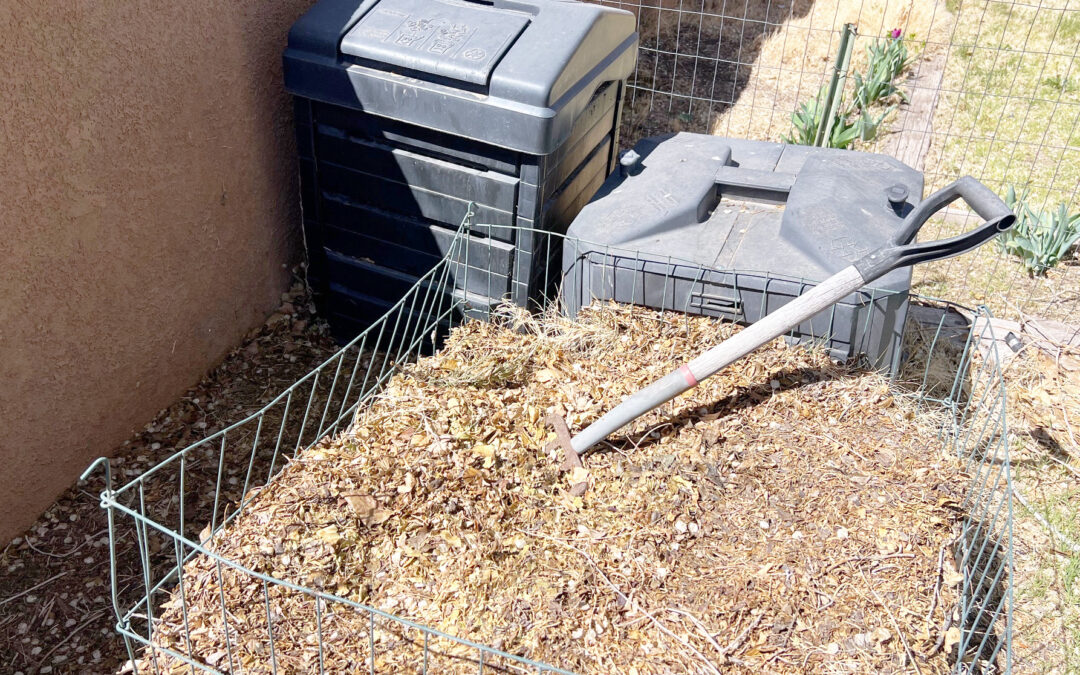
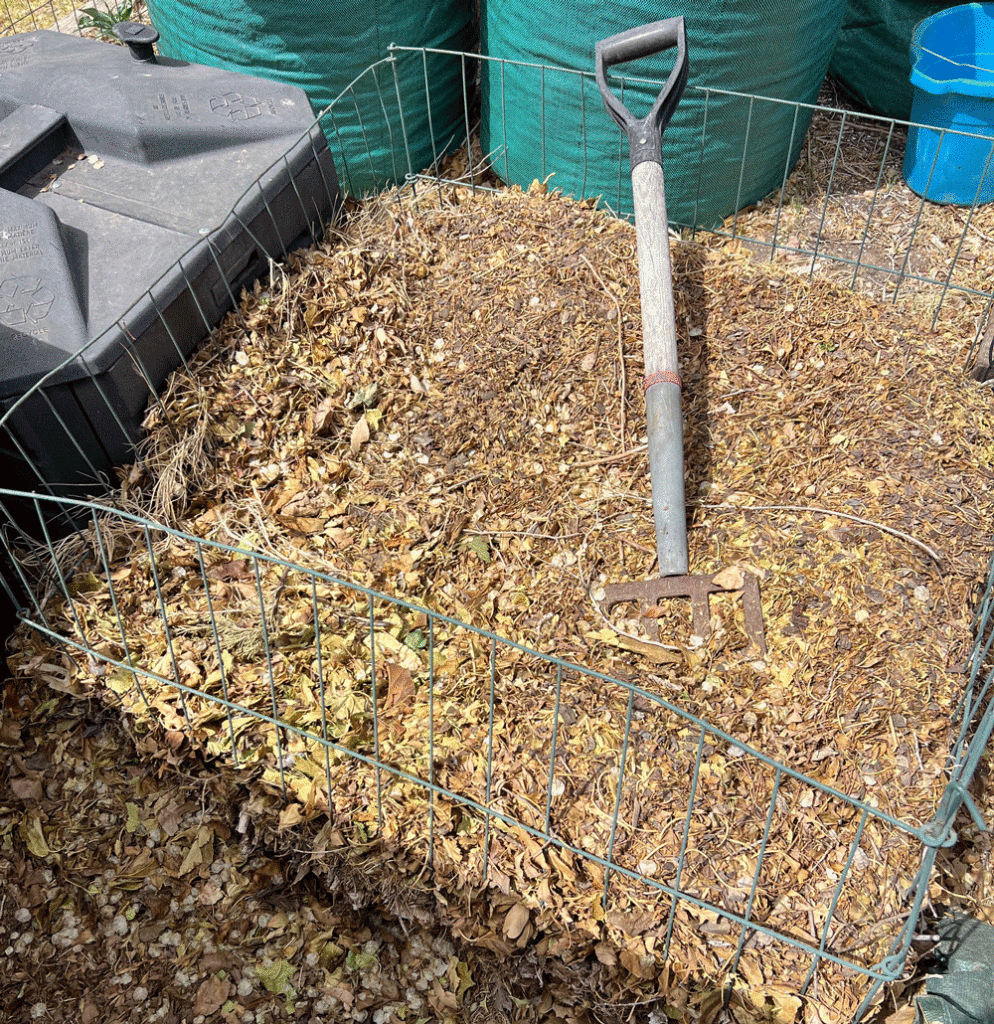
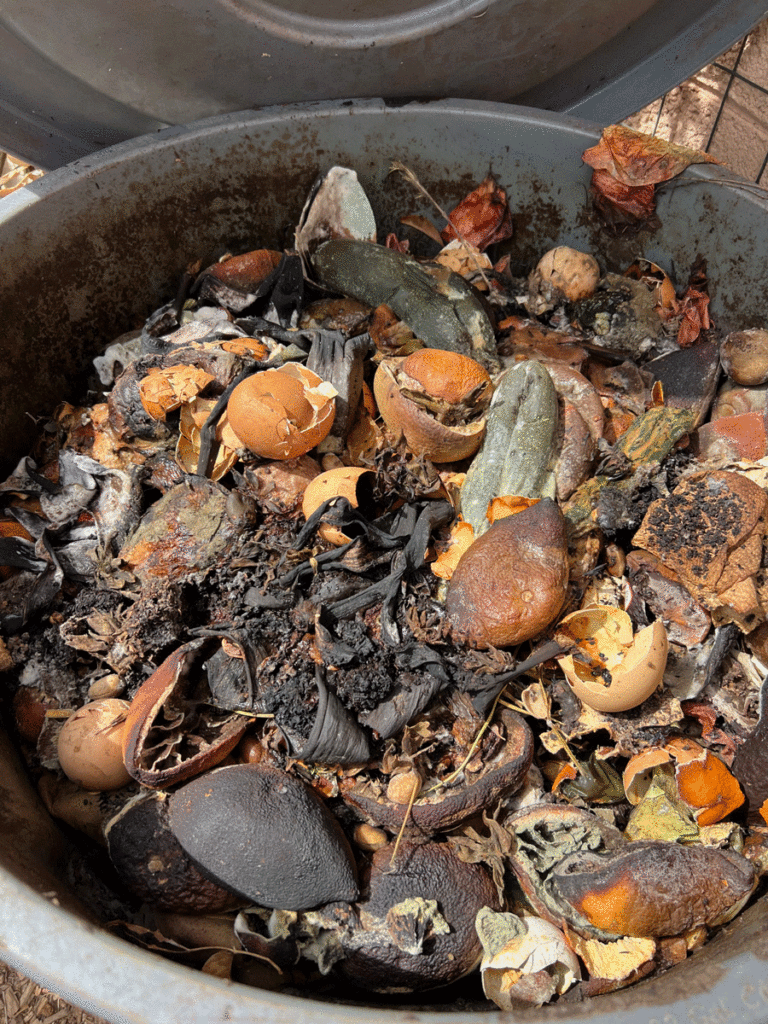
Composting requires three ingredients. The first is brown material from your yard like leaves, twigs and pinecones as well as newspapers, paper egg cartons, straw and so on. Green material, or food waste, is the second. For example, vegetable and fruit scraps, coffee grounds, crushed eggshells, or tea bags. The third is moisture — water goes a long way.
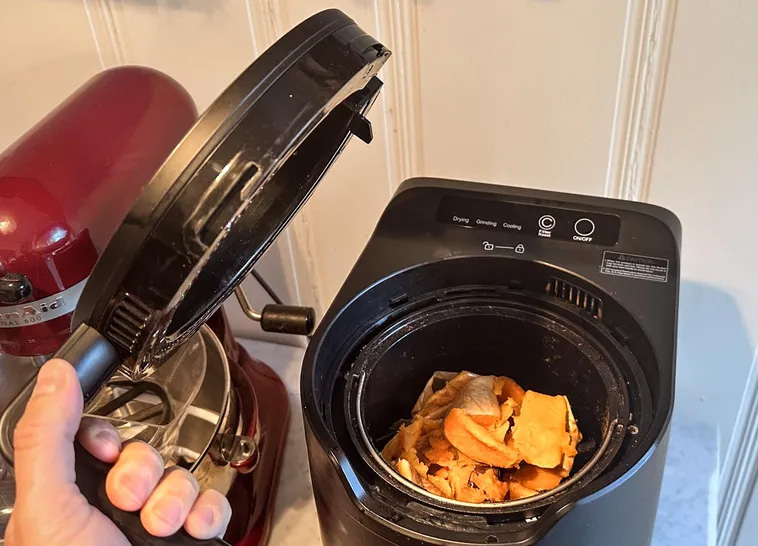
A new type of composter has hit the market: electric composters. These are simple indoor recycling machines that are plugged into the wall. The heat, grind and aerate food scraps to speed up the process, creating compost in a very short period. There are many types, some that sit on the counter and some that look like trash bins in your kitchen. One downside is that these machines can be pricey, ranging from $300 to $700.
Photo by Tomsguide.com
Composting Service
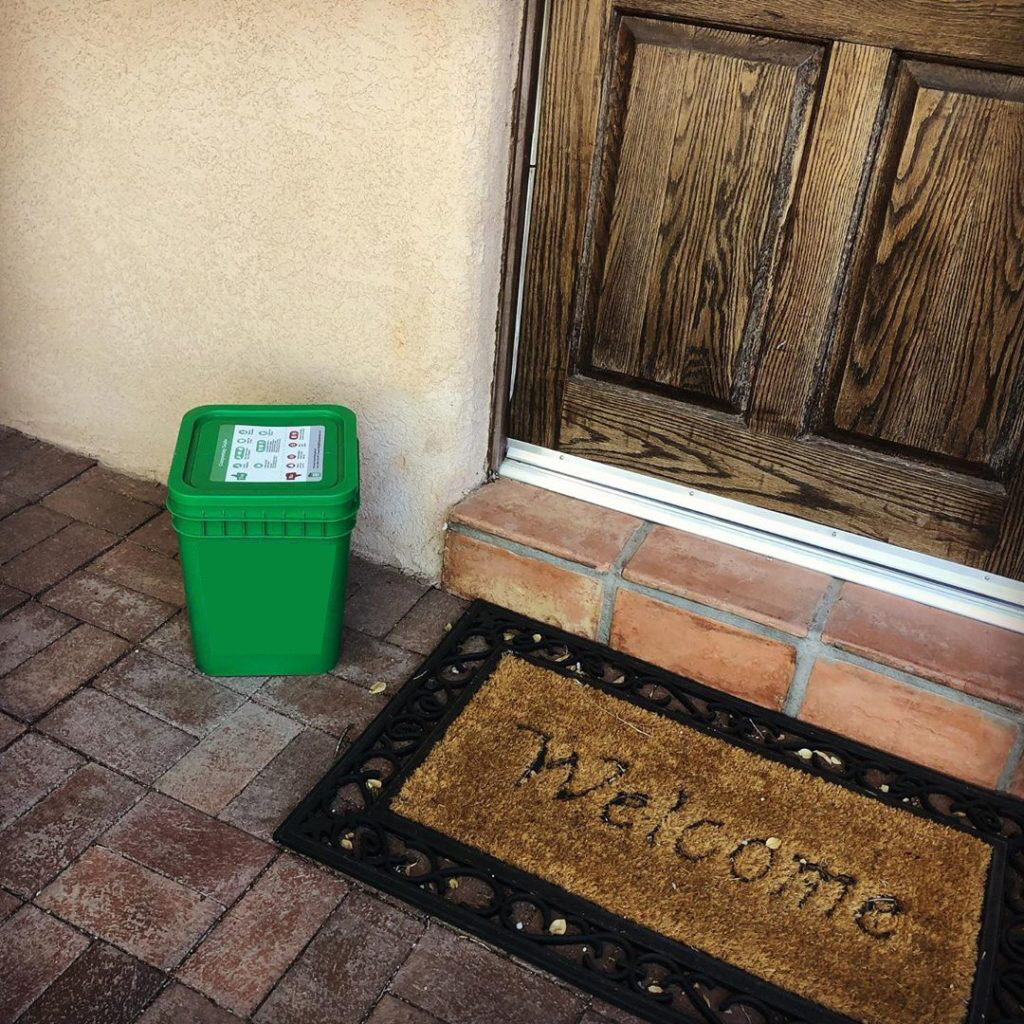
The last and perhaps the easiest method may be to drop all your food items into a bucket that you leave on your front porch. A service provider picks up the bucket and composts the material. You pay a monthly fee and after a bit you get compost delivered to your door. Prices are $22 a month for biweekly pickups.
The City of Albuquerque’s Sustainability Office is taking on Food Waste.Are you interested in diverting food scraps from the trash and turning it into compost to feed local soils? Please consider joining one of our community compost co-op sites.
Below are workshop options in April and early May.
Option 1: Take the compost science and hands-on learning classes.
Hands-on learning: Friday, April 25, 2-4pm at Barelas Senior Center’s community compost site. Note: We will plan more hands-on opportunities this summer.
Option 2: Learning Series at Barelas Senior Center.
Tuesday, April 22, 10:30-11:30am, Introduction to compost science and hands-on learning. Participants can choose a free plant!
AND
Tuesday, April 29, 10:30am-noon, Compost science, indoors. Register here.
AND
Tuesday, May 6, 10:30-11:30am, Hands-on learning.
Please help us spread the word about this opportunity to get involved in building healthy soils and community resilience. If you have questions, please email [email protected].
Author: Jill Brown, ASLA, is a landscape architect and owner of My Landscape Coach in Albuquerque. Have a question about the article? [email protected]
Just as we take shelter when the weather turns colder, so do your plants. This time of year, plants store most of their nutrients in their roots and find shelter in the ground. We can support this transition to help plants thrive during the entire winter season.
Also, it is time to give your irrigation system a rest. To avoid damage to your irrigation system we recommend setting it to the OFF position. Your next step will be to wait for a warm day to water deeply one more time and then take steps to winterize your irrigation system.
Follow this advice to ensure landscape success:
Turn off your irrigation system.
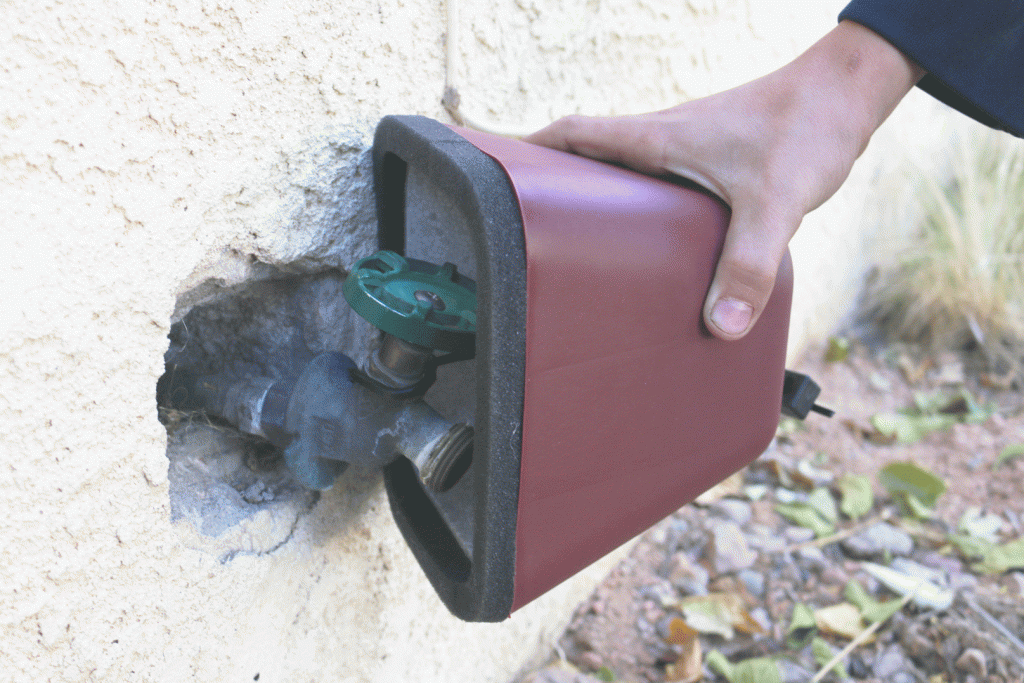
If your irrigation system is attached to an outdoor spigot, you should disconnect it and cover your hose bib using a faucet cover.
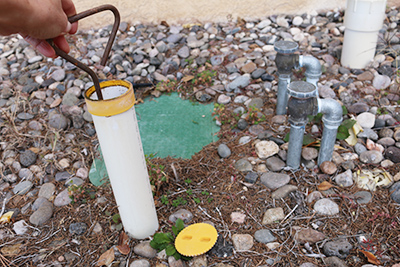
If you have a below-ground irrigation system, locate your shut-off valve (often hidden in a 3” PVC pipe; often with a white or yellow cap, as shown in the photo). Turn it to the right to shut it off. Be careful when turning so you do not break the valve.
Drain the water from all pipes, valves, and sprinkler heads. Learn more about protecting your irrigation system here.
It’s important to make sure your landscape stays healthy in the winter during times of drought. If we don’t get snow or rain, find a warm day once a month and deeply water your plants. After watering, set your system to the OFF position again.
How much should I water this November?
1-2 more times this month
Skip watering if it rains or snows
Give individual trees 100 gallons to a depth of 24 inches at least one time this month
Water turf for 7-10 minutes, to a depth of ½ inch”
Your outdoor water usage should be 80% less than in the summer season
How can I keep my landscape healthy this winter?
Turf
Mow your lawn to 2-2.5 inches tall. Grass left too long over the winter can develop brown patches.
Aerate next time it is warm. Aerating your lawn will give it a chance to breathe before the grass goes completely dormant. This also provides relief from any compaction that has built up during the warmer months.
Rake or blow off the leaves that have fallen on your lawn. Leaves that are left on the lawn could become moldy, which invites disease.
Top dress with compost. Compost acts as a fertilizer, adds moisture retention capacity and improves overall turf health.
Trees
Apply a thin layer of compost, about ½ inch, to provide nutrients.
Add mulch away from the trunk base, about 2 inches thick. Mulch helps maintain your ground at a constant temperature and helps retain moisture.
Water your trees thoroughly once a month, if needed, to support winter hardiness. Withholding water will not help the tree acclimate to winter.
Shrubs
Leave your leaves. Every autumn, leaves fall to the ground, sheltering the soil and beneficial organisms, returning organic matter back to the ground, and perpetuating the nutrient cycling essential for good plant health. This year, think about leaving those leaves in your garden by tucking them in around your shrubs. When we allow leaves to follow their natural life cycle, we can enjoy a colorful tapestry on our landscape as well as all the benefits provided by an organic mulch.
How do I avoid irrigation and other plumbing system damage? To avoid costly repairs, we recommend that homeowners take the following steps:
Find the master shutoff valve The master shutoff valve turns off the water to the entire house. If you have one, learn its location. This could be critical if a pipe bursts. Need an emergency turn-off? Call 842-WATR and select Option 1.
Insulate pipes and faucets in unheated areas Wrap exposed water pipes in unheated areas (such as a garage, basement, crawl space or space beneath your mobile home) with insulation or heat tape. Be sure to follow the manufacturer’s instructions carefully.
Seal off access doors, air vents and cracks Winter winds whistling through overlooked openings can quickly freeze exposed water pipes. DO NOT plug air vents used by your furnace or water heater.
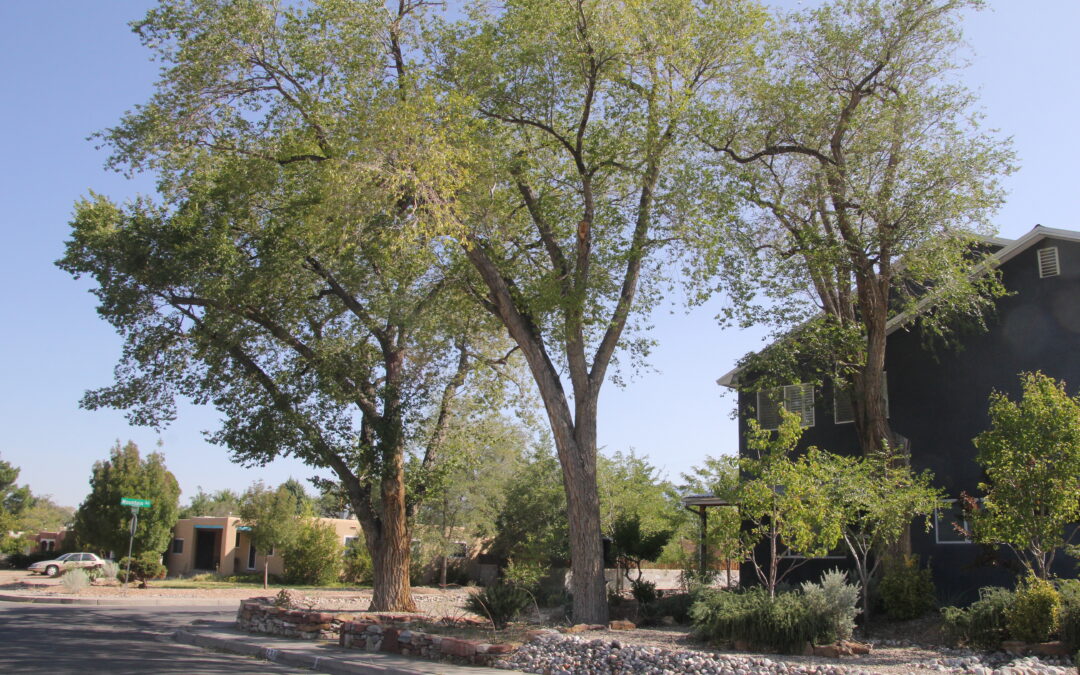
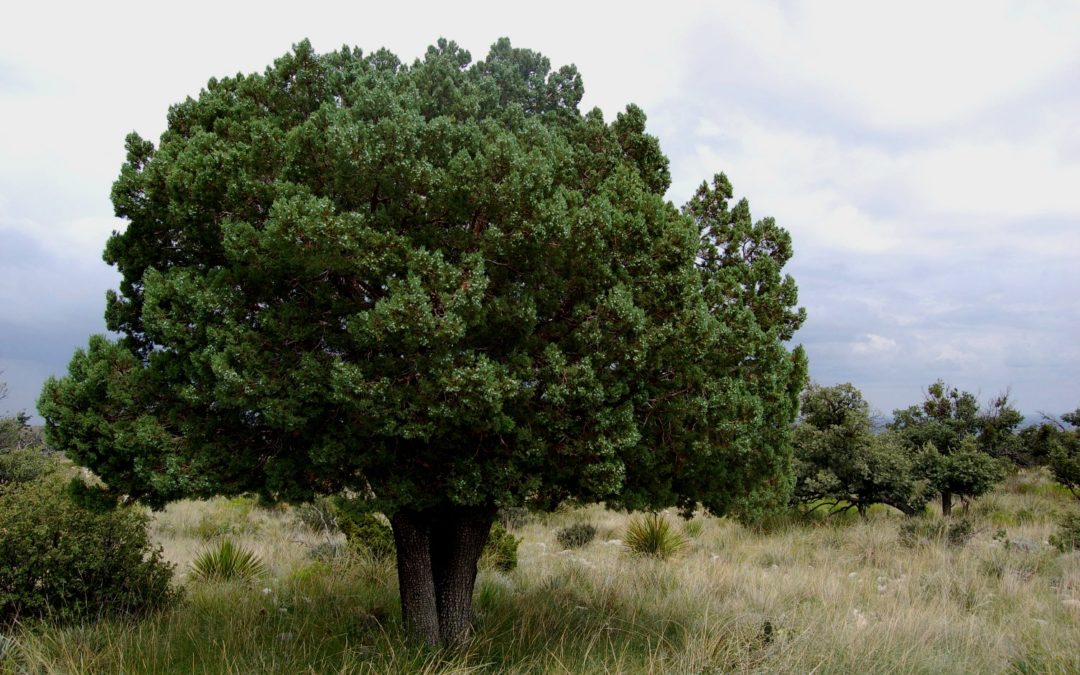
Trees are especially important in arid, urban environments like Albuquerque and Bernalillo County. They provide shade, mitigate urban heat, reduce greenhouse gasses and air pollution, and create wildlife habitat, among many other benefits. All trees, even climate-resilient and drought tolerant species, need to be watered adequately.
It’s worth the investment to keep our mature trees healthy. The mature trees on your property are worth much more than the cost of your treasured appliances and, yes, even more than your roof. Keeping our trees healthy and happy over their lifetime is a minimal investment and a valuable contribution to our community urban forest.
In Albuquerque, we tend to overwater our lawns and underwater our trees. It’s important to understand the basics of how best to water trees. For instance, a tree has two different main types of roots. The feeder roots lie within the first 6-24”of the ground, and the stabilizer roots can be at least 3’ deep You may think your trees’ roots can reach the water table, but you should think again — most of Albuquerque has a water table between 20 and 150 feet’ deep. Your roots are never getting that deep.
Due to the importance of our urban forest and how many people are seeking guidance on how to water their trees, the Bernalillo County Water Conservation Program, and Let’s Plant Albuquerque, partners collaborated to create this How to Build an Efficient Tree Watering System guide and the associated workshops.
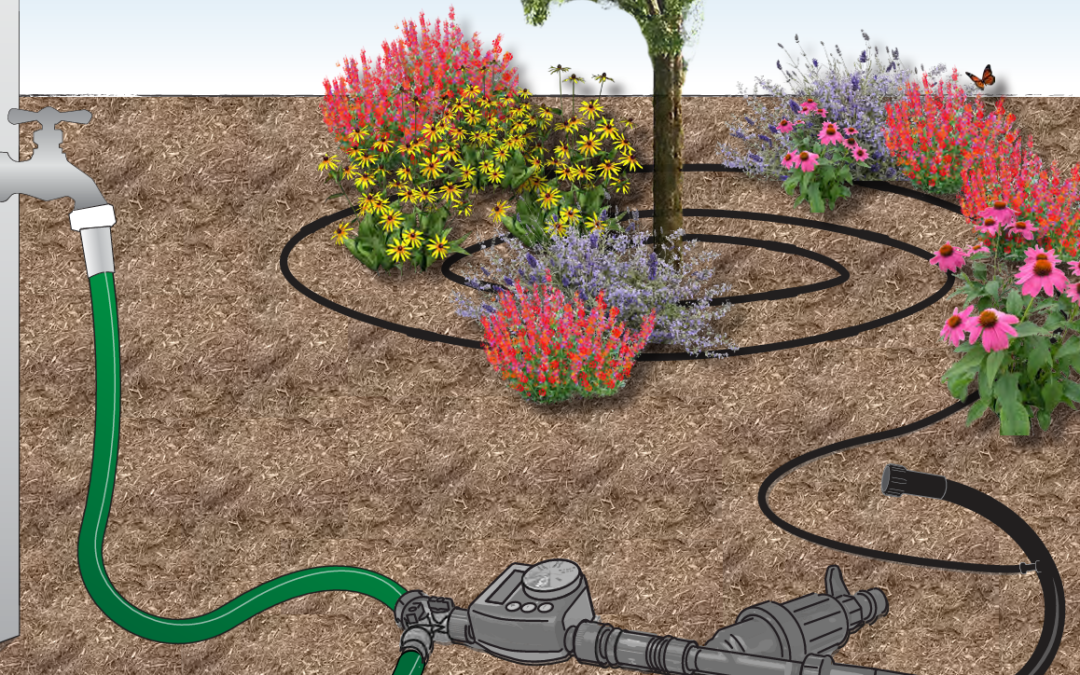
The tree irrigation system is inexpensive, flexible, easy to install and long-lasting. It uses drip irrigation attached to your hose bib and can be easily expanded as your tree matures.
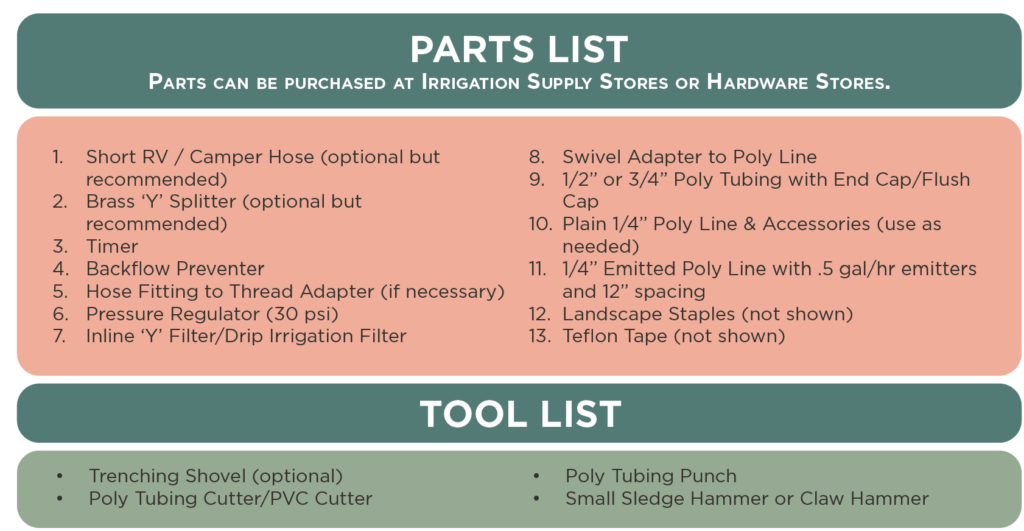
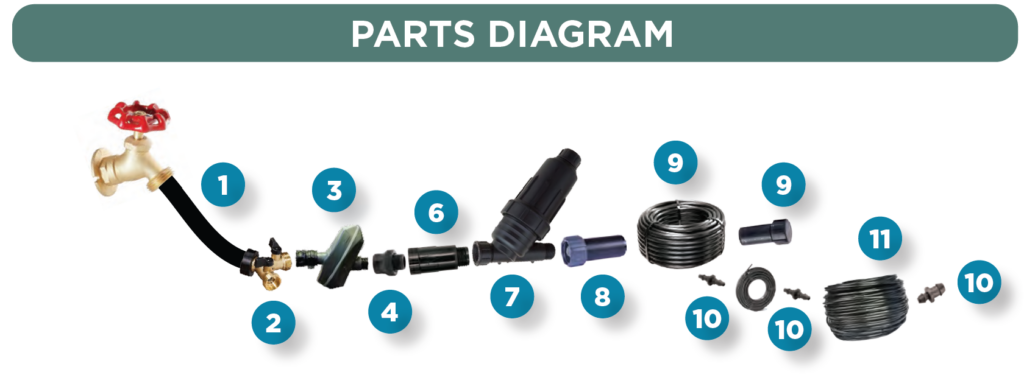
When assembling your system there are a few key parts to consider:
Teflon tape is needed to seal the threads at every connection to prevent water coming through.
Take note of the two different types of threads: hose threads and pipe threads. Hose threads are straight and require a washer to seal. Pipe and coupling threads are tapered for water use and will seal with just the application of Teflon thread seal tape.
Timers should be uninstalled and stored with the batteries removed over the winter. Some people like to install fresh batteries every spring to ensure there is no interruption during the growing season.
A pressure regulator is important for all drip systems due to the high pressure in our Albuquerque water lines. The regulator reduces the water pressure coming in from the main water supply. Then, it creates a constant low water pressure through the system, allowing the drip tubing to put out the correct volume of water per minute.
Distribution (lateral line) drip tubing comes in two general sizes, and each has advantages and limitations:
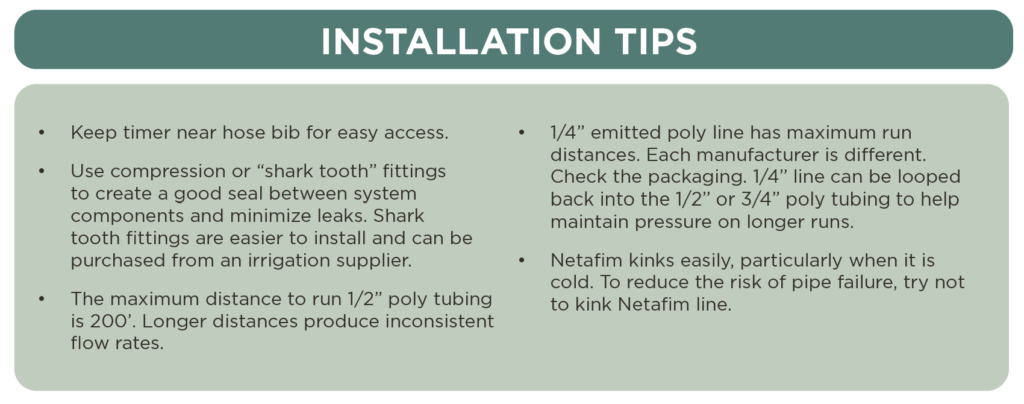
1/2” tubing is more common, and parts are available at big box stores. The run of distribution tubing must be less than 200 feet.
¾” tubing is available from irrigation supply stores. It holds pressure better, and tubing runs can be up to 600 feet.
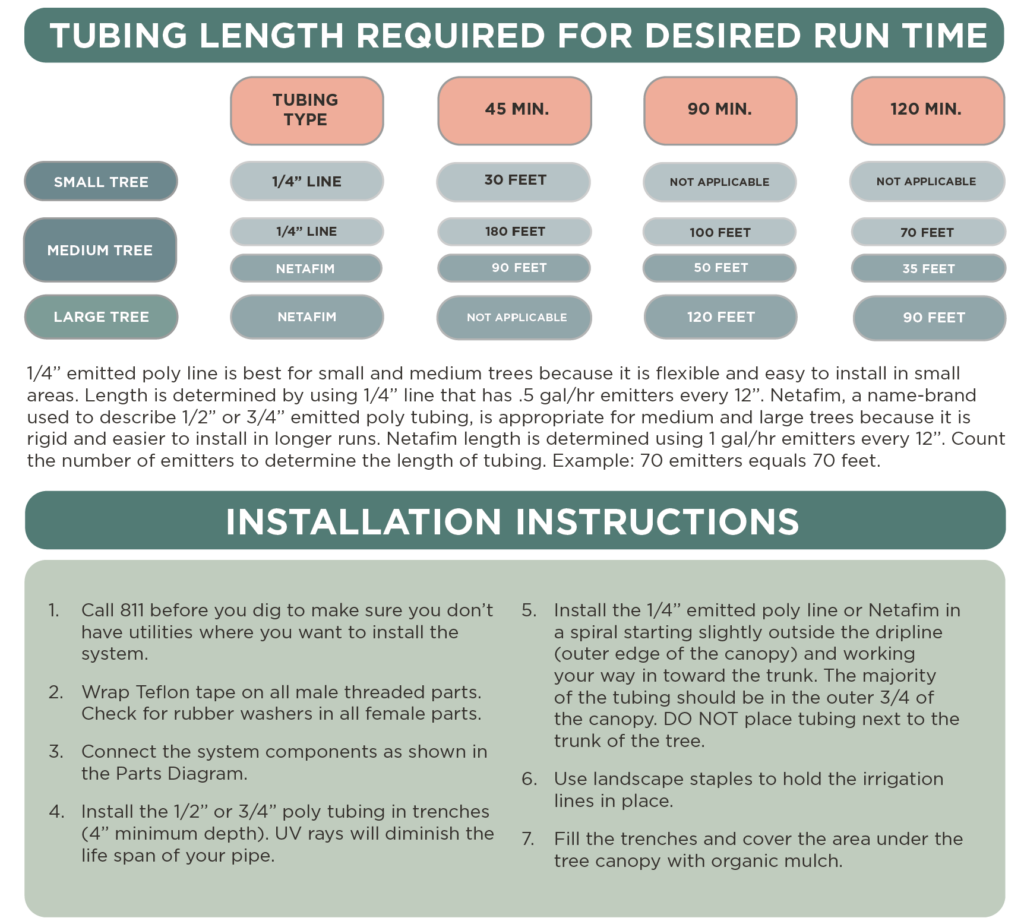
Inline drip line (emitter line) drip tubing comes in two sizes and includes drip emitters pre-installed in the line every 6”, 12” or 18”.
½” Netafim inline dripline tubing for use around medium and large trees. Use 12” emitter spacing.
¼” Netafim inline dripline tubing for use around small trees. Use 6” emitter spacing.
A flush type of end cap is handy for flushing out the system at season start-up or if a break occurs. It is recommended to remove and store flush caps over the winter.
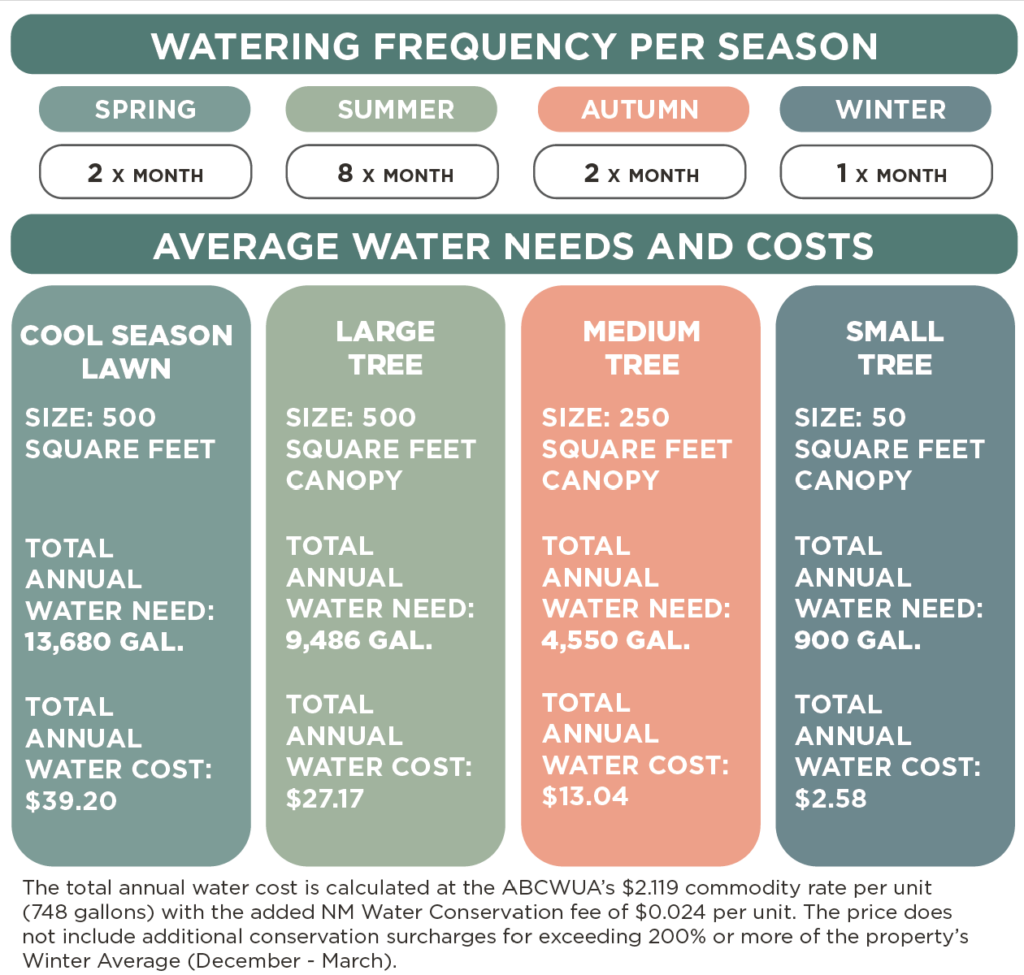
The watering guidance for the system was developed to not under or over water most trees in Albuquerque. However, irrigation is highly dependent on site conditions such as soil type and microclimate as well as the species of tree. This guidance is meant to be a rule of thumb or starting point, and adjustments should be made based on the local conditions and tree species.
Below are some of the factors that should be considered in generating a watering schedule for your yard:
Soils affect how often and how long you need to water — see the Water Authority’s Irrigation Guide for more details. In general, sandy soils require shorter but more frequent run times while clay soils need longer but less frequent run times.
Always check your plants to evaluate irrigation scheduling. Most plants will look a little bedraggled at 3 p.m. during the summer so check in the morning. Do they seem wilted or pale or have cupped leaves? These can be signs your tree needs more water.
Be aware that symptoms of overwatering and underwatering may look similar.
Occasionally, feel the soil the day after irrigating or use a soil probe such as a screwdriver or coat hanger to evaluate the level of moisture in the soil. If the probe is easy to push in and there is a swampy smell, the soil has too much water. If you can’t get the soil probe more than 4” into the soil, it’s too dry. Ideally, the soil probe can be pushed 12”-18” into the soil 24-48 hours after irrigating.
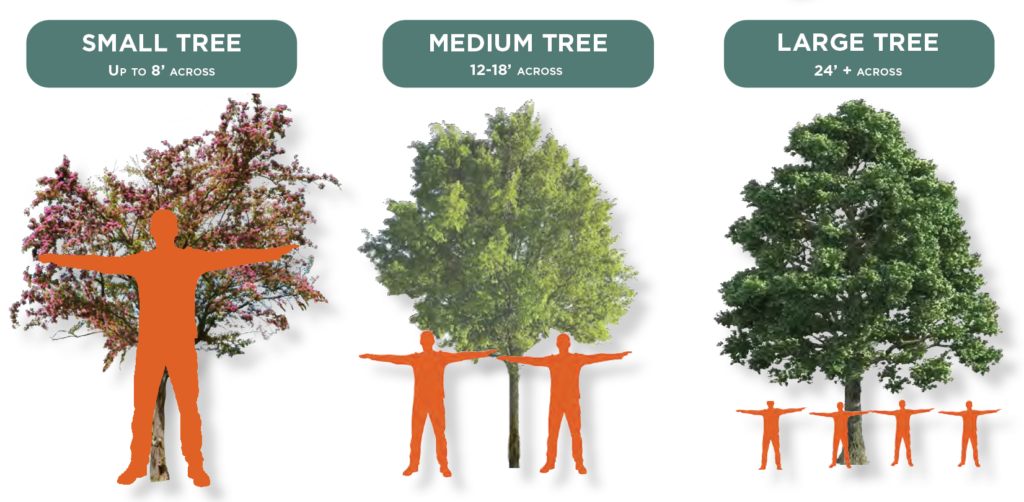
Consider what size tree you are trying to water. Check out the diagrams above and below to determine how much tube length you will need to meet the required water needs of your tree.
Author: Megan Marsee is the Water Conservation Program Lead for Bernalillo County and can be reached at [email protected] Have a question about the article? [email protected]
Nothing adds the same quality and value to a landscape as a healthy mature tree. The benefits include cooler outdoor spaces, cooler homes, aesthetic appeal, carbon capture, stormwater mitigation and more. There are some key things to think about when it comes to keeping your big old tree happy.
What are the key parts of the tree and what do they do? All the parts are important, many are redundant, and how they play together really matters. The redundant parts are leaves, small branches and small roots underground. While critical for tree health, the tree can lose some of any of these without suffering fatal damage; the tree will, with time and to the best of its ability, replace those lost parts with new growth.
The fine roots explore for water and minerals in the soil, hopefully with the help of symbiotic soil fungi. Only the youngest, smallest roots (those that haven’t even grown bark yet) take in water, like tiny sponges. These roots grow when and where soil moisture is available and die off when the soil gets too dry. Trees may have several flushes of absorbing roots growing and dying back over a season. Once in the roots, water moves up successively larger roots as it travels toward the stem.
There is one part of the tree that is not redundant. This is the root crown, or root flare, where the ropy wood of the root system changes into the blocky wood of the stem. The happiest, healthiest trees have a strong root flare visible above the soil line. These root shoulders act like buttress supports for the huge load of wood and foliage being acted on by gravity and wind.
As water moves up the trunk, it travels in sapwood (or xylem) — living wood just underneath the bark layers. Outside the sapwood is a thin ring called the cambium, cells that make new cells that make new cells … for as long as the tree lives. Outside that layer is the inner bark (or phloem), a green spongy layer with many functions, including moving sugars and other metabolites from the leaves to wherever they need to go. These three layers — xylem, cambium and phloem — constitute the “living rind” of the tree and are protected by the dead but intact outer bark layers. The central wood, or heartwood, is dead but intact as well.
Leaves out at the end of the small branches are busy converting sunlight energy into stored chemical energy in the form of sugars. These are then used as fuel and as building blocks for the tree to power its ongoing life functions and make the complex chemicals needed to do so.
What harms a tree? Things that harm the root system (soil compaction, drought, heat, chemicals), things that damage the root flare (stem girdling roots, mowers, construction), things that damage the living rind (wire girdling, kids with hatchets, vehicles) and things that damage leaves (over pruning, certain herbicides, heat). There are feedback loops, especially between the roots and the leaves. Root damage that reduces water uptake leads to leaves making less sugar which means less resource to grow new roots. Herbicide damage that deforms leaves leads to less sugar feeding root function as well as less pull on the water, both leading to less water and nutrient uptake going back to the leaves.
So, here’s what you do: Avoid those harmful things!
Protect roots by covering the soil with 3 or 4 inches of arborists’ wood chips. This cools soil, reduces soil water loss, cools air above, breaks down and feeds minerals into the soil, and promotes growth of beneficial soil fungi. Avoid cutting roots when possible; when necessary, cut as few as possible and cut as far from the trunk as possible. Don’t compact soil by dumping gravel all over it or parking on it. Don’t apply herbicides to the root zone, which is larger than the canopy above.
Protect the leaves by avoiding over pruning. Most mature trees don’t need regular pruning, and, in fact, that should be avoided. Pruning takes away energy sources (leaves) and creates energy sinks (wounds that must be dealt with). Excessive pruning can send a tree into a starvation spiral. Prune for specific goals. Avoid herbicides like those found in weed-n-feed fertilizers.
Protect the living rind by taking away Junior’s hatchet. More seriously, don’t tie wires or ropes around the trunk and branches unless you check them every year to make sure they aren’t girdling the tree. Lastly, don’t run into them with your car!
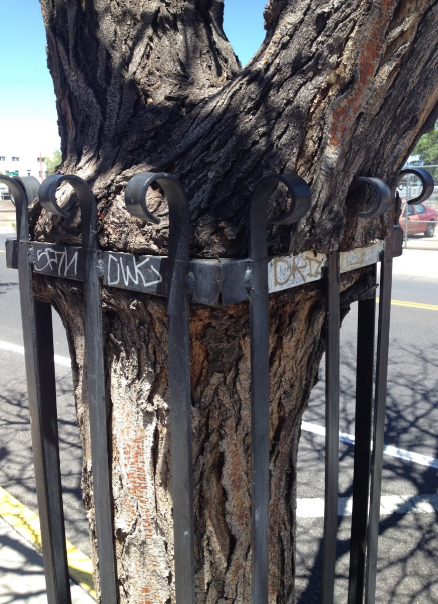
A tree-protection cage which has become a tree strangling cage. Severely stunted growth on an ash tree; imazapyr herbicide damage is likely cause.Construction damage, while often unavoidable, will lead to health decline in mature trees.
Have you ever heard of forensic arboriculture? Probably not … but it is a thing! Figuring out why trees die can be a challenge as there are often multiple causes, and the clues may be obscured by time or a deep layer of rock mulch. If you look at enough dead and dying trees, though, patterns begin to emerge.
In our desert environment, one major overarching cause of tree death is thirst. Most of the trees we plant are not native, at least not to the desert grasslands that make up the native ecosystem throughout most of our region. Since these trees are native to regions with higher natural rainfall, we must make up the difference through irrigation.
Some trees die of thirst simply because there is not enough water in their root zones to supply the trees’ needs. Drought symptoms might include smaller leaves and less-dense canopies, dead twigs in the outer canopy, and droopy foliage. Because it takes a few years for trees to really show stress, it will take a few more years for them to show a strong response to improved conditions — but they will!
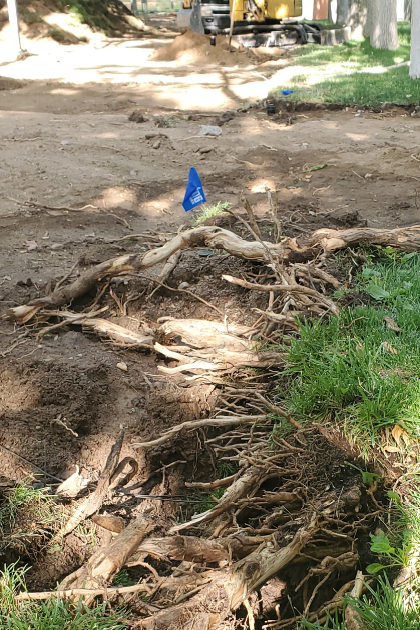
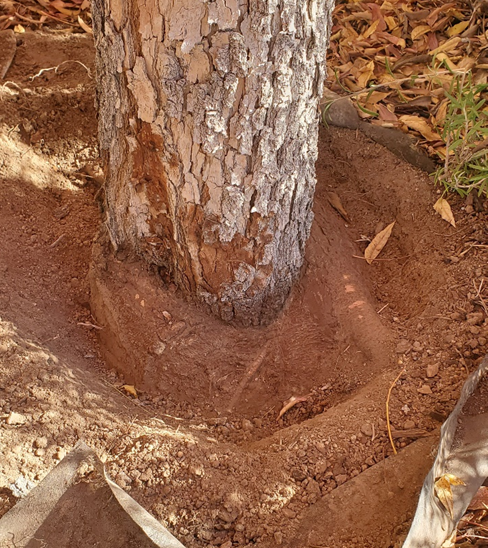
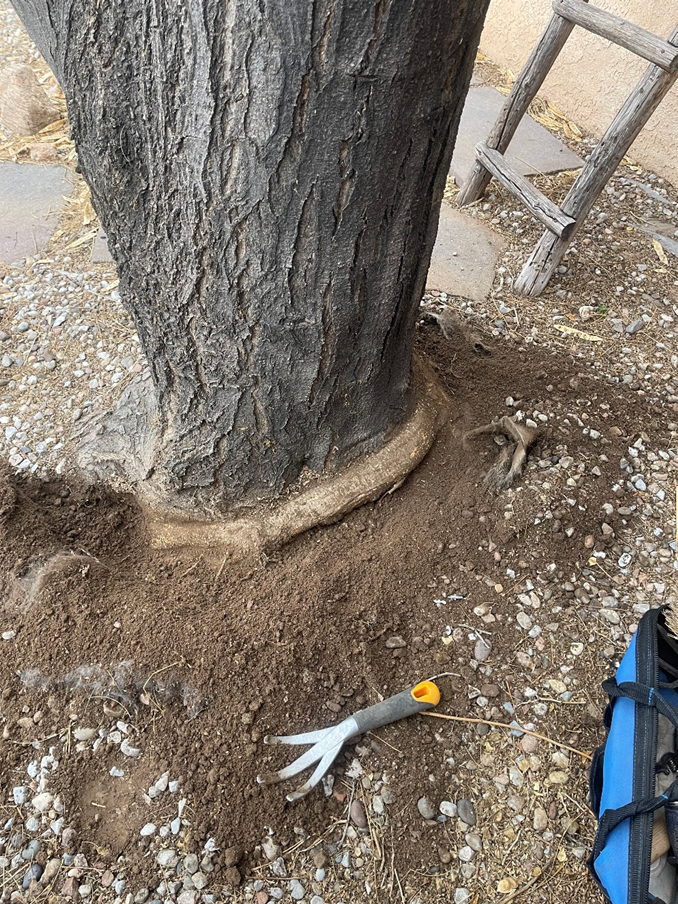
They will … assuming there aren’t other issues. One of the more common causes of drought stress, and possibly death, in trees is the presence of stem girdling roots. These are roots, usually from that same tree, that grow in a tight noose around the lower stem, just below ground level. Roots grow that way when they spend too long in a nursery pot or when they are only irrigated right at the very base of the tree. However these girdling roots start, they often end up causing a “choke point” where the trees’ vascular tissues are gradually crushed and the flow of energy-rich sap to the roots is reduced, as is the flow of life-sustaining water up to the leaves.
Stem girdling roots can be removed at planting, or even later if they are found. A sharp wood chisel often does the trick. Making sure trees are not planted too deeply is a great way to avoid creating stem girdling root problems. Many landscape trees are planted too deeply, which is rarely fatal on its own but can stunt growth, as well as setting up stem girdling roots.
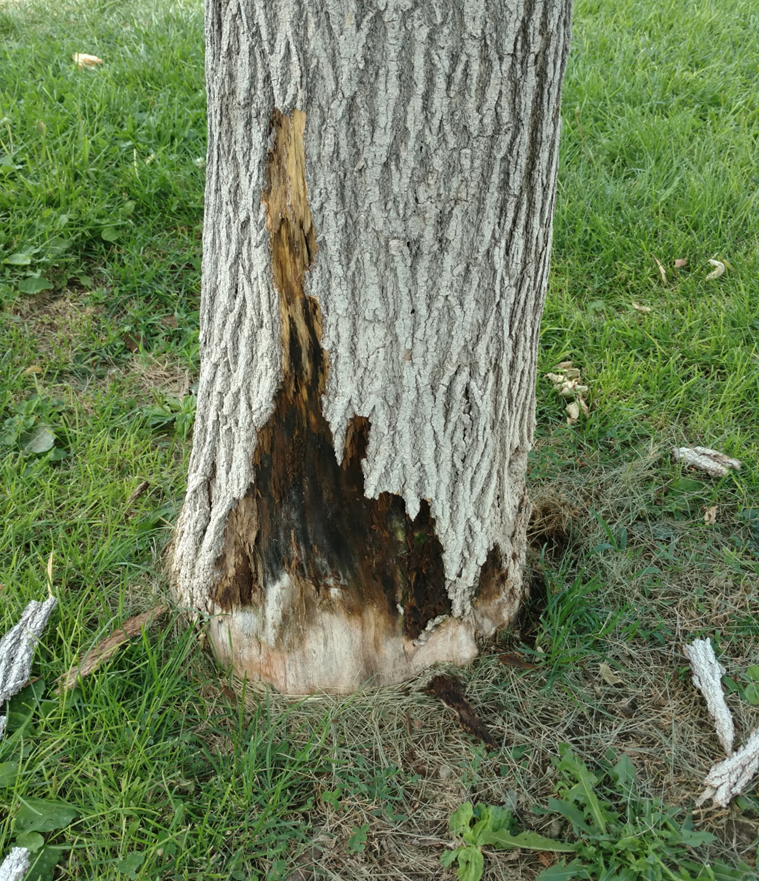
Other kinds of girdling can kill a tree. All too often, mostly in public and large commercial landscapes, we find young, recently planted trees with large wounds just above soil level. These are wounds that have taken off the bark, leaving bare wood exposed to the elements. Any time a tree is wounded this way, it’s “living rind” of inner bark, cambium and sapwood are greatly compromised. The wound also exposes the inner wood to decay, so that if the tree doesn’t die quickly due to the destruction of the living rind, it runs the risk of breaking at the base when the decay cavity gets too big. By then, the tree may have some size and so present a real risk to people and their important things — cars, houses and such.
Another avoidable cause of tree death is poisoning with herbicides. In this time of instant gratification and “convenience is king” thinking, people often react to the presence of a few unwanted plants by applying a lot of chemicals to kill those plants. Often, tree roots grow in the treated areas and take in sublethal to lethal doses of herbicides. This happens in public spaces, commercial spaces, residential spaces … we could all be a lot more careful with our chemical use!
Herbicide damage usually reveals itself as weirdly deformed, often very stunted, leaf growth. These distorted leaves cannot capture enough carbon through photosynthesis to keep the tree healthy, so decline follows, with death nipping at its buds. Trees may recover from a one-time application, but repeated applications across seasons and years may well lead to death.
Large stem-girdling root on a young Chinese pistache which was dying and had to be removed.
Keep your trees alive and healthy with these simple steps. First, make sure the tree doesn’t have a stem girdling root problem. This requires carefully digging around the base until you find the main root flare, and cutting away roots that are circling tightly around the stem. Then, make sure nothing else damages that lower trunk area, keeping that outer bark intact and protecting the living rind below. Finally, make sure your irrigation system is adequate. Established trees need water broadly out under the canopy, and even beyond, but not so much at the very base.
Large stem girdling root at the base of a honey locust tree. Prompt removal of the root is recommended. Mower or string trimmer damage to a young tree. This will lead to decay and disease entering the very base of the stem.
Why is it important to compost? Between 30 and 50 percent of residential waste could be composted instead of put in a landfill, which would reduce the volume of trash and the production of greenhouse gas. Compost is nature’s way of recycling nutrients by using microbes to help break down organic material. The end result is a nutrient-rich soil amendment with an earthy aroma that improves soil and plant health and can eliminate the need for fertilizers.
If you have limited outdoor space for composting, consider the Bokashi bucket method or explore other options. There are also community-based composting programs in Albuquerque. To find a composting option in your area, simply enter “composting near me” into your Internet search engine.
The Four Required Elements for Backyard Bin Composting
Moisture (water) to sustain the microbial life
Nitrogen-rich materials, also referred to as “greens,” that heat up the compost pile to create ideal conditions for decomposition
Carbon-rich materials, or “browns,” that provide food for the microorganisms and help balance the green materials
Oxygen to maintain aerobic conditions necessary for the desired microbes
What Can be Composted?
Greens (Nitrogen)
Browns (Carbon)
Food and vegetable scraps
Dry leaves
Grass clippings and yard trim
Shredded straw or hay
Coffee grounds and paper filters
Shredded paper (non-glossy, not colored)
Paper tea bags
Shredded cardboard (no wax coating, tape or glue)
Eggshells
Sawdust
Bread and grains
Wood chips
Fruit or fruit peels (limit citrus)
Paper towels and towel rolls
Keep These Items Out of Your Compost
Meat, fish and bones
Dairy products
Pet waste or cat litter
Stickers left on produce
Fats, oils and greases
Aggressive weeds or weeds with seeds*
*Certain carefully-maintained compost techniques can kill seeds
How to Bin Compost
Collect and store materials. An easy way to collect food scraps (greens) is to use a dedicated, washable container that can be stored under the sink or on the counter. When preparing meals, place scraps into this container. To avoid smells and pests, store the container in your fridge or freezer until you are ready to build or add to your pile. Browns, like leaves and wood chips, can be collected throughout the year and set aside until needed.
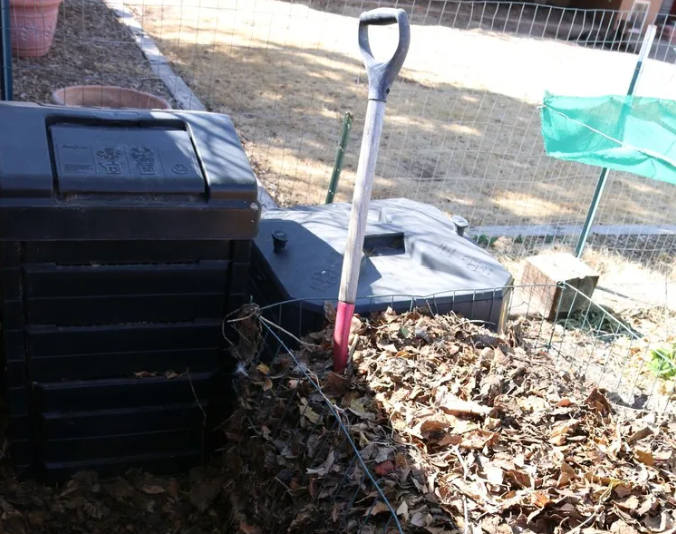
Select a space and then build or buy a bin. Choose a space outside that is dry, shady, within reach of a watering hose and easily accessible. Next, build a compost bin system or purchase a three-bin system, barrel or tumbler.
Prepare your browns and greens. Break large items into smaller pieces to speed up the process and create a more uniform product.
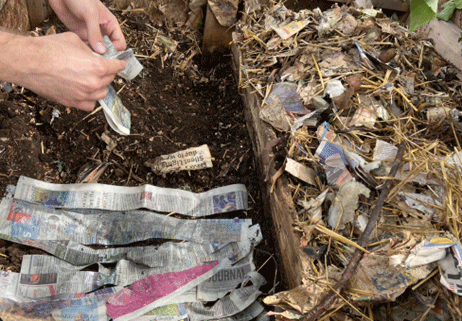
Build your pile. Start your bin with a 4 to 6-inch layer of large-sized brown material like twigs and wood chips. Then, layer greens and browns like you’re making lasagna at a ratio of two parts brown to one part green. Finally, add water to dampen the compost pile so it is moist but not soaked. *Tip: Squeeze a handful of the compost. If a few drops fall, it is moist. If water streams out, it is too wet.
Maintain the pile. As the material begins to decompose, the temperature will rise. Turn and mix your compost pile every few weeks so the decomposition process is sped up. Monitor the bin for moisture (damp, but not dripping) and odor (earthy, not stinky), and troubleshoot as needed.
Cure and use the finished compost. When there are no visible food scraps (except small pieces of eggshell), allow the compost pile to cure (sit unturned) for at least four weeks. If well-maintained, the whole process will take about three to five months.
Whether you decide to use a bin system, vermicompost or a different method, you will be turning waste into compost that builds healthy soils and sequesters carbon. To learn more about composting in New Mexico visit NM Master Composters and the NM Healthy Soil Working Group. Visit the City of Albuquerque for more information on the city’s sustainability efforts and tips for food waste prevention.