Passive rainwater harvesting is a great way to optimize your landscape while minimizing water use. So you may ask, “What are active and passive rainwater harvesting?”
Active rainwater harvesting involves collecting rainwater runoff from roofs and other impermeable surfaces into containers such as rain barrels or cisterns for later use. These containers can vary from small (50 gallons or less) to very large (thousands of gallons). The saved water can be distributed with a hose or drip system for use in the garden.
Passive rainwater harvesting channels water from roofs, patios or driveways directly into the landscape via swales (channels) into basins (depressions in the landscape) or into French drains where the water will be stored in the soil for use by the plants. For every 1,000 square feet of hard surface, 1 inch of rain will produce about 600 gallons of water, so it’s easy to see how active systems will produce overflow and why it’s always recommended to send that overflow into a passive rainwater harvesting system. This will lessen the amount of potable water you will need for your landscape while improving plant health.
So, what plants should you choose for your passive rainwater harvesting garden? First you need to realize there will be three different zones with different amounts of water available to the plants.
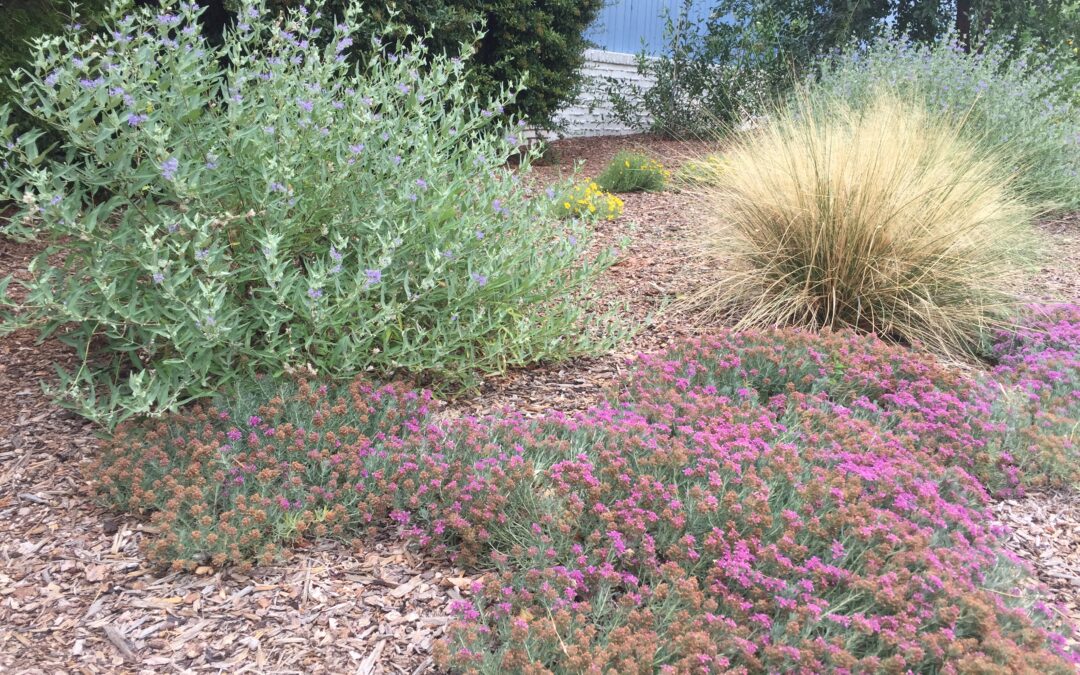
1. The High Ground Zone is the area around the outside perimeter of your basin or swale where there will be limited amounts of extra water available to the plants. This will be your most xeric (low water use) zone. Plants for this area could include:
Desert willow (Chilopsis linearis)
Grasses such as sideoats grama (Bouteloua curtipendula) or sand dropseed (Sporobolus crytandrus)
Desert four o’clock (Mirabilis multiflora) or blackfoot daisy (Melampodium leucanthum)
Sideoats Grama
2. The Transition Zone is partway up the sides of the swale or basin. Plants growing here will get some extra moisture but will not be at the low points of the basin or swale.
Escarpment live oak (Quercus fusiformus)
Grasses such as blue grama (Bouteloua gracilis) or little bluestem (Schizachryium scoparium)
Salvias such as autumn sage (Salvia greggii), Mexican blue sage (Salvia chamaedryoides) or Mexican red sage (Salvia darcyii), or dwarf goldenrod (Solidago sp.)
Escarpment Live OakLittle BluestemSalvia darcyii
3. The Inundation Zone will be the wettest area during large rain events. Only plants that can tolerate periods of standing water will work here. The basins can be enhanced with soil sponges to increase storage capacity and soil quality.
Netleaf hackberry (Celtis reticulata)
New Mexico olive (Forestiera neomexicana) or fernbush (Chamebatiaria milefolium)
Grasses such as giant sacaton (Sporobolus wrightii) or Indiangrass (Sorghastrum nutans)
Horsetail milkweed (Asclepius) or creeping germander (Teucrium chaemadrys)
Always make sure the sun or shade exposure needs of the plant match your site and remember that you will need to water these plants at least until established.
The word Mediterranean may bring to mind rows of lavender in southern France, an Italian villa or maybe a Spanish courtyard or Greek olive orchard. These areas around the Mediterranean Sea all share unique plants and garden design methods that are part of their allure in movies, marketing and as tourist destinations. Luckily for residents of the Albuquerque area, the mediterranean climate is similar enough to that of our high desert home that many mediterranean plants can be successfully grown here. (Note: There are other coastal areas of the world that are climatically so similar to the area around the Mediterranean Sea that they are also known as having mediterranean climates. These areas include parts of South Africa, Australia, Chile and California. A capital “M” is used for the Mediterranean place in the world, while a lowercase “m” refers to the climate that includes all five regions.)
Albuquerque has hot and increasingly dry summers, just like the Mediterranean. This means that plants from both places do best with deep watering to reach their deep, drought-adapted roots and a good layer of organic mulch to keep moisture in the soil. Most mediterranean plants prefer full sun, although a few can tolerate some shade. Mediterranean places tend to have soils with good drainage, so make sure to keep mediterranean plants away from any areas with clay or caliche.
There are, however, a few very important differences between Albuquerque and mediterranean climates. The most significant of these differences is temperature: As coastal areas, mediterranean climates don’t get very cold. It is rare to have snow or anything other than a light freeze. Many mediterranean plants are not cold hardy enough to grow in the high desert. Others may require a protected area in a courtyard or along a south-facing wall for extra warmth. The mediterranean plants that are more cold hardy and generally do well here can still be killed by the combination of freezing temperatures and wet soil. So, as temperatures drop in the fall, stop watering your mediterranean plants and don’t start again until the chance of frost has passed in spring.
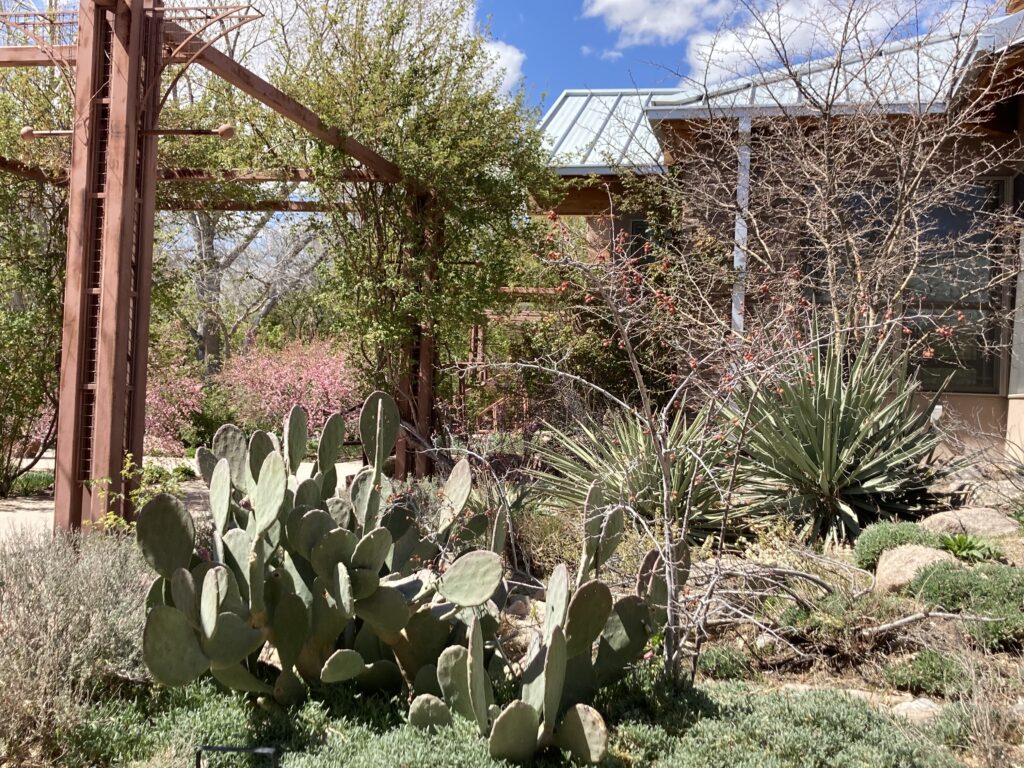
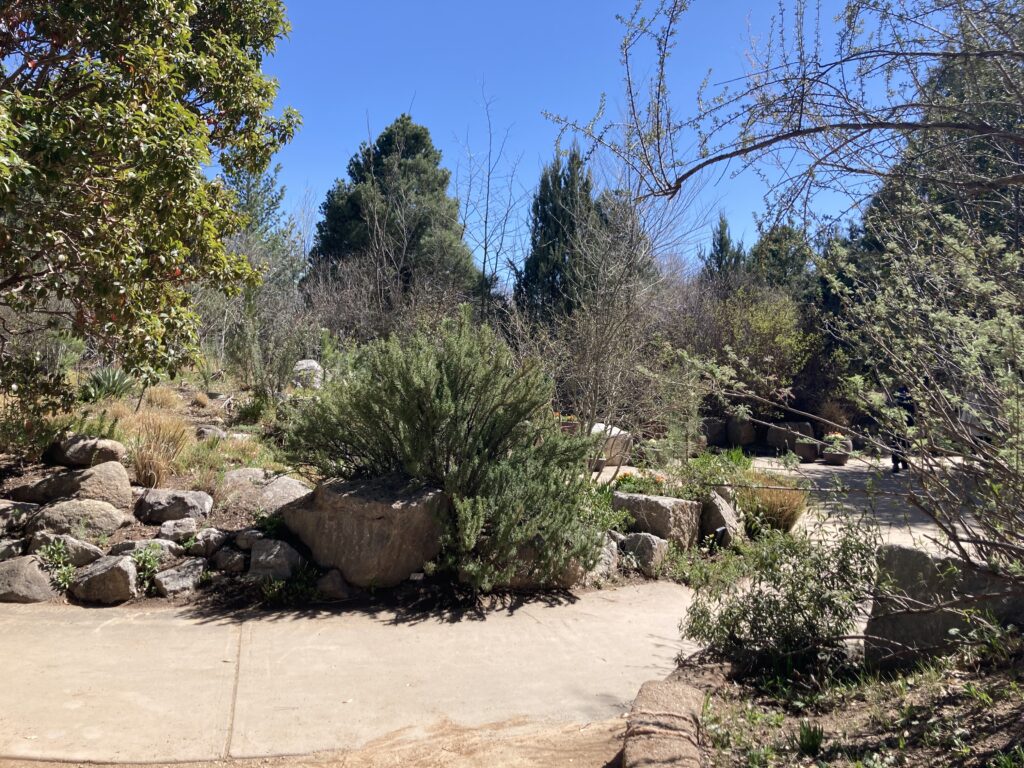
While selecting mediterranean plants for your landscape, you can also incorporate a few simple Mediterranean garden design strategies. The starting point for any Mediterranean garden is evergreen trees and shrubs. Think olive trees, Italian cypress and statuesque pines. However, since olive trees are not cold hardy in Albuquerque, instead try an escarpment live oak. Their glossy dark green leaves are a great substitute for an olive, and they are an important species for pollinators. Although Italian cypress can grow in Albuquerque (and was planted profusely in the 1970s), it is not particularly well-adapted here. A better choice is an upright juniper cultivar, such as Keteleeri. And while a Mediterranean stone pine or Aleppo pine would do well in a protected courtyard, Afghan pine is another option with better cold hardiness. Arizona rosewood, turpentine bush and manzanita hybrids are a few evergreen shrubs that will give your landscape a Mediterranean flavor.
Next, include some plants with light silvery-blue leaves to contrast with the evergreens suggested above. Silvery-blue foliage is a plant adaptation to intense solar radiation, so many mediterranean and locally native plants share this quality. Mediterranean natives with this striking color include lavender, gopher spurge and grey lavender cotton (which actually has yellow flowers), while silver-leafed native plants include sand sage, germander sage and chamisa. There are also many locally native plants with silvery leaves that provide contrasting shape as well as color: Agaves, desert spoon, blue Nolina and yuccas all can accent your landscape beautifully. Of course, these locally native plants will be easier to grow and will provide better pollinator habitat than mediterranean imports.
Edible plants and herbs have always been another important part of Mediterranean gardens. Rosemary, lavender, oregano, thyme, chives and culinary sage all hail from the Mediterranean and do well in Albuquerque. Mediterranean fruit trees, such as fig, pomegranate and apricot can flourish but do require a little extra water. This water need can be met by roof runoff if you plant them in a well-drained rainwater harvesting basin or swale. Fruits and herbs all provide flowers in addition to food. However, if you’re looking for an extra splash of color, red hot poker, moonshine yarrow and Bowle’s mauve are all mediterranean options.
Whatever mediterranean plants you choose, just remember to keep their roots dry when it’s cold out, make sure the soil drains well and give them a nice layer of wood mulch. They will repay you with a beautiful and low water use landscape for years to come.
Mediterranean plant options
Shade tree: Japanese pagoda
Evergreen trees: Keteleeri juniper, escarpment live oak
Small flowering trees: Vitex, crape myrtle
Large plants (5-8' tall/wide): Fernbush, blue Nolina, evergreen sumac
Medium plants (3-5' tall/wide): Rosemary, large agave (americana, ovata, havardiana), lavender, red hot poker, pink muhly grass
Being someone so immersed in planting design in my daily life and someone who is so plainly in love with plants, both wild and cultivated, it can be difficult to narrow my focus and play favorites. I owe this relationship with plants unequivocally to my grandmother the rosarian, who, when asked which rose was her favorite, would always reply, “The one that’s in front of me right now.” Therefore, I shall restrain myself for the purpose of this article to the seeded meadow in the high desert. I hope you will find the selections mentioned compelling enough to consider them and possibly experiment a little!
It was actually at my grandmother’s house that, in 2009, a friend and I, fresh out of the landscape architecture program at the University of New Mexico, germinated our first meadow from seed. We had stabilized 99% of the site’s steep grades with retaining walls, but a pesky little 300-square-foot sliver of dead sod at about a 30% slope seemed forever destined to erode out the driveway and down the storm sewer — rats!
There was an existing sprinkler system in place, and we were therefore able to provide timed irrigation to the surface of the soil without having to dig a bunch of new trenches and put a bunch of new plastic piping in the ground. A little idea sparked: Why not just seed a meadow! The cost of ingredients would be relatively low, and, given how cooked our bodies were from the work we’d already invested, a little bit of (somewhat) instant gratification sounded downright appealing.
On a late spring day, we bounced a springy roll of burlap out of the truck bed and onto our shoulders, then tossed the following in a large paper grocery bag:
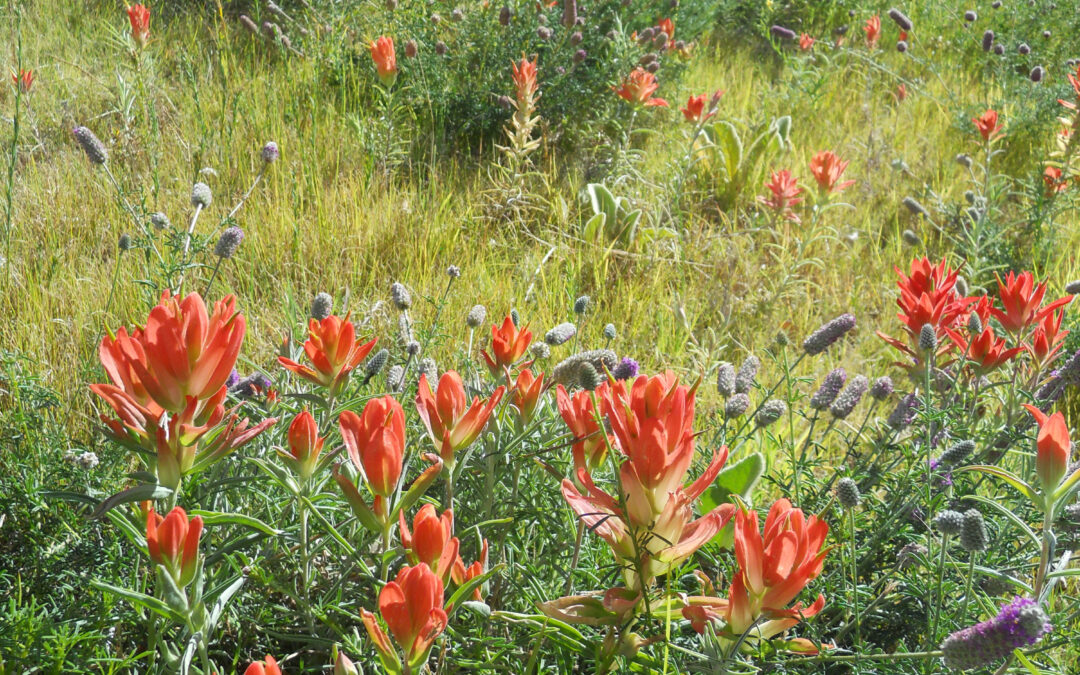
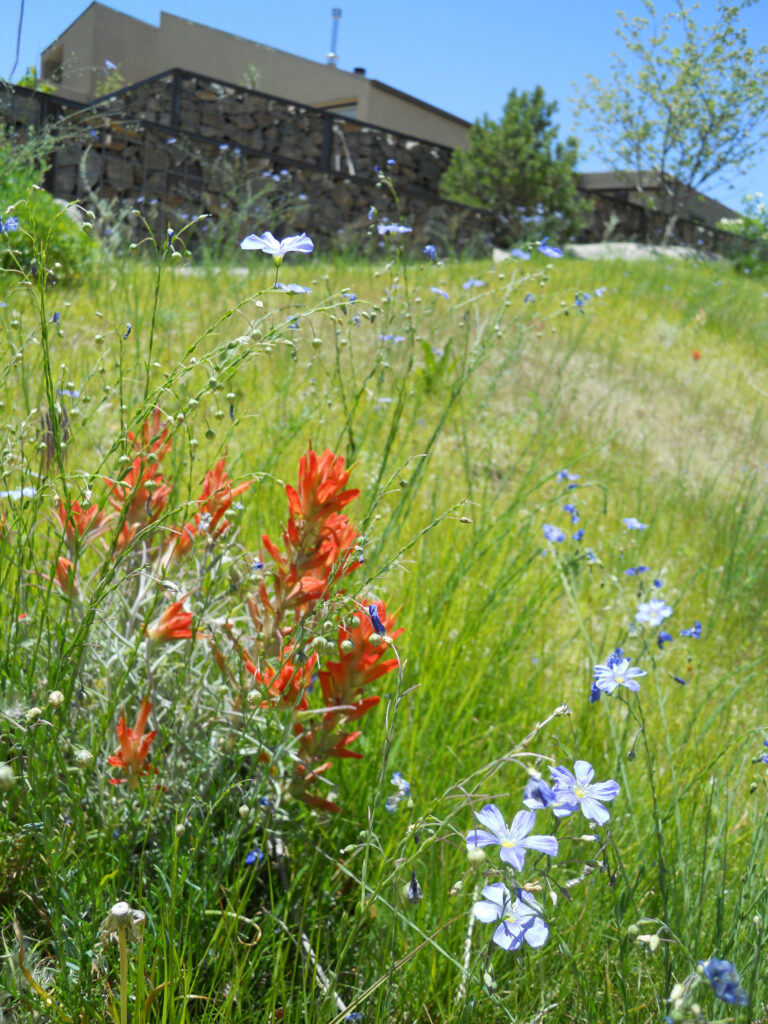
2 small packets of Indian paintbrush (Castileja lanata)
2 small packets of mullein (Verbascum thapsis)
A couple of handfuls of grape hyacinth (Muscari armeniacum) and species tulip bulbs collected from excavation on site
We prepared the soil minimally for the seed mix, scuffing a couple of 2-cubic-foot bags of compost into the top inch or two of soil with a hard rake. We then hand-broadcasted the seed atop the loose dirt, east-west and then north-south, followed by lightly raking the seed and soil together to mix the two. Lastly, using a generous fistful of (100-ish) sod staples, we tightly pinned a single layer of burlap to the surface. The burlap serves as the secret ingredient in the concoction of a high desert meadow, especially on a slope. It serves a couple of purposes: First, it secures the soil and seed mixture, ensuring it doesn’t wash away in rivulets from the sprinklers or get blown away by the wind; it also holds onto a little moisture while allowing the emerging cotyledons — the plants’ first leaves — enough elbow room to squeeze into the sunlight.
Straightening up and drying our foreheads, both a bit chuffed at how easy that’d all been, we started taking wagers. “Which of the wildflower seeds do you think will bloom first?” I asked. “My money’s on the Indian paintbrush,” said my friend, fully aware that Indian paintbrush is hemi-parasitic and relies on blue grama to survive. I cracked up. He cracked up! If there seemed to be a clear underdog in the race, that was it!
We set the sprinklers to run for five minutes twice a day and after a couple weeks had passed, we teased the burlap from the surface, revealing a uniform green carpet. At the margins of the sliver of meadow there was a distinct green border of sprouts ceasing right where the burlap was cut. Neither of us had expected it.
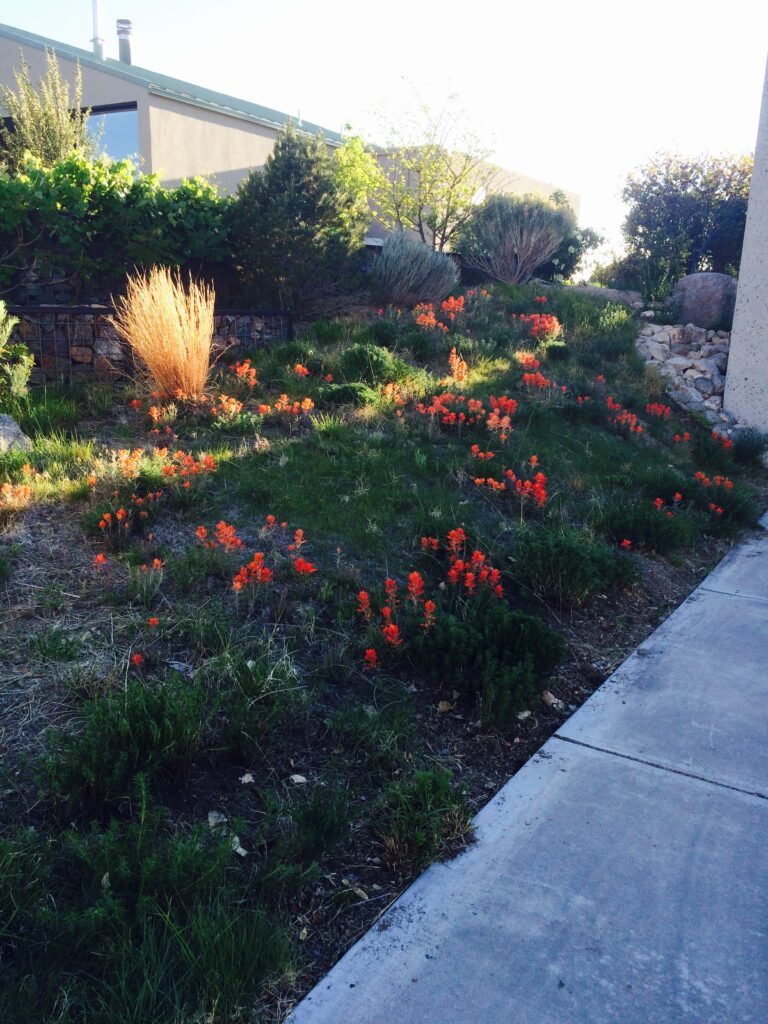
By the end of that summer, we had nearly weaned the meadow off irrigation. The grasses and perennial wildflowers had come in marvelously. Now, as we near the spring season of 2024, and the first winter jasmine shrubs and daffodils are blooming, I drive by that yard in the Sandia foothills and think to myself how one of the best performing landscapes I ever had a hand in was also one of the easiest and least expensive.
Each year, there continues to be a succession of blooms. In springtime, grape hyacinth emerges first, followed by a flush of Indian paintbrush and then purple prairie clover. The grasses green up in May and mature through August, and the little bluestem holds a warm, russet color through the winter.
While the flax initially performed well and provided early color, it has had the least longevity of any of the wildflowers. The mullein seeds germinated well and formed soft rosettes, but the current residents of the property sadly weeded it out of the meadow for aesthetic reasons. The purple prairie clover flowers profusely every summer with irrigation once or twice a week. But, the real star of the show, from that first year until this day is — I never thought I’d say it — the underdog, Indian paintbrush.
Learn more about specific types of gardening here:
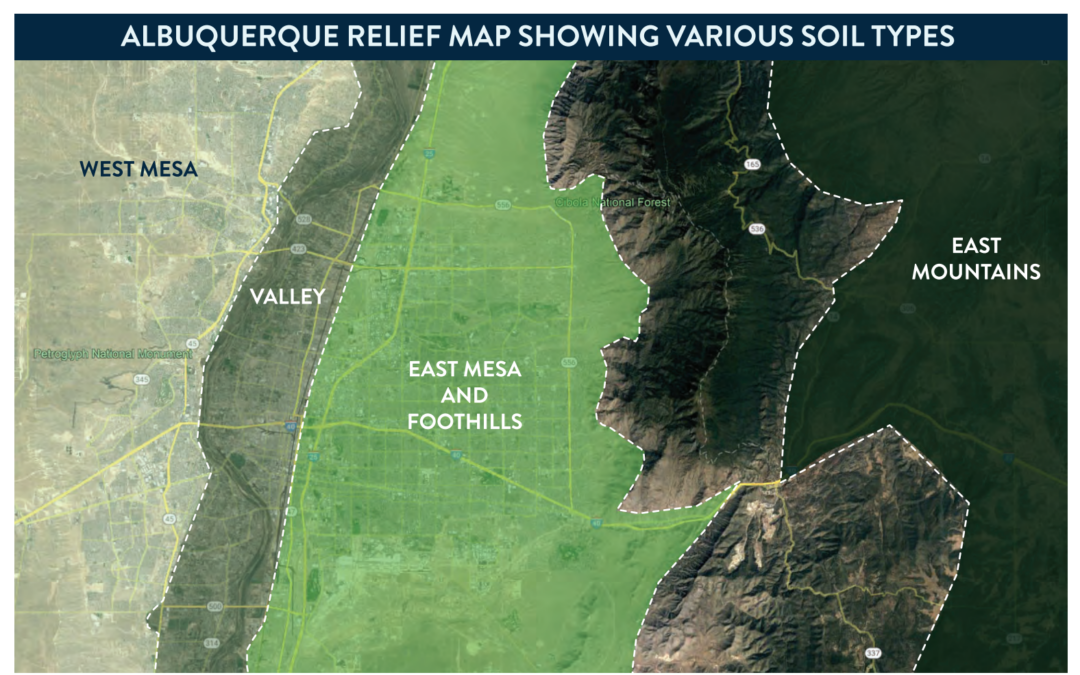
Albuquerque has a variety of soil types. Learning what type of soil is in your yard is a critical step to understanding how water will infiltrate the soil and how long specific plants need to be watered to get the water to the correct depth.
VALLEY SOILS
Valley soils vary from dense clay to grainy sand. They are layered and braided through the area because of the historic flooding of the Rio Grande. The valley also is where acequias weave through the community, providing many essential benefits. They provide water for creating foodsheds and are culturally significant for our community. They also help create and maintain our tree canopy and provide much needed pollinator habitat. This remains particularly important in our changing climate.
EAST MESA AND FOOTHILLS SOILS
The soils in the foothills are usually coarse, whereas the decomposed granite soils on the mesa are generally finer and prone to compaction. These soils have a broad range of organic material along with the base of decomposed granite, making for a huge diversity, even within a building site. Groundwater is deep — only shallow enough to be occasionally accessible to plants in unpaved arroyos near the foothills and stormwater basins fed by urban pavement.
WEST MESA SOILS
West Mesa soils, which vary from silty clay loam to finer sands, are sometimes deposited in a shallow layer above volcanic basalt. Groundwater is too deep to be accessible to most plants except in large stormwater collecting basins.
EAST MOUNTAIN SOILS
East Mountain soils tend to be a mix of moisture-retaining clay loams with some fast-draining gravelly deposits. The density and type of plant cover reflect the relative soil moisture. In upslope areas, where temperatures are consistently cooler and rain and snow more abundant, shrubland transitions to mixed conifer forest. Slopes tend to be drier than depressions, which accumulate moisture.
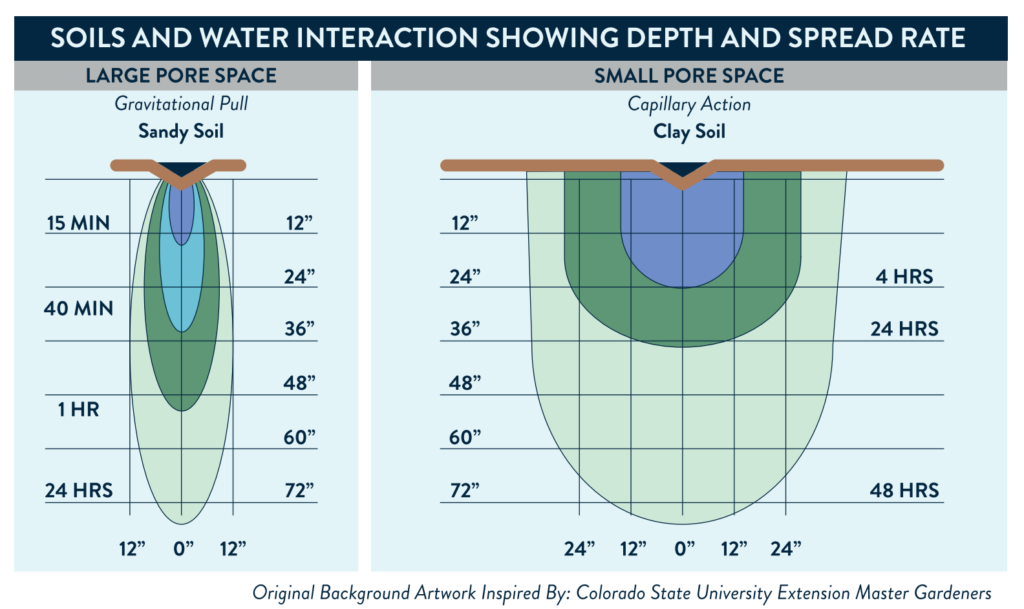
HOW WATER MOVES THROUGH DIFFERENT SOILS
Water soaks into sandy soils much more quickly than in clay soils, but it travels downward in a narrow pattern. In clay soils, the water travels much more slowly and spreads out in a much wider pattern.
Pro Tips:
• Plants in sandy soils generally need additional emitters to distribute water more evenly in a root zone. They also may need to be watered more frequently but for shorter amounts of time.
• Plants in clay soils generally need fewer emitters because the water spreads out. They will probably need to be watered less frequently but for longer periods.
• All soils need to drain between waterings to allow oxygen back into the soil pores.
A struggling plant may be receiving too much water. If soil stays saturated, plants will drown. Since there is a lot of clay in our soils, it is very easy to drown plants. A drowning plant often has similar symptoms to one not receiving enough water: wilted leaves and poor color. Always check soil moisture with a moisture meter before adding more water.
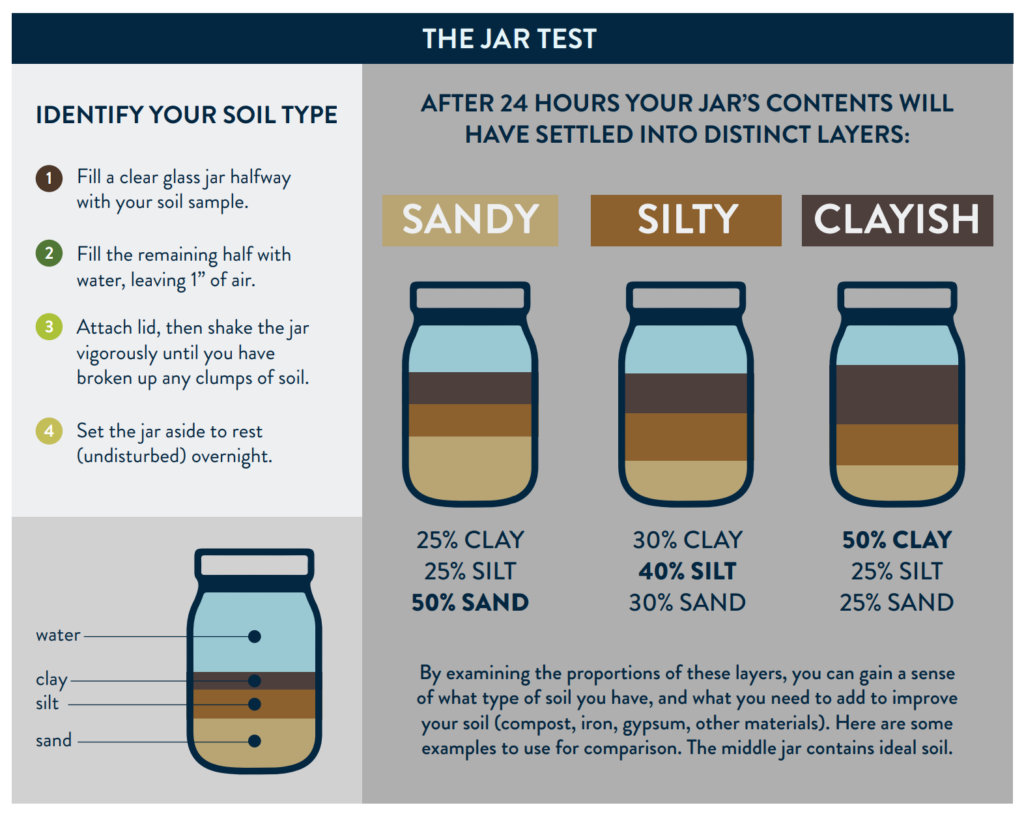
PERFORMING A JAR TEST TO DETERMINE SOIL TYPE
An easy way to get a better idea of what type of soil you are working with is to conduct a jar test. A jar test will separate the three main components of soil: sand, silt and clay. These determine the soil texture that contributes to drainage and overall plant health.
Most building sites, including home sites and the land directly surrounding them, have areas of heavy compaction. When soil is compacted, pore space that allows oxygen and water to get to the root zone is reduced, building an impermeable layer in the soil.
Soil compaction adversely affects percolation rates (the movement of water through the pores) and makes it much harder for roots to expand within the soil and thrive.
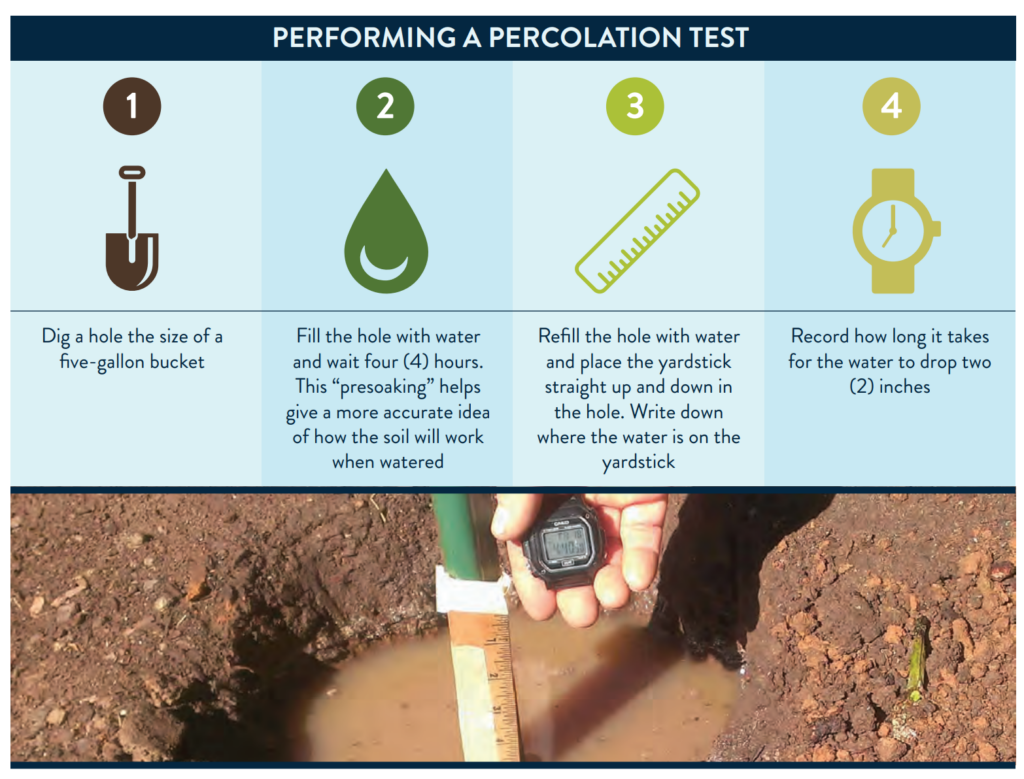
HOW TO TEST THE PERCOLATION RATE IN SOIL
If you do a jar test you will have a pretty good idea what percentage of sand, silt and clay make up your soil. Performing a percolation test will allow you to see how your soil interacts with water.
TOOLS NEEDED:
Shovel, yardstick, timer/watch, pen, paper and hose
To get your hourly percolation rate, divide how long it takes the water to drop 2 inches by 120. A soil percolation rate between 1 and 3 inches per hour is adequate for plants with average drainage needs. If the rate is less than 1 inch per hour, drainage is too slow, and the soil will either need to be improved by adding compost or planted with plants that tolerate wet soils. Watering should be less frequent but longer.
If the drainage is more than 4 inches per hour, it is too fast. Soil will need to be amended with compost and other organic matter either by digging it in or using it as a top dressing. Watering should be more frequent and for shorter time periods.
WHY IS MY SOIL COMPACTED?
Many things — including construction, heavy equipment or vehicles, or a lack of organic matter — can create compacted soil that won’t allow water to drain. One way to prevent further compaction is to park your vehicles and store heavy items only in your driveway or on soil devoid of trees or landscaping.
HOW DO I IMPROVE MY SOIL?
Add organic matter (compost) to clay to make it more permeable and add compost to sand to improve its water-holding capacity.
Add a deep (3”-4”) layer of organic mulch to help all soil types retain moisture better, suppress weeds and feed soil microorganisms. Native and low water use, desert friendly plants do not need compost. Although they will grow slowly in uncompacted native soil, they thrive best there.
It’s been a rough few months in the 505. We’re having a challenging gardening season, to say the least. Dry. Hot. Intense. The unraveling of our climate has been on full display.
Whether you’re choosing more adaptive plants and creating habitat or beginning your gardening journey, no doubt you’ve lost plants this summer — or worried about it. I’ve been calling it the Summer of Feeling Like a Not So Great Gardener.
Just to put this in perspective, I’ve been gardening for over 30 years and I’ve struggled and learned a lot this summer. Learning to steward land in a way that’s in alignment with our changing climate is not easy. But it’s crucial.
In the midst of these challenges, you might be experiencing more emotions than you’re used to — anxiety, for example? Frustration, perhaps. Confusion about where to start. Sadness at all the loss and devastation. Feeling alone. Lack of confidence. Overwhelm. Anger. Dread.
So, what’s a gardener to do? It’s easy to think our emotions are totally separate from the scorching heat. We’re used to compartmentalizing — experiencing emotions and deep spiritual questions in one part of our life and tackling complex external issues, like choosing climate-ready trees to plant, in another part of our life. No matter how well we’re dealing with these emotions, they’re bound to creep into our external gardening. What if, instead of shutting ourselves down in order to accomplish the daunting task of adapting our urban forest to the changes before us, we actually bring our emotional and spiritual selves into the garden? This is precisely the zone where deep and meaningful climate resilience awaits us — in the cultivation of our Home Gardens with our Inner Gardens. We grow an ability to weather storms, to adapt as things unravel — in both our inner and outer landscapes.
For example, let’s look at overwhelm, which is so common these days and to which we gardeners are not immune. We might be asking, “Am I doing enough? Am I making the right changes and adaptations? Which do I do first — spread mulch or create ways to passively harvest the rain?” We might be worrying about how much water we’re using or that we’re not using enough. There are so many decisions to make, and it’s easy to feel overwhelmed.
Here’s what I recommend for dealing with overwhelm:
Notice: Take a deep breath and recognize, “Ahh, this is overwhelm. That’s all it is. It’s happening in my inner garden, inside my heart.” That’s the first step. Pause. Notice it. Take a breath with it. The inner garden is what is happening in our consciousness — which primarily lives at the level of our heart (not our brain). There’s a lot of fertile ground to work with in there.
Just be: Next, take 15 minutes and just go outside and sit in the garden. Find a place to just be. Don’t plan or make any lists, just sit and breathe. Don’t skip this step, it’s the most important one. Listen to the sounds, feel the soil, notice the smells. What insights come through?
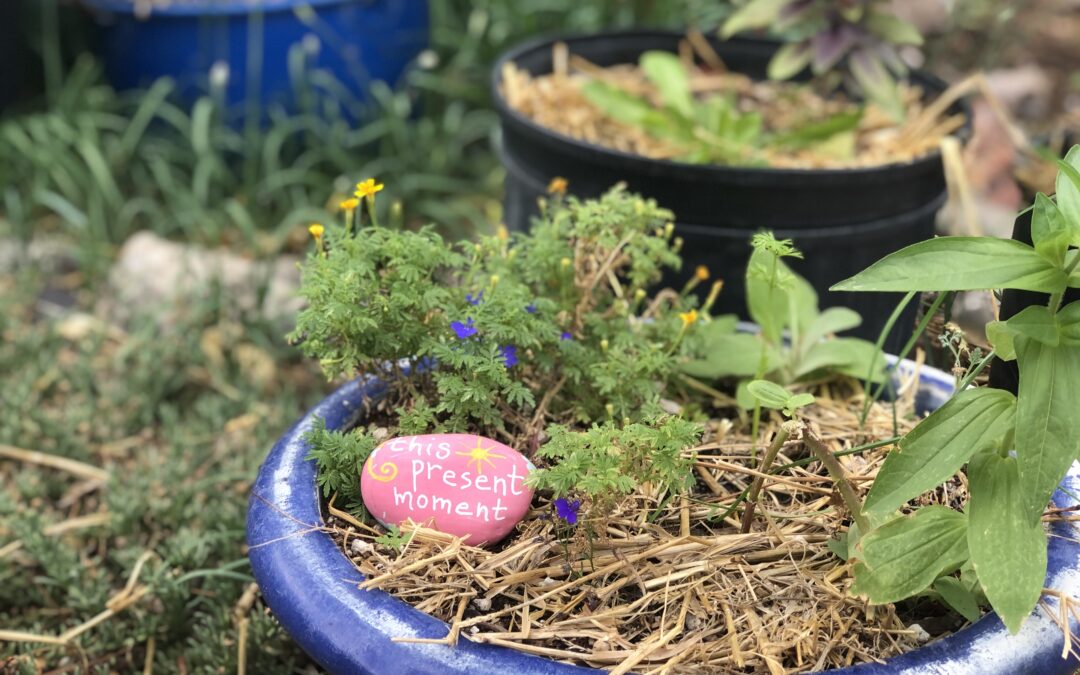
Create: Then, find a special place in the garden and create something to help remind you of what insights came up. It can be very simple, just something that speaks to you — a gathering of stones, an arrangement of leaves, a circle of flower petals. When we take the time to tend what’s growing within our inner garden, we have more inner space to effectively handle what’s happening in our outer garden. This is resilience.
Reconnect: The next time you’re doing a garden task — like weeding — briefly pause and reconnect with your inner garden in your heart. Set a simple intention to help shift the pattern of overwhelm, such as “This garden belongs to all who live here, human and non-human. May my activities today bring benefit to all the beings here.” And then carry on weeding, but with this intention.
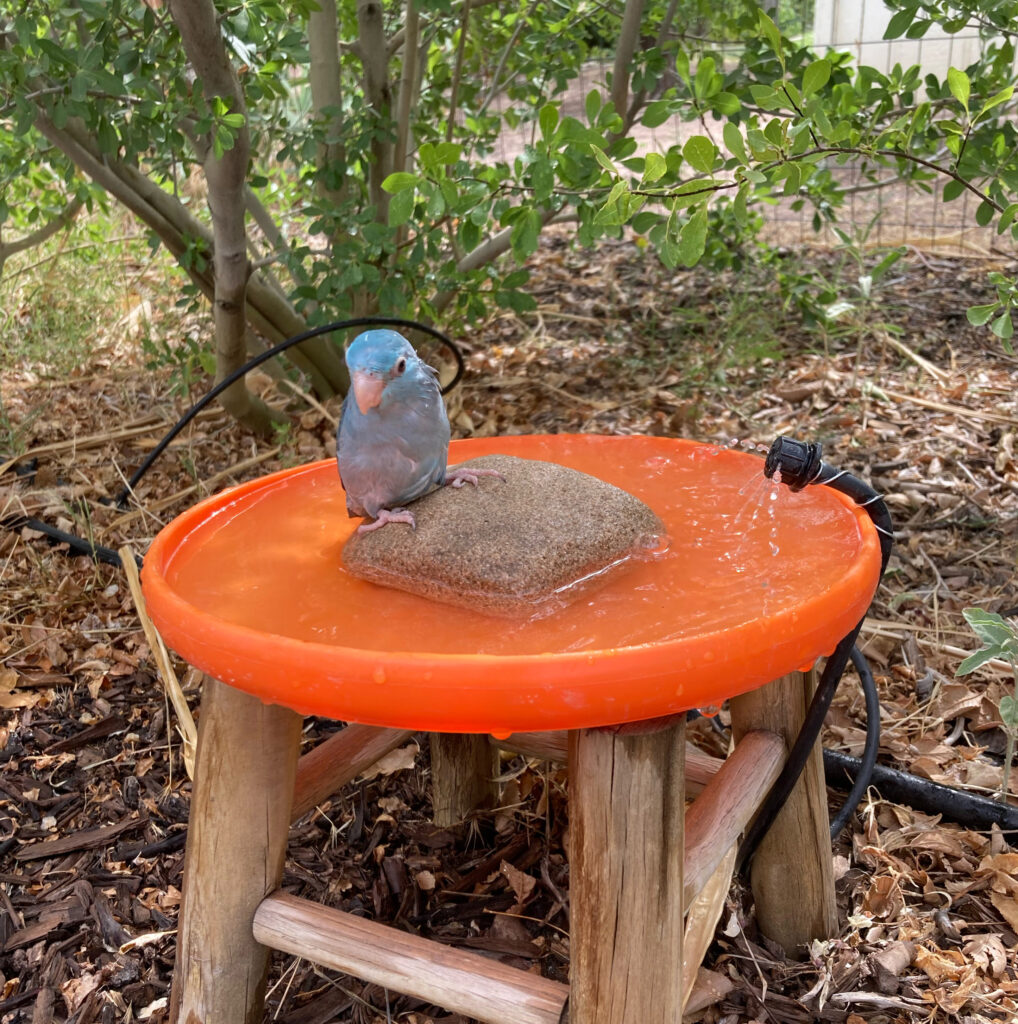
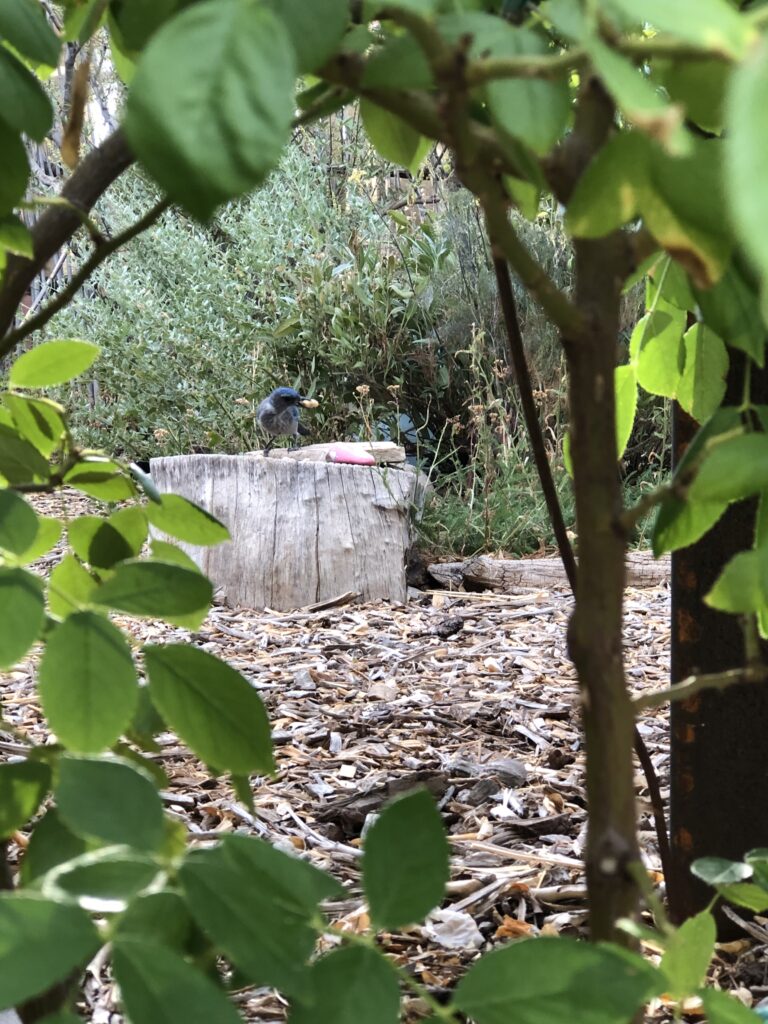
An intention like this can shift our state of mind away from overwhelm and into a place of gratitude and caring. From this place, we’ll make better gardening decisions. We might notice that the birds need more water and fill an old Frisbee with water and put a rock in it. We might start giving ourselves the space to be imperfect in our gardening. We might begin to see ourselves more as a caretaker of the space and less as the “owner” — ”our” garden becomes “the” garden.
The inner garden and the home garden have a profound and interdependent relationship. As we tend both of them together, we cultivate a deeper resilience in both gardens. This adaptation and flexibility then ripple from our own hearts out into the world, so in need of our tending and care.
Learn more about specific types of gardening here:
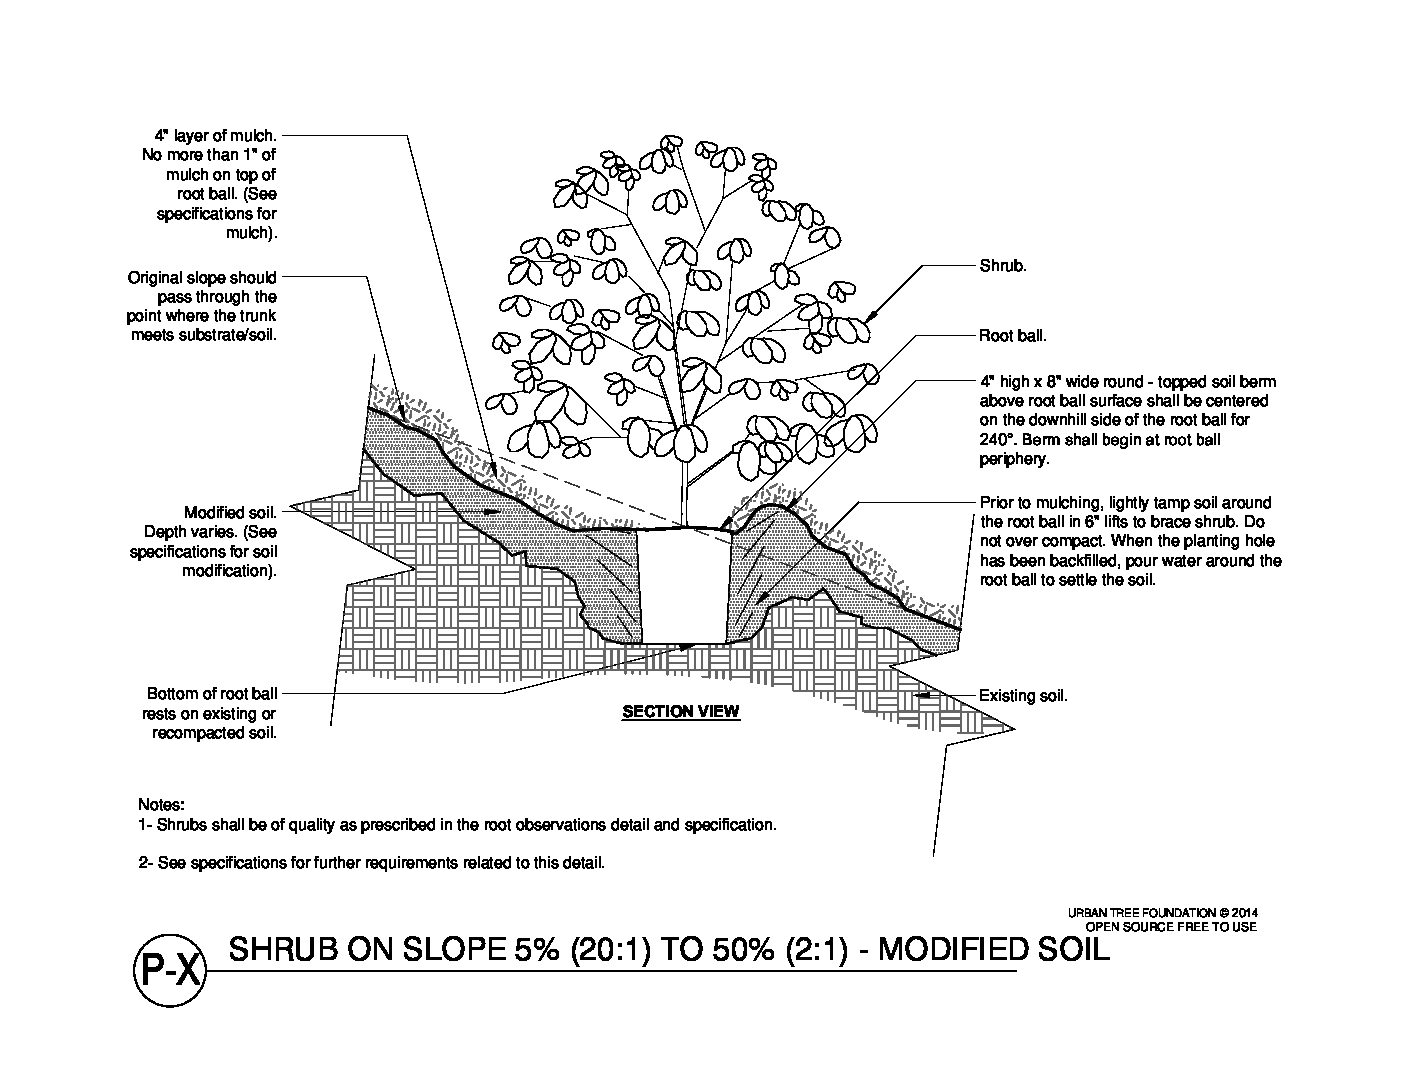
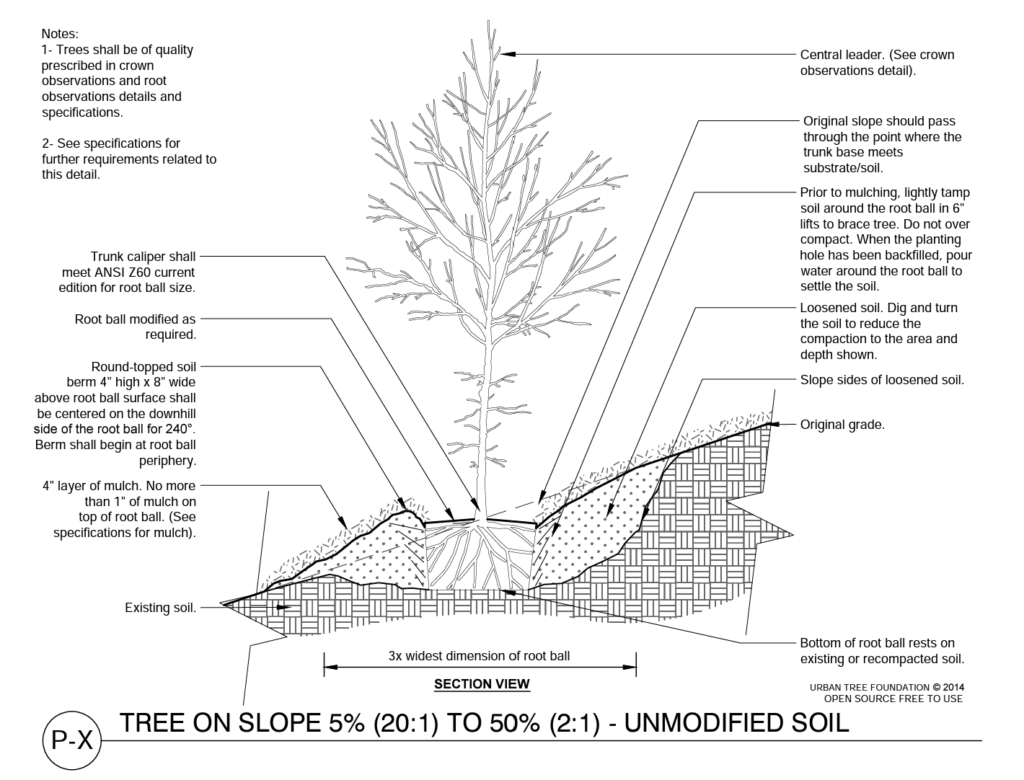
Regardless of how you water, you will want to create a berm, or raised “dam,” on the downside when planting on a slope. This berm captures any rainfall coming down the slope, detaining it long enough to soak in, and also holds water that comes from irrigation or hand-watering. By cutting away part of the slope on the upside of the plant, there’s additional room to capture and retain more water. Our diagram (put the word “above” or “below” here, as is appropriate) shows these methods using a berm with wood mulch. Our preference is to create the berm out of soil and apply shredded wood mulch inside the well created by the berm because shredded wood mulch will help moisture stay longer in the soil.
If you are watering plants by hand, turn down the pressure and place the hose on the uphill side of the plant so the water runs into the well and the berm slowly. By doing it this way, you will have to repair the well and berm less frequently. If you are watering with a bubbler or drip system, always make sure that the bubblers or emitters are placed on the upside of the slope and the plant so the water comes down the slope into the well and has a chance to penetrate the root zone located in the well and bermed area. Finally, if you are watering plants on a slope with Netafim (in-line emitter drip tubing), you can place the loops or grid of tubing throughout the well area, held in by the berm. The water will drip very slowly and be contained within the bermed well.
Having grass on slopes is discouraged because it is very difficult to keep your grass healthy without watering inefficiently. If you need to water grass on slopes, please carefully check out the section of our irrigation efficiency guide on cycle and soak.
By following these simple steps, you should be able to efficiently water and successfully plant on a slope.