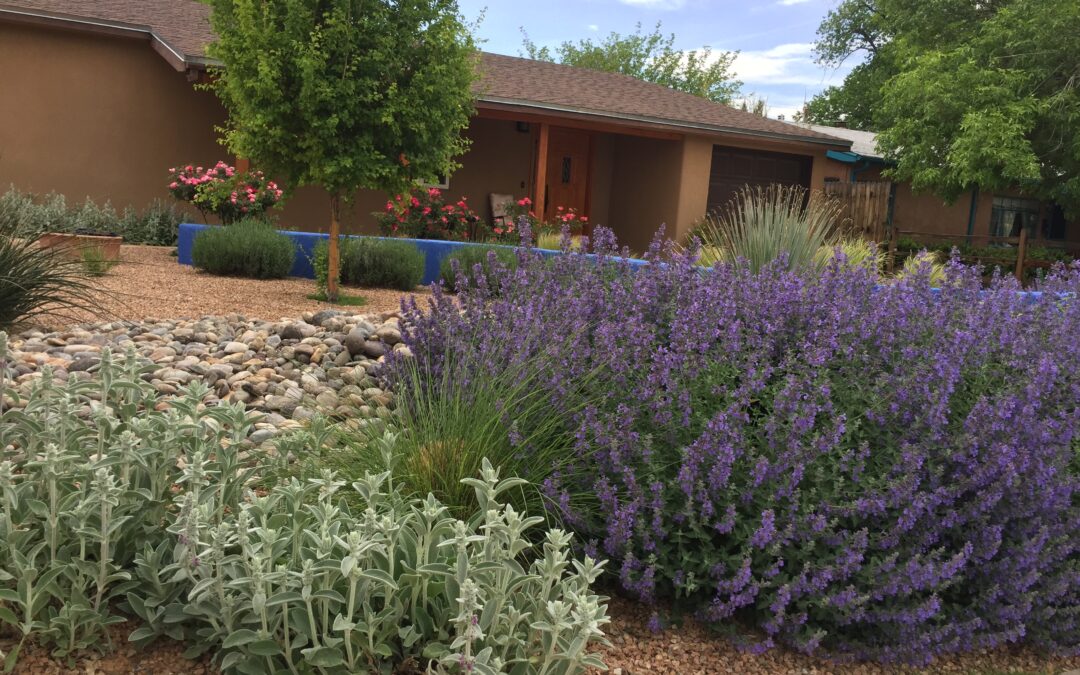
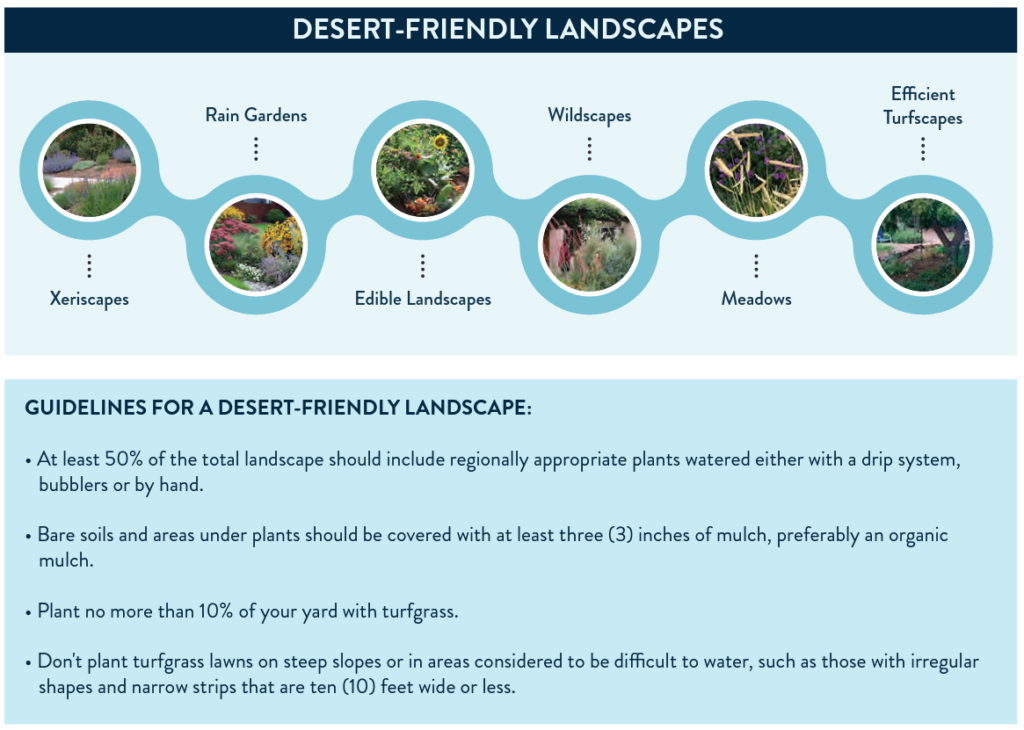
The Albuquerque metro area has a variety of landscapes. These include desert-friendly landscapes, such as lush, pollinator-friendly xeriscapes, and wildscapes or prairie plantings, where native grasses and wildflowers bring the feel of a prairie to a yard. Rain gardens are specifically designed to make the most of natural precipitation, while edible landscapes have garden beds or edible plants interspersed throughout them. Efficient turfscapes have smaller areas of turfgrass and diverse plantings. Conventional turfscapes with large areas of cool-season grass and high-water foundation shrub plantings are no longer considered desert-friendly landscapes. Desert-friendly landscapes describe a variety of landscapes that include beautiful, diverse plantings with increased resiliency achieved through efficient watering.
A sea of gravel may require little water, but it does not create a healthy environment. Weed fabric doesn’t prevent weeds from growing on top of the fabric and has been proven to be detrimental to soil and tree health in the long term. Trees struggle if they have been part of a yard that was once heavily irrigated and has been converted to a gravelscape. We do not recommend gravelscapes for reducing water use. Instead, transform those landscapes into cooler, healthy environments by adding appropriate plants and irrigation.
Desert-friendly landscapes make a positive contribution to lowering the urban heat-island effect, which is caused by heat emitted off surfaces including gravel, concrete and asphalt. This heat causes an updraft within an urban setting, which changes the weather patterns over a city and decreases the chances of precipitation and cooling. Plants, especially trees, help decrease or eliminate this heat island effect.
Desert-friendly landscapes help reduce noise pollution by absorbing sound. Desert-friendly plantings also increase biodiversity in your yard and in our community, generating much-needed pollinator habitat. Xeriscapes, particularly once they are established, use significantly less water than a conventional turfgrass lawn. Did you know that Albuquerque is a designated Bee City USA? To find out more, go to: Burque Bee City USA (beecityusa.org). For more information on pollinator gardens, go to ABQ Backyard Refuge Program (https:// www.505outside.com/2021/05/31/backyard-refug-es-for-people-and-wildlife/). To find out about rebates that help homeowners transform their yards into desert-friendly xeriscapes, visit: https://www.505outside.com/residential-desert-friendly-conversion-rebates-xeriscape-conversion/
Xeriscapes have been largely misrepresented and misunderstood over the past 30 years, often being mistaken for zeroscape (a.k.a. no plants). What xeriscape really means is a native, desert-adaptive or desert-friendly landscape that often feels lush and vibrant and has plants that are appropriate for the Albuquerque climate. It attracts all kinds of wildlife and changes with the seasons.
Pro Tips for Using Drip Emitters in Xeriscapes:
• Always have more than one emitter per plant in case one becomes clogged. • Switch from adjustable micro sprayers and “shrubblers” to individual emitters or in-line emitted drip lines to know exactly how much water is being provided to your plants. • When using drip or other low-flow irrigation, accommodate plant needs by adjusting the flow rate (larger or smaller gph) and number of emitters per plant. • Drip irrigation is the best way to water plants that do not like getting their leaves wet. With drip emitters and ¼” spaghetti tubing, water can be placed exactly where it is needed.
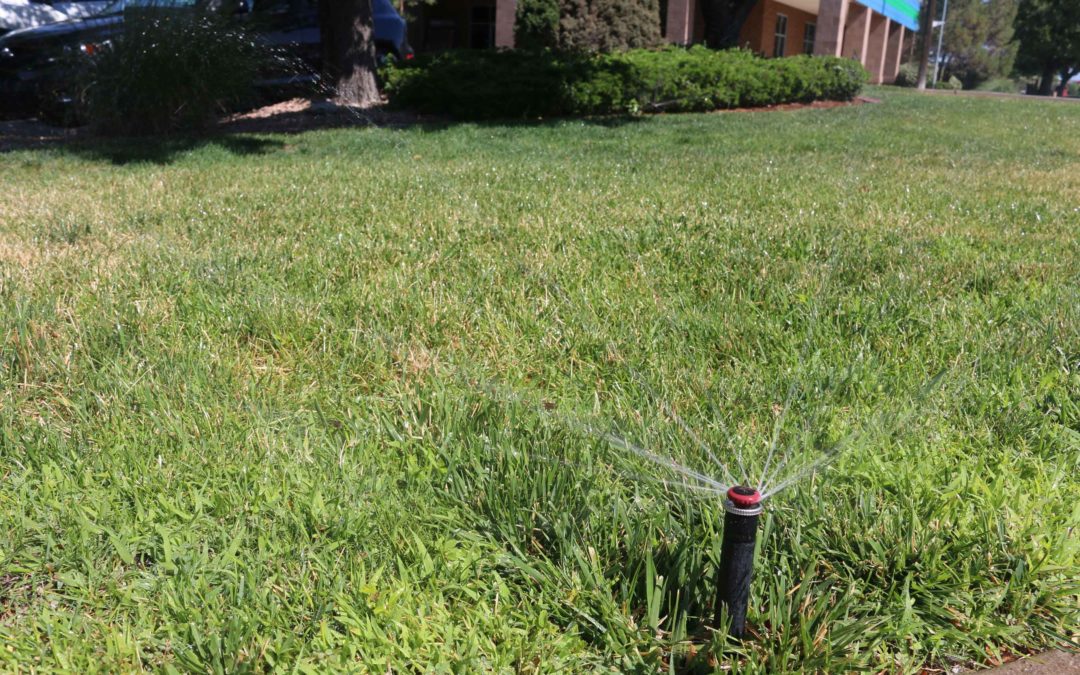
Xeriscapes often include trees, shrubs, flowering “pollinator-friendly” perennials, desert accents, groundcovers, ornamental grasses and vines. They also can contain small functional turf areas, vegetable beds and other edible plants. Xeriscape plants are medium or low-water usage plants. Some can survive with rainwater alone after an establishment period of at least three full irrigation seasons. Adding trees to a desert-friendly xeriscape increases shade and habitat, creates favorable microclimates and reduces the urban heat island effect in Albuquerque. When deciding which tree to use in a particular place, refer to our Xeriscaping Guide or The Nature Conservancy’s Climate Ready Tree List.
HOW MUCH WATER IS NEEDED TO KEEP UP A BEAUTIFUL XERISCAPE?
This budget is only for outdoor use. Please include your winter averages to complete your TOTAL usage on your billing. For typical xeriscape landscapes with 500 square feet of NATIVE grass lawn (warm-season grasses) and two medium trees
Most irrigation work can be done by the homeowner, except for one component. Tapping into your home's main water line needs to be done by a licensed contractor to ensure it is completed safely. To help homeowners know how to select and work with a contractor, we have provided the Irrigation Association's Irrigation Consumer Bill of Rights in the Appendix.
To make sure you have an efficient system, we highly recommend that you hire a professional irrigation designer to create a custom plan. Having a custom plan minimizes water waste and the chance of problems in the future and also helps ensure an efficient distribution of water, which reduces water usage. We also recommend asking a designer to produce a "call-out" list of all the parts required for the installation or renovation. This helps homeowners decide whether to DIY or hire a contractor.
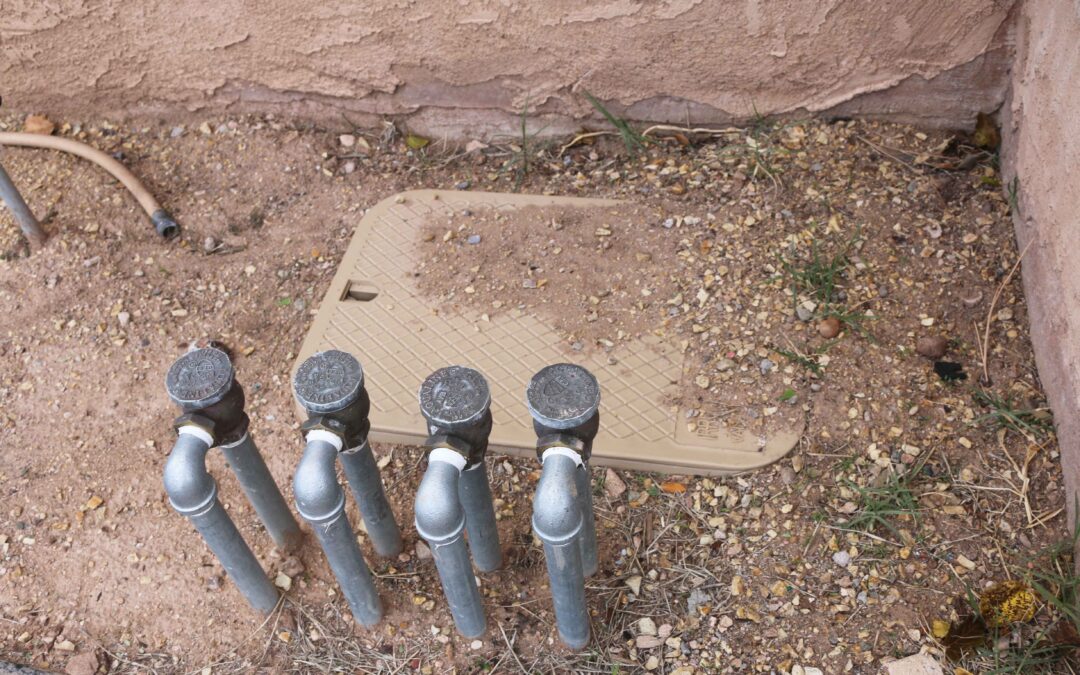
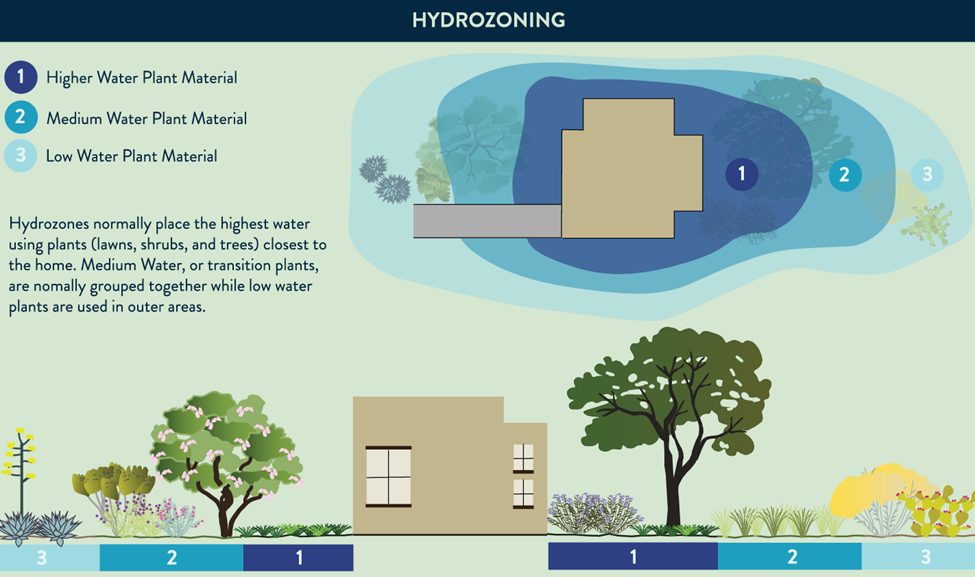
SEPARATINGIRRIGATIONZONES&HYDROZONING
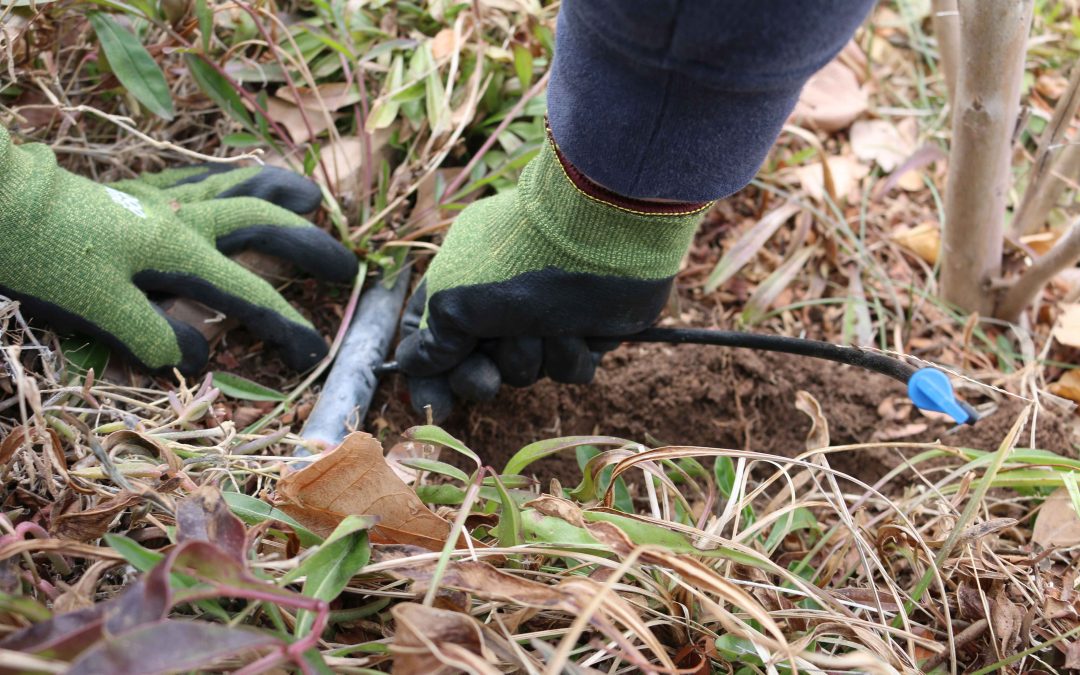
When you begin to plan a drip system, whether you’re installing a new system or retrofitting an existing system, it is imperative to design it so the drip valves are separate from your lawn valves. If you plan to grow a vegetable garden or water annual beds with a drip system, those areas also need to be on separate valves.
The next thing to do is organize your drip zones by plant watering needs. This means that higher water plants and lower water plants should be on separate valves (hydrozoning) whenever possible, so watering is much more efficient. Hydrozoning is not always possible when retrofitting an established landscape. In that case, you can adjust your water delivery with various sized drip emitters so plants with higher water needs receive more water per hour.
Check out our New Irrigation Efficiency Guide: Beautiful Landscapes with Less Water. Download the guide here.
Does the thought of making changes to your yard seem costly? Can you still get reasonable benefits from just changing a few things instead of your whole yard? Do you feel overwhelmed because you don't know where to start? Do you feel like you don't know enough about irrigation systems to know what to do?
Having an efficient automatic irrigation system can be financially affordable for homeowners, especially with help from our rebates. Homeowners can choose to install or update a spray or drip irrigation system. To figure out your budget using our rebates, consider the following questions: How much can I spend on irrigation updates this year? It's important to be realistic about what you can spend and stick to your budget. You don't necessarily need to spend thousands of dollars to begin saving water. We offer rebates to help you cover some of the costs. Upgrades don’t have to be completed all at once. They can be done in phases.
Check out our New Irrigation Efficiency Guide: Beautiful Landscapes with Less Water. Download the guide here.
There are misconceptions about how to prune a tree. Here are seven things you need to know before you begin.
1. Always have a reason for each cut you make on a tree. A beautiful day and hearing you need to prune now are not the right reasons. The main reasons we trim our trees are to support strong tree structure, encourage fruit production, prevent damage, provide clearance to avoid conflicts, shape the tree for aesthetic reasons and repair the tree from previous damage.
2. Chose the right time of the year. There are good times of the year to prune. Pruning at other times can lead to tree distress and disease. Prune during late winter and early spring, just as trees are coming out of dormancy and will be actively growing soon. For fruit trees, wait until they have flowered before pruning to encourage production and direct growth.
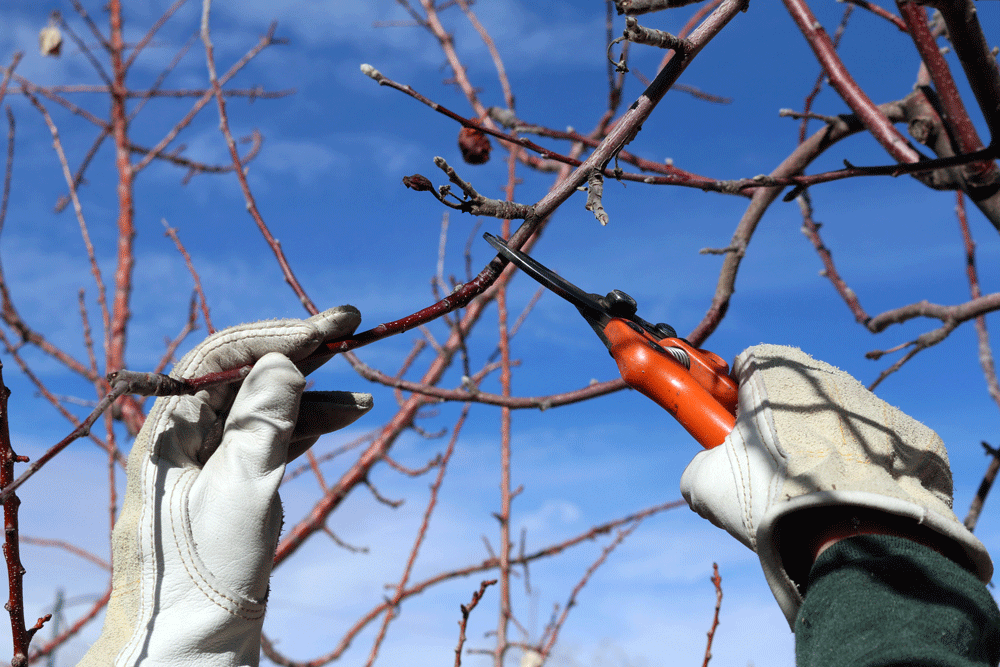
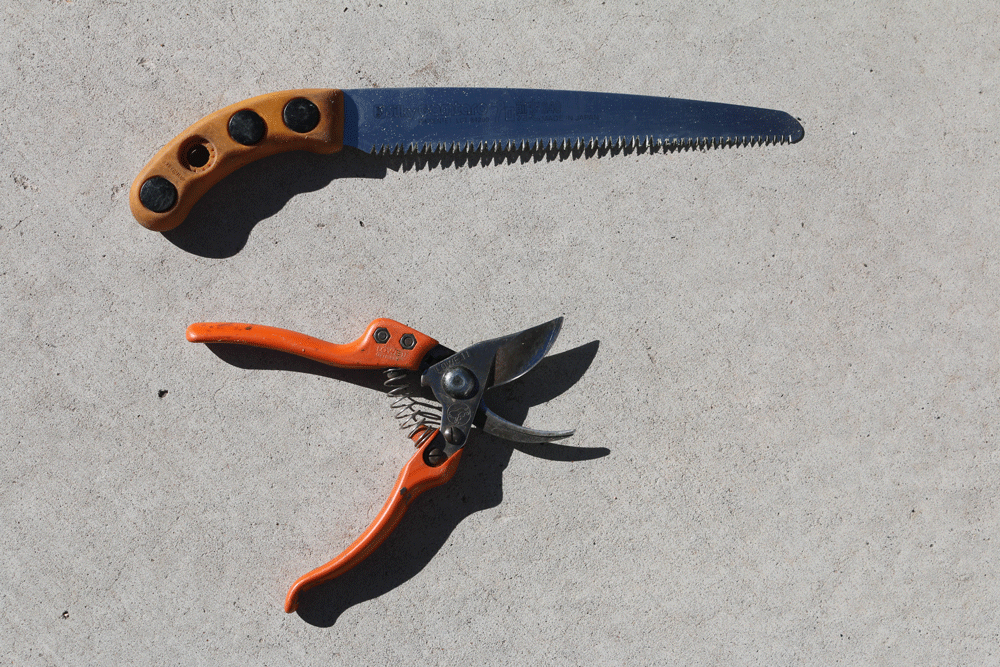
3. Use good hand tools, including a bypass hand pruner and scabbard, 8” folding hand saw, long reach pruner and orchard ladder (step ladders on uneven ground can be dangerous). As fun as they may seem, never use a chainsaw unless operating from the ground below shoulder height. Always wear PPE including safety chaps. Remember to sterilize tools with alcohol or Lysol spray when moving between trees.
Hand Pruner and Bypass Pruning Shears
4. Know your tree type. To figure out your tree type and its particular needs, try some plant identification apps, read the Arbor Day Foundation brochure “what tree is that.” or take photos of the tree and ask an expert. Pictures should include the overall tree form, leaves, bark, flowers or fruit. The most common trees in the Albuquerque landscapes are honey locust, Modesto ash, Siberian elm, London planetree, desert willow, Austrian pine, ashes, ornamental pear, Afghan pine, purple leaf plum, cottonwoods, golden raintree, Chinese pistache, pinon pine, redbuds, crabapples, Navajo willow, Texas red oak and mimosa.
5. Check out your tree’s health. How much water does it need and if/when does it need to be pruned? Highly-stressed trees should not have living branches pruned or removed. A healthy tree’s overall vigor and branch growth from previous years should be around 3”- 4” of growth per year between a bud scar and a new terminal bud. Access the density of the canopy all around and under the tree. For healthy conifers look for four years’ worth of needles on a branch. Less than two years on a branch is considered stressed.
6. Know the three types of pruning cuts: heading, removal and reduction. Avoid heading unless attempting to correct damage. Removal describes cutting branches all the way back to the main trunk. Remove 1” caliper branches and avoid cutting anything bigger than 3”. Some trees, like our local cottonwood, may not be able to heal large wounds. Reduction cut is the ideal cut. It is used to redirect and subordinate growth. Reduction cutting allows the tree to heal properly. Prune back to a branch that is at least 1/3 the size of the branch removed in order to avoid excess sprouting and allow the remaining branch to assert dominance.
7. Know where and how to make the cut. Refer to the diagrams to properly identify the branch collar, which contains the Branch Protection Zone (BPZ) that has specialized tissues which resist the passage of decay organisms into the trunk. Cut about 1/2” outside the branch collar. This allows for proper wound healing. Use the following three-step method when making a cut: First, make a partial upward cut several inches out from the final cut. Next, make a full downward cut a half inch farther out to take the weight off. Lastly, make the final cut without nicking the branch collar.
By reviewing and understanding these seven tree pruning concepts you are well on your way to properly pruning your trees. Remember, tree pruning is only needed every few years. The proper watering of your trees needs to happen monthly. Check out the other tree health articles below to keep yours in tip-top shape.
Author: Amos Arber, Xeriscape Rebate Inspector with the Water Resources Conservation Department for the Water Authority. Have a question about the article? AskAnExpert@abcwua.org
Most irrigation systems have a lifespan of 20 years before they begin to break down. If your house is older than that, most likely you are dealing with issues (water pressure, uniformity of watering, overspraying and possible leaks) that negatively affect the quality of your landscape. If you are going to go through the time, effort and cost of a total yard transformation, seriously consider replacing your whole irrigation system.
PRO TIPS FOR SPOTTING POSSIBLE PROBLEMS WITH THE IRRIGATION SYSTEM:
• Grass is often taller and darker green around a sprinkler that is leaking or in the middle of a lawn where a pipe is leaking.
• Wet spots in a pathway could indicate either a broken emitter is shooting water or a leak is occurring in piping underneath the path.
• Odd sounds, like hissing or splashing, or squishy areas in the lawn or gravel often indicate a leak.
• Calcium deposits on gravel without plants can indicate a leak.
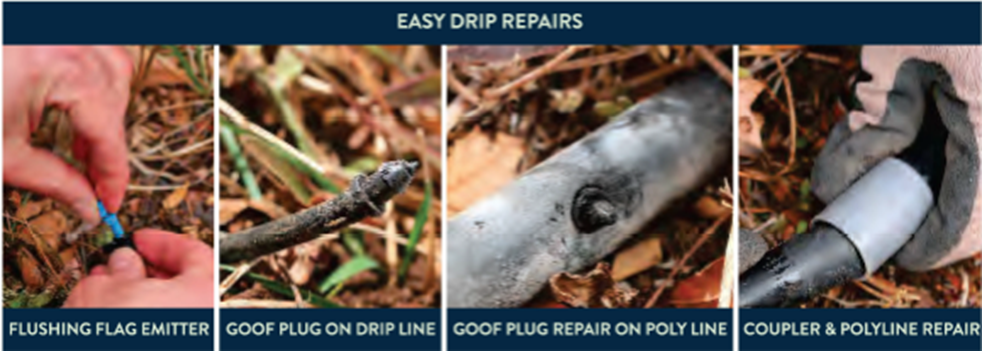
• A wilting plant can indicate a clogged emitter.
• Small areas of dry turf, often near a sprinkler, usually mean there's a clogged nozzle.
To achieve higher efficiency over time you need to maintain your system. Extending the lifespan of your system requires some upkeep. Most often this maintenance is very easy and won't take much time at all.
Containers are an easy way to add a splash of color to your garden, porch, balcony or patio, without ever having to dig a hole in our hard New Mexico soil. While you could drop pansies or geraniums in a pot and consider it complete, you could also plant a truly stunning container garden full of color, texture and fragrance. The right combination of plants arranged properly in a planter can be magical. After that, you only need to keep things watered and fertilized as you enjoy the colorful design all season long.
1. Choose the Right Container
Containers have their own unique characteristics to consider, including weight, appearance and sensitivity to weather changes. Also, consider your budget, space and style when selecting them. Keep in mind that the larger the size, the less you'll need to water. But whatever you choose, make sure your containers have good drainage.
2. Select a Color Theme and Plant Combinations
Starting with a color theme for your container garden can help with plant selection. When combining plants in your containers, it’s important to make sure they all have the same light requirements and watering needs. A good rule of thumb is to plant in odd numbers and combine three types of plants — thrillers, fillers, and spillers — in each container to add interest and balance to your design.
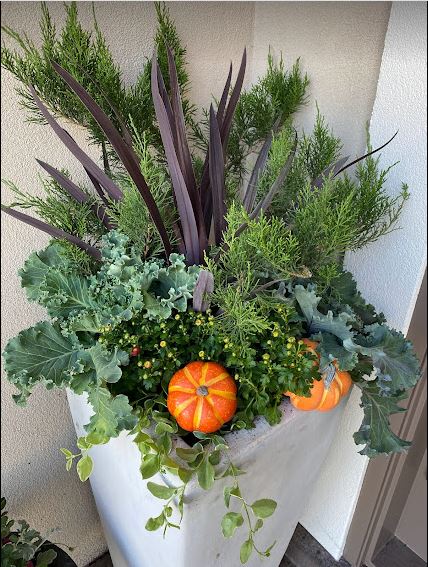
“Thriller” plants are the centerpiece of your design. They add height and a bold vertical element. Options include plants chosen for foliage, ornamental grasses or other upright plants. In larger containers, small shrubs or trees, topiaries, spirals and other vertical selections can be used. Thrillers typically go near the center of a container, but they can also be put toward the back of the planter, depending on its final location.
“Filler” plants tend to be more rounded and make the container look full. These are generally placed in front of or around your selected thriller. In a narrow, long container like a window box, fillers are placed halfway between the edge of the container and the thrillers. Violas, pansies, dusty miller, ornamental kale/cabbage, ornamental peppers, geraniums and mums are just a few of the many options for autumn fillers.
“Spiller” plants literally spill out of a container. If your container garden is going to be visible from all sides, be sure to place spillers all the way around. Some favorite autumn spillers are licorice plant (Helichrysum), English ivy, Dichondra 'Silver Falls', ivy geranium and perennial vinca (minor or major), also called periwinkle. I am especially fond of some of the brighter vinca varieties like Illumination or Wojo’s Gem.
3. Fill the Container with a Good Potting Mix
Once you've selected plants and a container, it's time to get started! Fill your container about two-thirds full with a good quality potting mix. If you have a really large planter and would like to use less potting mix, you can use empty water bottles or smaller empty nursery pots or containers turned upside down to take up some of the space in the bottom of the container. Fill around them with potting mix until your container is two-thirds full.
4. Arrange Plants in Your Container
When you're ready to add plants, remove the plants from their nursery pots, gently loosening the root ball with your fingers. Place them in your container and add soil, stopping about two inches from the top of the container to leave enough space for watering.
5. Water Your Plants
Water your container garden thoroughly to help the soil settle. After watering, add more soil if needed to insure good root coverage. Check your containers every 2-3 days, and when the top two inches are dry, it’s time to water again. Don’t forget container plantings may need water twice a day when it’s hot, especially if it’s also windy.
Don't be afraid to add different types of plants, such as annuals, perennials, herbs, cold-hardy vegetables, and even small shrubs, to the same container. The important thing is to select plants that require the same growing conditions. I really like using dwarf Alberta spruce or lemon cypress as the vertical element, surrounded by licorice plants, pansies/violas, dusty miller and ornamental cabbages. I will occasionally add artificial gourds, pumpkins and other décor to make them even more festive.
With a little planning and creativity, you can put together stunning container designs that can be enjoyed all season long.